Canon 1941B001 Operating Guide
Canon 1941B001 Manual
 |
View all Canon 1941B001 manuals
Add to My Manuals
Save this manual to your list of manuals |
Canon 1941B001 manual content summary:
- Canon 1941B001 | Operating Guide - Page 1
Capture Perfect 3.0 Operation Guide ENGLISH - Canon 1941B001 | Operating Guide - Page 2
computer to acquire images from the Canon Document Scanner. To fully understand the CapturePerfect 3.0 functions and to be able to use them effectively, please read this guide and the ISIS/TWAIN Driver Help guide as well as your scanner's operating manual. About Trademarks • ISISTM and MultiStreamTM - Canon 1941B001 | Operating Guide - Page 3
, in part or in whole, without prior permission is prohibited. • This guide is subject to change without notice. • Every effort has been made to ensure the accuracy of the information in this guide. However, Canon Electronics Inc. and its subsidiaries assume no responsibility for any errors or their - Canon 1941B001 | Operating Guide - Page 4
Other Functions ...34 Scanning Methods 38 Scan Page...39 Scan Batch to File (Saves scanned images to a specified file 40 Scan Batch to Printer (Prints scanned images 43 Scan Batch to Mail (Attaches scanned images to email 45 Scan To Presentation (Displays scanned images full-screen 47 Scan - Canon 1941B001 | Operating Guide - Page 5
settings for folders specified as save destinations. Important • Confirm that your scanner is properly connected to the computer. Refer to your scanner's operating manual for details. • Before using CapturePerfect, install the ISIS/TWAIN driver for the scanner. Refer to your scanner's operating - Canon 1941B001 | Operating Guide - Page 6
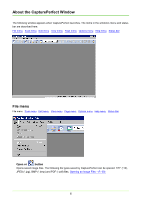
About the CapturePerfect Window The following window appears when CapturePerfect launches. The items in the window's menu and status bar are described here. File menu Scan menu Edit menu View menu Page menu Options menu Help menu Status Bar File menu File menu Scan menu Edit menu View menu Page - Canon 1941B001 | Operating Guide - Page 7
so they fit the size of the paper, and then prints. • Actual Pixel The image is printed so that one image pixel corresponds to one printer pixel. So the size of the printed image is smaller when printing to a high resolution - Canon 1941B001 | Operating Guide - Page 8
or files. Scan Batch to File (Saves scanned images to a specified file) (→P. 40) Scan Batch to Printer Prints the images as documents are scanned. The scanned images are not saved. Scan Batch to Printer (Prints scanned images) (→P. 43) Scan Batch to Mail or button Attaches scanned images to an - Canon 1941B001 | Operating Guide - Page 9
Note In an environment with a projector connected to the computer, such as a presentation meeting, paper documents can be scanned and instantly projected onto the screen for description. Scan JOB or button Select a job title from the JOB list box and click to execute the scan job. Scan JOB (Scan - Canon 1941B001 | Operating Guide - Page 10
Redo Executes the operation that was last undone. Brightness Displays the Brightness Adjustment dialog box for adjusting brightness and contrast of the displayed image. Adjusting Brightness of the Displayed Image (→P. 64) Copy Copies the images selected by Select All or in the area specified by - Canon 1941B001 | Operating Guide - Page 11
View menu File menu Scan menu Edit menu View menu Page menu Options menu Help menu Status Bar Toolbar Switches display of the toolbar on and off. Statusbar Switches the Status Bar (→P. 15) on and off. Zoom In or button Magnifies the view of the image. Each time you select Zoom In in the View - Canon 1941B001 | Operating Guide - Page 12
Rotate Left or button Rotates the page image(s) specified in the submenu counterclockwise. Rotate Right or button Rotates the page image(s) specified in the submenu clockwise. Split View Splits the image display window into two or four screens. Split View (→P. 56) Thumbnail By opening the - Canon 1941B001 | Operating Guide - Page 13
Page menu File menu Scan menu Edit menu View menu Page menu Options menu Help menu Status Bar Next page or button Displays the image of the next page. Prev. page or button Displays the image of the previous page. Last Page Displays the image of the last page. First Page Displays the image of - Canon 1941B001 | Operating Guide - Page 14
to set scanning criteria and file type for MultiStream output. About MultiStream Functions (→P. 27) Note If the specified scanner does not support MultiStream output functions, MultiStream Settings are ignored. Barcode/OCR Log Displays the Barcode/OCR LogSetting dialog box for specifying a log file - Canon 1941B001 | Operating Guide - Page 15
OCR Settings Displays the OCR Settings dialog box for setting the language for character recognition. About OCR Functions (→P. 29) Help menu File menu Scan menu Edit menu View menu Page menu Options menu Help Status Bar About Shows CapturePerfect version information. Help or button Shows this Help - Canon 1941B001 | Operating Guide - Page 16
scanner and computer are both turned on. Refer to your scanner's operating manual for details. 1 Click Select Scanner in the Scan menu. The Select Scanner of the scanner does not appear in the dialog box, install the ISIS/TWAIN driver for the scanner. 2 Select the scanner to be used, and click the - Canon 1941B001 | Operating Guide - Page 17
2 Make the appropriate settings for your scanning conditions. For help related to these settings, click the Help button in the dialog box to refer to the driver help. 3 Click the OK button to exit the settings dialog. 17 - Canon 1941B001 | Operating Guide - Page 18
About Saving Image Files Image file types, file name requirements and multi-page files that can be saved with CapturePerfect are described here. About File Types Images scanned with CapturePerfect can be saved as TIFF (*.tif), BMP (*.bmp), JPEG (*.jpg) or PDF (*.pdf) files. However, please note - Canon 1941B001 | Operating Guide - Page 19
by Image Viewer that was bundled with Windows prior to Windows 2000. • The compression format supported by CapturePerfect may not be supported by other applications. If a TIFF file saved by CapturePerfect cannot be opened by another application, set the compression to None and save it again - Canon 1941B001 | Operating Guide - Page 20
position changes when an item is selected. Quality Setting High Quality Standard High Compression User Slider Value 90 (Auto) 75 (Auto) 10 (Auto) Manual setting Image Quality High Standard Low See Note File Size Large Standard Small See Note Note When High Quality is selected, the quality of - Canon 1941B001 | Operating Guide - Page 21
Setting PDF File Saving Options When saving scanned images as PDF (*.pdf) files, set the compression and OCR object language saving options. 1 Click PDF File in the Options menu. The PDF File Setting dialog box appears. 2 Make the following settings: • Mode Select the PDF file compression ratio. - - Canon 1941B001 | Operating Guide - Page 22
regardless of the scanner driver's Deskew setting. If you scan sizes smaller than the set scan size or you set the TWAIN driver Margin to a large transfer) High-Speed (JPEG transfer) can be enabled if your scanner supports JPEG transfers. When the scanning mode specified during scanner setup is 256 - Canon 1941B001 | Operating Guide - Page 23
When BMP or JPEG is Selected Only Single Page is available in the list box, and one image is saved per file. Also, the Schema Settings button is enabled, and scanning information can be included in the specified File Name. About Schema (→P. 24) When TIFF or PDF is Selected • Single Page Multiple - Canon 1941B001 | Operating Guide - Page 24
About File Naming Requirements and limitations of file names assigned to images scanned and saved by CapturePerfect are described here. About File Name Settings • After selecting the BMP, JPEG, TIFF, or PDF file type and specifying Single Page as the MultiPage Setting, the character string specified - Canon 1941B001 | Operating Guide - Page 25
OCR check boxes cannot be selected at the same time. • Barcode is valid when supported by the scanner, and when the Barcode Search scanner setting is enabled. Up to Resolution and DropOut. Schema Setting Image Format Resolution Driver Setting Black and White Error Diffusion Text Enhanced Advanced - Canon 1941B001 | Operating Guide - Page 26
Schema Setting Drop out Driver Setting None Drop-out color Red Drop-out color Blue Drop-out color Green Drop-out color Custom Red Enhance Blue Enhance Green Enhance Custom - Canon 1941B001 | Operating Guide - Page 27
front and back of a page. The MultiStream Settings dialog box is available if your scanner supports the MultiStream function, by selecting MultiStream Settings in the Options menu or the Scan Batch to depend on the selected scanner. Refer to your scanner's ISIS/TWAIN driver help for details. 27 - Canon 1941B001 | Operating Guide - Page 28
• File Type Select the type (TIFF, BMP, PDF or JPEG) for saving files. However, JPEG is displayed when the Image Format is set to 256-level Gray or 24-bit Color. About Saving Image Files (→P. 18) • Multi Page Setting Set the Multi Page and Schema settings to suit the file type. MultiPage Settings - Canon 1941B001 | Operating Guide - Page 29
About OCR Functions CapturePerfect provides OCR functions that can recognize characters in scanned images as text information. Character recognition is activated when the Enable check box is selected in the OCR Settings dialog box. Note • When OCR functions are enabled, deskewing is performed on the - Canon 1941B001 | Operating Guide - Page 30
3 Select the language of the text to be recognized from the list box. Note Chinese character recognition results display correctly only in Chinese environments. 4 Click the Area button. The OCR Area Settings dialog box appears. 5 Enter the area in which to search for text. 6 Load one document page - Canon 1941B001 | Operating Guide - Page 31
Note • The displayed image size can be changed by the Zoom In and Zoom Out buttons so that characters in the image can be compared with recognition results. • The area for OCR can be changed by dragging the mouse diagonally on the previewed image. 7 Click the OK button to close each dialog box and - Canon 1941B001 | Operating Guide - Page 32
Barcode/OCR LogSetting dialog box shown below, and then specify a destination log file. Note • The barcode tab is activated when the scanner supports barcode scanning. • If editing (addition, deletion, replacement) is performed on the image file page for which a log file is saved, the corresponding - Canon 1941B001 | Operating Guide - Page 33
About Barcode/OCR Modification The barcode and OCR recognition results are saved in a log file. About Log Files (→P. 32) In the Modify Barcode/OCR dialog box, you can display and modify the recognition results stored in a log file, as needed. Note • Modifications to the recognition results are - Canon 1941B001 | Operating Guide - Page 34
About Other Functions CapturePerfect provides the "Save Rotated Image" and "Save As Two Images" functions that save scanned images after specified rotation, or after splitting into top and bottom or left and right halves, respectively. Select the "Save Rotated Image" or "Save As Two Images" option - Canon 1941B001 | Operating Guide - Page 35
Rotate Right 90°: Scanned images are rotated 90° clockwise before saving. Rotate 180°: Scanned images are rotated 180° before saving. Save As Two Images Save Rotated Image Save As Two Images Capacity Warning Settings By splitting an image, two separate images are created from each one scanned, by - Canon 1941B001 | Operating Guide - Page 36
3 Select the split orientation. divide up and down: Splits the scanned image horizontally into two separate images. divide right and left: Splits the scanned image vertically into two separate images. Note When saving split images, the names of the single-page files are applied in the order top- - Canon 1941B001 | Operating Guide - Page 37
the capacity warning threshold calculation (nor are folders). • A maximum of five folders can be specified for capacity warning. • When a warning is displayed, follow the message instructions to continue or change the save destination. 37 - Canon 1941B001 | Operating Guide - Page 38
to File (→P. 40) : Scanned images are saved to the files specified when starting to scan. • Scan Batch to Printer (→P. 43) : Scanned images are printed directly to the specified printer. (Images are not saved.) • Scan Batch to Mail (→P. 45) : Attaches scanned images to an email. (Images are not - Canon 1941B001 | Operating Guide - Page 39
scan criteria. For help related to these settings, click the Help button in the dialog box to see the driver help. 3 Place a document in the scanner. Refer to the scanner's operating manual for details about placing documents for scanning. 4 Click the button, or click Scan Page in the Scan menu - Canon 1941B001 | Operating Guide - Page 40
34) (→P. 35) (→P. 27) (→P. 24) Note If your scanner does not support MultiStream functions, the Use MultiStream option will not appear. About MultiStream Functions (→P. 27) by the scanner driver, and batch separation type selections depend on whether your scanner supports patch code searching. 40 - Canon 1941B001 | Operating Guide - Page 41
the image on the patch code sheet is not saved. Scanner Does Not Support Patch Code Search • None Disables batch separation. • Skip, Continue Scanning 34) 6 Place a document in the scanner. Refer to the operating manual of the scanner for details about placing documents for scanning. 7 Click the Save - Canon 1941B001 | Operating Guide - Page 42
When no documents remain in the scanner, scanning is interrupted and the Continue Scanning dialog box appears. Note • If the specified file name is the same as that of an existing file, a dialog box prompts to confirm overwriting the existing file. Click the OK button to overwrite the file. • When " - Canon 1941B001 | Operating Guide - Page 43
.) Note To save and print scanned images, use Scan Batch to File (→P. 40) to print the scanned images after saving. Scan Batch to Printer is performed by the following steps: 1 Select Print Format in the File menu, and select a format. • Actual Size Regardless of the printing paper size or - Canon 1941B001 | Operating Guide - Page 44
to use. The Print dialog box appears. Note To set printer details, click the Properties button. The dialog box for the current printer driver appears. For details about settings, refer to the user's manual for your printer driver. 4 Click Scanner Setting and set the scan conditions. For help related - Canon 1941B001 | Operating Guide - Page 45
. 3 Click Scanner Setting and set the scan conditions. For help related to these settings, click the Help button in the dialog box to see the driver help. 4 Set the other setting to suit the documents to be scanned. 5 Place a document in the scanner. Refer to the operating - Canon 1941B001 | Operating Guide - Page 46
Outlook Express. 9 Enter the address, subject and message text as needed, and click the Send button to send the e- mail. Refer to your e-mail software's manual for details of the e-mail sending procedure. 46 - Canon 1941B001 | Operating Guide - Page 47
Recognition Enabled Deskew Enabled Note • Scan To Presentation scans with the above scanning conditions regardless of ISIS driver settings. • Depending on the scanner, the above scan conditions may not be supported. • Actual performance of the "Skip blank page" function is affected by the ISIS - Canon 1941B001 | Operating Guide - Page 48
3 When the loaded document is finished, scanning stops. 4 To continue scanning, load another document. When finished, click "×" at the top right. Note • You can press the ESC key on the keyboard to exit Scan To Presentation. • Scanned images can be saved as occasion demands when exiting Scan To - Canon 1941B001 | Operating Guide - Page 49
Exit Scan To Presentation Exit Scan To Presentation mode by pressing the Esc key on the keyboard, or by clicking Exit Scan To Presentation on the submenu. When exiting Scan To Presentation mode, a message asks if you want to save image files. Save the image files as occasion demands. 49 - Canon 1941B001 | Operating Guide - Page 50
Scan JOB (Scan According to a Previously Registered Job) Scan JOB utilizes previously registered scan conditions and methods (Scan Batch to File, Scan Batch to Print or Scan Batch to Mail) to scan according to the specified job. Job Registration Use the following procedure to register jobs for - Canon 1941B001 | Operating Guide - Page 51
are saved to the specified PC. • Scan To Mail: Attaches scanned images to an e-mail. • Scan To Print: Scanned images are printed by the specified printer. 5 Click Detail Settings. A setting dialog box appears according to the selected function. • Scan To PC: Refer to Scan Batch to File (→P. 40) for - Canon 1941B001 | Operating Guide - Page 52
• Scan To Mail: Refer to Scan Batch to Mail (→P. 45) for setting details. • Scan To Print: Refer to Scan Batch to Printer (→P. 43) for setting details. Note The Details of File Settings button appears in the Scan Batch to File Setting and Scan Batch to Mail Setting - Canon 1941B001 | Operating Guide - Page 53
can verify the registered contents of the job by selecting Job in the Edit menu. 3 Place a document in the scanner. Refer to the scanner's operating manual for details about placing documents for scanning. 4 Select Scan JOB in the Scan menu, or click the registered for the job. button to scan - Canon 1941B001 | Operating Guide - Page 54
Scanned Image Operations The operations you can perform on scanned or opened images are described here. The way scanned images are viewed can be changed, and images can also be saved or printed. • Displaying the Thumbnail Window (→P. 55) : Displays the thumbnail window. • Split View (→P. 56) : Split - Canon 1941B001 | Operating Guide - Page 55
Displaying the Thumbnail Window Thumbnail (reduced) views of opened images are displayed in the Thumbnail window, and the selected thumbnail in the Thumbnail window is displayed in the Image View window. To turn display of the Thumbnail window on and off, click Thumbnail in the View menu. Note • The - Canon 1941B001 | Operating Guide - Page 56
Split View By splitting the display window, you can display multiple page images at once. To split the display window, select Split View from the View menu. You can split the window into 2 or 4 screens. Important With split view, the size of images you display or the number of screens you display - Canon 1941B001 | Operating Guide - Page 57
Two-screen view Four-screen view 57 - Canon 1941B001 | Operating Guide - Page 58
Saving an Image This procedure saves open image files with a specified name. Note If multiple image files are open, all pages are saved. Important If several image files have been opened and a PDF file with password security is among them, you cannot save files with a new name (Save As). 1 Click - Canon 1941B001 | Operating Guide - Page 59
- When the selected file type is JPEG File (*.jpg), the image quality set by the JPEG File setting in the Options menu is applied. Refer to Setting JPEG File Image Quality (→P. 20) for details. Important If you select JPEG file (*.jpg) when a black and white image file is open, it is saved as a - Canon 1941B001 | Operating Guide - Page 60
Opening an Image File This procedure opens image files that were saved by CapturePerfect. Note The following file types saved by CapturePerfect can be opened: TIFF (*.tif), JPEG (*.jpg), BMP (*.bmp) and PDF (*.pdf) files. 1 Click the button on the toolbar. (Or click Open in the File menu.) The - Canon 1941B001 | Operating Guide - Page 61
Note Multiple files can be selected to be opened together. By selecting one file and holding the Shift key while selecting another file, all files in between are selected. Multiple files can also be selected by holding the Ctrl key while selecting each file. 61 - Canon 1941B001 | Operating Guide - Page 62
orientation as needed, and click the OK button. Note To set printer details, click the Properties button. The dialog box for the current printer driver appears. For details about settings, refer to the user's manual for your printer driver. 3 Click Print Format on the File menu, and select the - Canon 1941B001 | Operating Guide - Page 63
4 Click the button on the toolbar. (Or click Print in the File menu.) The Print dialog box appears. 5 Verify the settings, and click the OK button. 63 - Canon 1941B001 | Operating Guide - Page 64
Adjusting Brightness of the Displayed Image You can adjust the brightness and contrast of the displayed image. Select Brightness in the Edit menu to open the Brightness Adjustment dialog box. Moving the sliders left and right adjusts the brightness and contrast of the displayed image. Note • For - Canon 1941B001 | Operating Guide - Page 65
Inserting/Adding Pages to an Image File Pages can be inserted and added to TIFF or PDF files. For the image to insert/add, you can specify an image from the scanner or a file saved with CapturePerfect. 1 Open the TIFF or PDF file in which to insert the page. Note • Pages cannot be added to BMP or - Canon 1941B001 | Operating Guide - Page 66
When "from Scanner" is selected 1) The Append Page dialog box is displayed. 2) Select the location to add or insert the page, make the Scanner Settings, and click OK. Scanning begins, and pages are added or inserted. 3) When there are no more documents, scanning stops. When "from File" is selected - Canon 1941B001 | Operating Guide - Page 67
2) Select the image file to add or insert, and click Open. The Insert/Add from the file dialog box appears. 3) Select the location to add or insert the page, the image file page to be inserted, and click OK. 5 When finished inserting/adding the page, confirm that the page was added or inserted in - Canon 1941B001 | Operating Guide - Page 68
Replacing a Page in an Image File You can replace a page in a saved multi-page TIFF or PDF file. For the replacement image, you can specify an image from the scanner or a file saved with CapturePerfect. 1 Open the TIFF or PDF file in which to insert the page. 2 Click Replace Page in the Page menu to - Canon 1941B001 | Operating Guide - Page 69
4 Replace the page. When "from Scanner" is selected 1) The Replace Page dialog box is displayed. 2) Set the Scanner Settings, and click OK. Scanning begins, and pages following the displayed page are replaced. 3) When there are no more documents, scanning stops. When "from File" is selected 1) The - Canon 1941B001 | Operating Guide - Page 70
2) Select the image file containing the image to be replaced, and click Open. The Replace the page from the file dialog box appears. 3) Confirm the replacement image(s) in the image file by clicking Next Page and Prev. Page, specify the page range for replacement, and click OK. Pages following the - Canon 1941B001 | Operating Guide - Page 71
Setting PDF File Security Options Set the security options to restrict viewing, printing and page editing of PDF files. Security Settings Open a PDF file, and click Password Settings in the Edit menu to open the Password Settings dialog box. 1 Select check boxes to set passwords. • Password to open - Canon 1941B001 | Operating Guide - Page 72
has security set, Remove Security Information is enabled in the Edit menu. To cancel security, click Remove Security Information and following the message instructions. Note • The Permissions Password must be entered if it has been set. • If only the Document Open password has been set, clicking - Canon 1941B001 | Operating Guide - Page 73
S Save As Two Images ....... 35 Save Rotated Image......... 34 Saving 58 Scan Batch to File 40 Scan Batch to Mail 45 Scan Batch to Printer ....... 43 Scan JOB 50 Scan menu 8 Scan Page 39 Scan To Presentation....... 47 Scanner Selection 16 Scanner Settings 16 Schema 24 Security Settings 71
-
 1
1 -
 2
2 -
 3
3 -
 4
4 -
 5
5 -
 6
6 -
 7
7 -
8
-
9
-
10
-
11
-
12
-
13
-
14
-
15
-
16
-
17
-
18
-
19
-
20
-
21
-
22
-
23
-
24
-
25
-
26
-
27
-
28
-
29
-
30
-
31
-
32
-
33
-
34
-
35
-
36
-
37
-
38
-
39
-
40
-
41
-
42
-
43
-
44
-
45
-
46
-
47
-
48
-
49
-
50
-
51
-
52
-
53
-
54
-
55
-
56
-
57
-
58
-
59
-
60
-
61
-
62
-
63
-
64
-
65
-
66
-
67
-
68
-
69
-
70
-
71
-
72
-
73
 |
 |

Operation Guide
ENGLISH
Capture Perfect 3.0