Canon 2063B001 DC220 DC230 Instruction Manual - Page 55
Adjusting the Picture, Exposure, Focus and Color
 |
UPC - 013803079500
View all Canon 2063B001 manuals
Add to My Manuals
Save this manual to your list of manuals |
Page 55 highlights
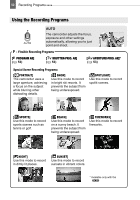
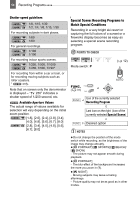
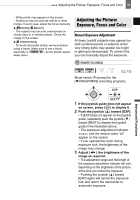
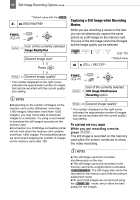
Adjusting the Picture: Exposure, Focus and Color 55 - White points may appear on the screen. - Autofocus may not work as well as in other modes. In such case, adjust the focus manually. [ SNOW]/[ BEACH] - The subject may become overexposed on cloudy days or in shaded places. Check the image on the screen. [ FIREWORKS] - To avoid camcorder shake, we recommend using a tripod. Make sure to use a tripod especially in , as the shutter speed slows down. Adjusting the Picture: Exposure, Focus and Color Adjusting the Picture: Exposure, Focus and Color Manual Exposure Adjustment At times, backlit subjects may appear too dark (underexposed) or subjects under very strong lights may appear too bright or glaring (overexposed). To correct this, you can manually adjust the exposure. POINTS TO CHECK ( 12) Mode switch: P (except for the [ FIREWORKS] recording program). EXP NEXT 1 If the joystick guide does not appear on screen, press ( ) to display it. 2 Push the joystick ( ) toward [EXP]. • If [EXP] does not appear on the joystick guide, repeatedly push the joystick ( ) toward [NEXT] to display the joystick guide in the illustration above. • The exposure adjustment indicator and the neutral value "±0" appear on the screen. • If you operate the zoom during exposure lock, the brightness of the image may change. 3 Adjust ( ) the brightness of the image as required. • The adjustment range and the length of the exposure adjustment indicator will vary depending on the brightness of the picture at the time you locked the exposure. • Pushing the joystick ( ) toward [EXP] again will cancel the exposure lock and return the camcorder to automatic exposure. Advanced Functions
-
 1
1 -
2
-
3
-
4
-
5
-
6
-
7
-
8
-
9
-
10
-
11
-
12
-
13
-
14
-
15
-
16
-
17
-
18
-
19
-
20
-
21
-
22
-
23
-
24
-
25
-
26
-
27
-
28
-
29
-
30
-
31
-
32
-
33
-
34
-
35
-
36
-
37
-
38
-
39
-
40
-
41
-
42
-
43
-
44
-
45
-
46
-
47
-
48
-
49
-
 50
50 -
 51
51 -
 52
52 -
 53
53 -
 54
54 -
 55
55 -
 56
56 -
 57
57 -
 58
58 -
 59
59 -
 60
60 -
61
-
62
-
63
-
64
-
65
-
66
-
67
-
68
-
69
-
70
-
71
-
72
-
73
-
74
-
75
-
76
-
77
-
78
-
79
-
80
-
81
-
82
-
83
-
84
-
85
-
86
-
87
-
88
-
89
-
90
-
91
-
92
-
93
-
94
-
95
-
96
-
97
-
98
-
99
-
100
-
101
-
102
-
103
-
104
-
105
-
106
-
107
-
108
-
109
-
110
-
111
-
112
-
113
-
114
-
115
-
116
-
117
-
118
-
119
-
120
-
121
-
122
-
123
 |
 |
