Canon CanoScan D1230UF CanoScan D1230U/D2400U Quick Start Guide - Page 9
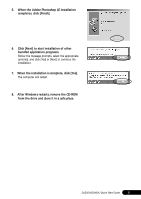
Click [Scan].
 |
View all Canon CanoScan D1230UF manuals
Add to My Manuals
Save this manual to your list of manuals |
Page 9 highlights
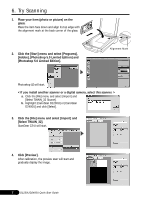
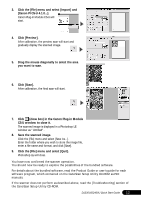
5. Drag the mouse diagonally to select the area you want to scan. 6. Click [Scan]. After calibration, the final scan will start. 7. Click in the ScanGear CS-U window to close it. The scanned image will appear in the Photoshop LE window. 8. Save the scaned image. Click the [File] menu and select [Save As...]. Enter the folder where you wish to store the image file, enter a file name and file type, and click [Save]. 9. Click in the Photoshop LE window to close it. You have now confirmed the scanner operation. You should now be ready to explore the possibilities of the bundled software. For details about the bundled software, read the Product Guide or user's guide for each software program, which contained on the CanoScan Setup Utility CD-ROM as PDF manuals. If the scanner does not perform as described above, read the [Troubleshooting] section of the CanoScan Setup Utility CD-ROM. D1230U/D2400U Quick Start Guide 8
-
 1
1 -
2
-
3
-
 4
4 -
 5
5 -
 6
6 -
 7
7 -
 8
8 -
 9
9 -
 10
10 -
 11
11 -
 12
12 -
 13
13 -
 14
14
 |
 |
