Canon Color imageCLASS MF8170c imageCLASS MF8170c Set-Up Instructions for the
Canon Color imageCLASS MF8170c Manual
 |
View all Canon Color imageCLASS MF8170c manuals
Add to My Manuals
Save this manual to your list of manuals |
Canon Color imageCLASS MF8170c manual content summary:
- Canon Color imageCLASS MF8170c | imageCLASS MF8170c Set-Up Instructions for the - Page 1
Canon Color imageCLASS MF8170c. To get your machine ready for use, please follow the instructions in this document before referring to any other documentation. Unpack the machine and its components. Check that you have the following: ● Machine ● Document feeder tray ● Drum cartridge ● Toner - Canon Color imageCLASS MF8170c | imageCLASS MF8170c Set-Up Instructions for the - Page 2
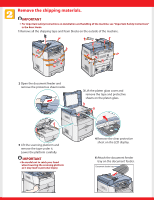
Remove the shipping materials. IMPORTANT ● For important safety instructions on installation and handling of the machine, see "Important Safety Instructions" in the Basic Guide. 1 Remove all the shipping tape and foam blocks on the outside of the machine. 2 Open the document feeder and remove the - Canon Color imageCLASS MF8170c | imageCLASS MF8170c Set-Up Instructions for the - Page 3
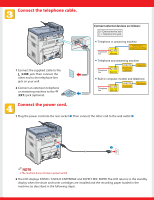
wall outlet ➋. NOTE ● The machine does not have a power switch. 2 The LCD displays INSTALL Y/M/C/K CARTRIDGE and SUPPLY REC. PAPER. The LCD returns to the standby display when the drum and toner cartridges are installed and the recording paper loaded in the machine (as described in the following - Canon Color imageCLASS MF8170c | imageCLASS MF8170c Set-Up Instructions for the - Page 4
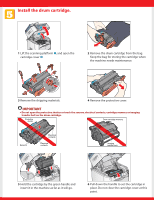
cover. IMPORTANT ● Do not open the protective shutter or touch the sensors, electrical contacts, cartridge memory or imaging transfer belt on the drum cartridge. Protective shutter Drum cartridge memory Sensors Electrical contacts Electrical contacts Imaging transfer belt 5 Hold the - Canon Color imageCLASS MF8170c | imageCLASS MF8170c Set-Up Instructions for the - Page 5
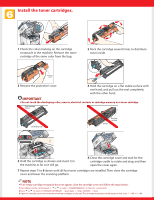
receptacle in the machine. Remove the toner cartridge of the same color from the bag. 2 Rock the cartridge several times to distribute toner inside. Protective cover 3 Remove the protective cover. 4 Hold the cartridge on a flat stable surface with one hand, and pull out the seal completely - Canon Color imageCLASS MF8170c | imageCLASS MF8170c Set-Up Instructions for the - Page 6
of paper size 3 Pinch and slide the blue rear paper end guide to match the size of paper. Paper limit mark 4 Pinch and slide the blue side paper end guides to match the size of paper. Hook Hook 5 Load the specified in the machine. For details, see Chapter 2,"Paper Handling," in the Basic Guide. - Canon Color imageCLASS MF8170c | imageCLASS MF8170c Set-Up Instructions for the - Page 7
. ● For details on how to input characters, see Chapter 2,"Registering Information in Your Machine," in the Facsimile Guide. Setting the Current Date and Time: 1 Press [Menu] ➊ ➝ or ➋ to select on the LCD ➝ press [Set] ➌. 2 Press or ➋ to select ➝ - Canon Color imageCLASS MF8170c | imageCLASS MF8170c Set-Up Instructions for the - Page 8
Remote UI Guide (included in the User Software CD). NOTE ● Remember to register your machine to ensure product support. The serial number is located on the back of the machine. For installation help and operational instructions, call us at: 1-800-828-4040 1-800 OK CANON U.S.A. CUSTOMERS CANADA
-
 1
1 -
 2
2 -
 3
3 -
 4
4 -
 5
5 -
 6
6 -
 7
7 -
8
 |
 |

Set-Up Instructions
Set-Up Instructions
Thank you for purchasing Canon Color imageCLASS MF8170c.
To get your machine ready for use,please follow the instructions in this document before referring to any other documentation.
READ THIS FIRST
READ THIS FIRST
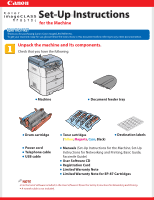
Unpack the machine and its components.
Check that you have the following:
●
Machine
●
Drum cartridge
●
Toner cartridges
(
Yellow
,
Magenta
,
Cyan
, Black)
●
Document feeder tray
●
Power cord
●
Telephone cable
●
USB cable
for the Machine
●
Destination labels
●
Manuals
(Set-Up Instructions for the Machine, Set-Up
Instructions for Networking and Printing, Basic Guide,
Facsimile Guide)
●
User Software CD
●
Registration Card
●
Limited Warranty Note
●
Limited Warranty Note for EP-87 Cartridges
NOTE
●
For the list of software included in the User Software CD, see the
Set-Up Instructions for Networking and Printing
.
●
A nework cable is not included.