Canon DR-4010C Reference Guide
Canon DR-4010C - imageFORMULA - Document Scanner Manual
 |
UPC - 013803065664
View all Canon DR-4010C manuals
Add to My Manuals
Save this manual to your list of manuals |
Canon DR-4010C manual content summary:
- Canon DR-4010C | Reference Guide - Page 1
Document Scanner Reference Guide Please read this manual before operating this scanner. After you finish reading this manual, store it in a safe place for future reference. - Canon DR-4010C | Reference Guide - Page 2
FCC REGULATIONS (For 120 V model) Document Scanner, Model M11059 This device complies with Part 15 of the FCC Rules. Operation is subject to the following two conditions: (1) This device may not cause harmful interference, and (2) this device must accept - Canon DR-4010C | Reference Guide - Page 3
NOT OPEN THE SEALED DISK PACKAGE AND PROMPTLY RETURN THE CANON SCANNER, THE DISK PACKAGE CONTAINING SCANNER DRIVER SOFTWARE PROGRAMS AND/OR SCANNER UTILITY SOFTWARE PROGRAM PROPRIETARY TO CANON OR ITS LICENSOR (THE "SOFTWARE") AND THE ACCOMPANYING DOCUMENTATION AND OTHER ITEMS TO THE PLACE WHERE YOU - Canon DR-4010C | Reference Guide - Page 4
their respective owners. Copyright Copyright 2006 by CANON ELECTRONICS INC. All rights reserved. No part of this publication may be reproduced or CANON ELECTRONICS INC. Disclaimers The information in this document is subject to change without notice. CANON ELECTRONICS INC. MAKES NO WARRANTY - Canon DR-4010C | Reference Guide - Page 5
, and troubleshooting.) The "Software" volume explains the ISIS/TWAIN driver settings and Job Registration Tool settings. CapturePerfect 3.0 Operation Guide (electronic manual)* Explains the application that enhances the operation of all Canon document scanners. * The electronic manuals are PDF - Canon DR-4010C | Reference Guide - Page 6
The following symbols are used in this manual to explain procedures, restrictions, handling precautions, and instructions that should be observed for safety. WARNING Indicates a warning concerning operations that may lead to death or injury to persons if not performed correctly. To - Canon DR-4010C | Reference Guide - Page 7
Instructions 4 Installation Location 4 Power 5 Moving the Scanner 6 Handling 6 Disposal 8 1-2 Features of the DR-4010C Document Scanner9 1-3 Names and Functions of Parts 12 1- 4 Installation Requirements 14 Chapter 2 Basic Operation 16 2-1 Documents 16 2-2 Document Feed and Eject Tray - Canon DR-4010C | Reference Guide - Page 8
space around the scanner for operation, maintenance, and ventilation. At least 3.9" (100 mm) when eject tray is empty. 15.7" (400 mm) when the document feed tray and document feed tray extension are closed. 25.6" (650 mm) when the document feed tray and document feed tray extension are open - Canon DR-4010C | Reference Guide - Page 9
Do not connect other electrical equipment to the same power outlet to which the scanner is connected. Also, when using an extension cord, make sure that the extension cord supply, contact your local authorized Canon dealer or service representative for further information. Before Using the Scanner 5 - Canon DR-4010C | Reference Guide - Page 10
do so may result in a fire or electric shock. ■ Never use alcohol, benzene, paint thinner, aerosol sprays, or any other highly flammable substance near the scanner. ■ Do not cut, damage, or modify the power cord. Do not place heavy objects on the power cord, and do not pull or excessively bend - Canon DR-4010C | Reference Guide - Page 11
power switch OFF, and disconnect the power plug from the power outlet. Then, contact your local authorized Canon dealer or service representative to have the unit serviced. ■ Before moving the scanner, be sure to turn the power switch OFF, and disconnect the power plug from the power outlet. CAUTION - Canon DR-4010C | Reference Guide - Page 12
used for an extended period of time, such as during consecutive holidays. ■ Do not wear loose clothing or jewelry that may get caught in the scanner while you are using it. This may result in personal injury. Be extra careful of neckties and long hair. If anything becomes caught in the - Canon DR-4010C | Reference Guide - Page 13
Supports a Variety of Scanning Modes The scanner supports the following scanning modes, depending on the document type: - Single-sided/double-sided mode - Single sheet/dual feeding path • U-Turn Path Documents are fed and ejected from the front of the scanner. (See "2-2 Document Feed and Eject Tray - Canon DR-4010C | Reference Guide - Page 14
-sided or onesided. • Prescan Function The scanner is equipped with a Prescan function that allows you to adjust the contrast and brightness of a prescanned image and then send the adjusted image to the application software, without needing to scan the document again. • Remove Binder Holes This mode - Canon DR-4010C | Reference Guide - Page 15
Function The scanner supports MultiStream, which, according to the application, can create two images with different scanning conditions from one path scan. However, this function can only be used if the software supports MultiStream. • Long Document Compatibility You can scan documents up to - Canon DR-4010C | Reference Guide - Page 16
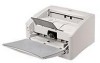
the parts of the scanner before using the scanner. ■ Front View (Feed Tray Open) Document Eject Tray Extension Open if the document extends beyond the edge of the eject tray. (See p. 20.) Document Eject Tray Scanned documents are ejected here. (See p. 20.) Document Feed Tray Place the document to - Canon DR-4010C | Reference Guide - Page 17
Chapter 1 ■ Back View Document Eject Tray 2 Open this tray to use the scanner in a straight path configuration. (See cable or a USB cable that supports HiSpeed USB 2.0. Power Connector CAUTION • Do not block the ventilation openings. Doing so could cause the scanner to overheat, creating a risk - Canon DR-4010C | Reference Guide - Page 18
Installation Requirements To use the DR-4010C scanner, your computer must satisfy the following system requirements. • One of the following operating systems: - Microsoft Windows 2000 Professional SP4 or later - Microsoft Windows XP Professional SP2 or later - Microsoft Windows XP Home Edition SP2 - Canon DR-4010C | Reference Guide - Page 19
details, consult your local authorized Canon dealer. - The USB cable you are using should be the one originally included with the scanner or a Hi-Speed USB recommended specifications, the scanning speed may vary, depending on the scan settings. • The ISIS/TWAIN Drivers provided with the scanner do - Canon DR-4010C | Reference Guide - Page 20
without embossing (*1) The DR-4010C offers two document eject configurations: U-turn path (the document is ejected to the document eject tray at the front of the scanner) and straight path (the document is ejected to the back of the scanner.) (See "Document Feed and Eject Tray," on p. 19.) U-turn - Canon DR-4010C | Reference Guide - Page 21
can lead to smudges in the scanned image and transfer the dirt to subsequent documents. Always clean the internal parts of the scanner after scanning such documents. (See "Cleaning the Sensor Glass and the Rollers," on p. 35.) • When scanning a two-sided document that is printed on thin paper, the - Canon DR-4010C | Reference Guide - Page 22
and then scan the photocopy. Wrinkled or creased documents Extremely thin, translucent paper Curled document Carbon paper Documents with paper clips or staples Coated paper Torn documents • When you scan a batch of NCR (No Carbon Required) documents, make sure that they are not stuck together - Canon DR-4010C | Reference Guide - Page 23
and Eject Tray Prepare the document feed tray and document eject tray according to the paper size and feed/eject method. Preparing the Document Feed Tray 1 Grasp the middle of the document feed tray and slowly open it toward you. If the documents slide off the tray, pull out the document feed tray - Canon DR-4010C | Reference Guide - Page 24
scanner in a straight path. You can switch between these methods by opening or closing the document eject tray 2. Select an eject method according to your needs. Document Flow U-turn Path Document Eject Tray Straight Path Document Eject Tray 2 Straight Path Open document eject tray 2. Document - Canon DR-4010C | Reference Guide - Page 25
thin paper, thick paper and business cards that cannot be scanned through the Uturn path. Scanned documents are ejected to the back of the scanner. • The U-turn path cannot be used if the document eject tray 2 is open. • When using the straight path, the pages are stacked in the reverse order from - Canon DR-4010C | Reference Guide - Page 26
of documents placed in the feed tray is called the Page Separation mode. Feeding documents one sheet at a time or feeding documents consisting , damage the document, or cause a paper jam or scanner malfunction. • Do not wear loose clothing or jewelry that may get caught in the scanner while you are - Canon DR-4010C | Reference Guide - Page 27
and align their edges. CAUTION • Do not place the documents on top of the scanner to align them. Doing so may cause a malfunction. • When placing documents into the feed tray, take care not to cut your hands on the edges of the paper. 3 Adjust the document guides so that they are wider than the - Canon DR-4010C | Reference Guide - Page 28
while the scanner is scanning, resolve the problem, make sure that the scanned image of the last page that was successfully fed has been stored, and then resume scanning the remaining document pages. • Note that documents that are printed on thin paper may fall out of the document eject tray. 24 - Canon DR-4010C | Reference Guide - Page 29
document feed tray and the document eject tray extension to prevent damage to the scanner while it is not being used. Feeding in the Bypass Mode 1 Push the feed selection lever up ( .) 2 Place the document into the document feed tray one sheet at a time and adjust the position of the document guides - Canon DR-4010C | Reference Guide - Page 30
feed them. Take care not to get your hand caught under the roller unit, as this may cause personal injury. Roller Unit • After you finish scanning, close the document feed tray and the document eject tray extension to prevent damage to the scanner while it is not being used. 26 Basic Operation - Canon DR-4010C | Reference Guide - Page 31
the application settings. b Stop: Stops scanning. c Save as file: Saves scanned images to the [My Pictures] folder in the PDF format. Example: When you place a document in the scanner and press job button c, scanning starts, the DR-4010C monitor displays the progress and status of the job, and the - Canon DR-4010C | Reference Guide - Page 32
. Job Buttons DR-4010C Launcher Start up a specified application program. Send via E-Mail Start up your e-mail program, and attach the scanned image data to a new e-mail message. Note The Job Registration Tool is a TWAIN-compatible application that is installed with the ISIS/TWAIN driver, and - Canon DR-4010C | Reference Guide - Page 33
application developed for Canon document scanners. CapturePerfect 3.0 includes the following modes. Select the desired scan mode from the Scan menu to perform scanning. For more information, see the User Manual (electronic manual) and the CapturePerfect 3.0 Operation Guide. • Scan Batch to - Canon DR-4010C | Reference Guide - Page 34
when the scanner is used in environments, such as conference halls, where it can be connected to large displays or projectors. CapturePerfect 3.0 is switched to full-screen display, the document is scanned, and the scanned image is displayed at full size on the screen. DR-4010C Projector The - Canon DR-4010C | Reference Guide - Page 35
the paper. 1 Remove any documents that have been left in the eject tray, and close the eject tray guide. Chapter 2 IMPORTANT If a document stops in the eject tray, remove the document before closing the document eject tray extension. Attempting to force the document eject tray extension closed may - Canon DR-4010C | Reference Guide - Page 36
. IMPORTANT Make sure to pull the document out carefully, without applying too much force. If jammed paper tears while it is being removed, make sure to remove any remaining pieces from inside the scanner. 4 Close the upper unit slowly. Make sure that the upper unit is completely closed by pushing - Canon DR-4010C | Reference Guide - Page 37
• If a paper jam occurs when "Rapid recover system" is enabled in the ISIS/TWAIN driver settings, the image data of the document is not saved and scanning stops. This allows you to continue scanning from the document that caused the paper jam after the paper jam is fixed. Chapter 2 Basic Operation - Canon DR-4010C | Reference Guide - Page 38
Maintenance Clean the scanner on a regular basis as described below to maintain peak scanning quality. CAUTION • When cleaning the scanner, turn OFF the power switch and disconnect the power cord from the power outlet. • Do not use excessive force when removing or attaching the rollers. Doing - Canon DR-4010C | Reference Guide - Page 39
documents are dirty, the sensor glass or rollers inside the scanner may be dirty. Clean them periodically. IMPORTANT Feed rollers are consumable parts. When the rollers start to wear out, paper jams and misfeeds may occur more often. When this happens, purchase an exchange roller kit and replace - Canon DR-4010C | Reference Guide - Page 40
rollers are shown below. Roller Unit Sensor Glasses Rollers Retard Roller 2 Use compressed air to keep the interior of the scanner images and could cause feeding errors. If there are scratches on the sensor glass, contact your local authorized Canon dealer or service representative. 36 Maintenance - Canon DR-4010C | Reference Guide - Page 41
, wring it out thoroughly, and then wipe the rollers of the upper unit while turning them. Do not try to turn the rollers in the lower part of the scanner. Clean these rollers simply by wiping the exposed part. Clean while turning Clean only exposed part IMPORTANT • Do not use detergent to clean the - Canon DR-4010C | Reference Guide - Page 42
not force the upper unit to close. Doing so may damage the scanner. Cleaning the Roller Unit 1 Push the roller lock lever down. While supporting the roller unit with your hand, slide the roller lock lever to the right. 2 Move the roller unit to the right a and then pull it out b. 3 Wipe the removed - Canon DR-4010C | Reference Guide - Page 43
the roller unit with the shaft pin on the main unit. Note If the cutout and pin do not fit, rotate the roller until the parts are properly matched. 5 Slide the roller lock lever to the left and raise the roller unit into position. 6 Push the roller lock lever up to lock the roller unit. Maintenance - Canon DR-4010C | Reference Guide - Page 44
Cleaning the Retard Roller 1 Insert a finger of each hand into the grooves on both ends of the roller cover and remove the cover. 2 Move the roller lock lever down and forward (a,) and then slide it to the right (b.) 3 Shift the retard roller to the right to remove it. 40 Maintenance - Canon DR-4010C | Reference Guide - Page 45
3 4 Wipe the removed retard roller with a cloth that has been moistened with water and throughly wrung out. 5 Position the retard roller so the notch in the roller is facing the scanner's shaft. 6 Slide the roller lock lever to the left, and insert it into the retard roller slot. Maintenance 41 - Canon DR-4010C | Reference Guide - Page 46
7 Push the roller lock lever towards the back of the scanner to lock the retard roller into place. 8 Replace the roller cover. 9 Push the center of the roller cover down and make sure that it clicks into place. 42 Maintenance - Canon DR-4010C | Reference Guide - Page 47
P. 45 Documents Do Not Feed Properly P. 46 Saved Image Files Do Not Open P. 47 Scanning Results Are Not as Expected P. 48 If, after consulting this section, you still cannot resolve the problem, contact your local authorized Canon dealer or your service representative. ✘ The Scanner Does Not - Canon DR-4010C | Reference Guide - Page 48
operate with all types of USB interfaces. Contact your local authorized Canon dealer or service representative for more information. (See p. 14.) Problem The scanner does not support the USB cable. Solution Use the USB cable provided with the scanner. Problem The USB hub is not compatible with the - Canon DR-4010C | Reference Guide - Page 49
? • Is there a problem in the PC system? IMPORTANT • If documents are not scanned normally even if the scanner setup is OK, a probable cause is that the scanner driver or application software is not running correctly. Re-install the scanner driver or application software. • When system errors - Canon DR-4010C | Reference Guide - Page 50
The rollers inside the scanner are dirty or worn. Clean the rollers, see "3-1 Regular Maintenance," on p. 34. If the rollers are worn, then they need to be replaced. Contact your local authorized Canon dealer or service representative to purchase a roller replacement kit. 46 Troubleshooting - Canon DR-4010C | Reference Guide - Page 51
appear to improve performance. Contact your local authorized Canon dealer or your service representative about purchasing a roller replacement kit, and then replace the retard roller and the roller unit. ✘ Saved Image Files Do Not Open When image files saved by CapturePerfect 3.0 cannot be opened - Canon DR-4010C | Reference Guide - Page 52
shifted out of position. Set [Page size] to [Auto-detection]. Or, set [Border Removal] to on. Symptoms Problem Solution The scanned image is skewed. The document has been fed at an angle. (skew) Use the document guide adapter to prevent document skew, and set [Deskew] to on. 48 Troubleshooting - Canon DR-4010C | Reference Guide - Page 53
after cleaning the scanning glass and rollers, the scanning glass inside the scanner may be scratched. Contact your local authorized Canon dealer or service representative. Symptoms Problem Solution The scanned image is abnormal for certain documents. Functions such as [Auto-detection], [Deskew - Canon DR-4010C | Reference Guide - Page 54
66 mm) Business cards are supported. However, scanning embossed cards is not guaranteed. Size: Thickness: 2.12" × 3.37" (53.9 mm × 85.5 mm) 0.03" ± 0.003" (0.76 ± 0.08 mm) Document Feeding Method Automatic/Manual Scanning Method Color 3-line contact image sensor Light Source LED Effective - Canon DR-4010C | Reference Guide - Page 55
(Image quality 20 pages/min. (not supported) priority) Amount of paper that can be stacked in automatic feeder 10 mm stack, maximum (100 sheets of 20 lb bond (80 g/m2)) Interface Hi-Speed USB 2.0 / SCSI-III Other Functions Double feed detection, Long Document mode Dimensions (with trays 12 - Canon DR-4010C | Reference Guide - Page 56
Replacement Parts Exchange roller kit (product code: 1921B001) Kit to replace the roller unit (pickup roller, feed roller) and retard roller. • Refer to "4-2 Removing and Attaching the Rollers," in the User Manual for information about replacing the rollers. • Contact your local authorized Canon - Canon DR-4010C | Reference Guide - Page 57
35 Retard Roller 40 Roller Unit 38 Scanner 34 Sensor Glass 35 D Disposal 8 Document Eject Tray 20 Document Eject Tray 2 20 Document Feed Tray 19 Document Feed Tray Extension ........ 19 Document Guides 23 Documents 16 DR-4010C monitor 27 E Easy Start Guide 1 Eject Tray Guide 31 External - Canon DR-4010C | Reference Guide - Page 58
INC. 1248, SHIMOKAGEMORI, CHICHIBU-SHI, SAITAMA 369-1892, JAPAN CANON U.S.A. INC. ONE CANON PLAZA, LAKE SUCCESS, N.Y. 11042, U.S.A. CANON CANADA INC. 6390 DIXIE ROAD, MISSISSAUGA, ONTARIO L5T 1P7, CANADA CANON EUROPA N.V. BOVENKERKERWEG 59-61, P.O.BOX 2262, 1180 EG AMSTELVEEN, THE NETHERLANDS
-
 1
1 -
 2
2 -
 3
3 -
 4
4 -
 5
5 -
 6
6 -
 7
7 -
8
-
9
-
10
-
11
-
12
-
13
-
14
-
15
-
16
-
17
-
18
-
19
-
20
-
21
-
22
-
23
-
24
-
25
-
26
-
27
-
28
-
29
-
30
-
31
-
32
-
33
-
34
-
35
-
36
-
37
-
38
-
39
-
40
-
41
-
42
-
43
-
44
-
45
-
46
-
47
-
48
-
49
-
50
-
51
-
52
-
53
-
54
-
55
-
56
-
57
-
58
 |
 |

Document Scanner
Reference Guide
Please read this manual before operating this scanner.
After you finish reading this manual, store it in a safe
place for future reference.