Canon DR 7090C User Manual - Page 80
If the Scanning Side is set to [Skip Blank, Set Scanning Side to [Duplex].
 |
UPC - 013803100242
View all Canon DR 7090C manuals
Add to My Manuals
Save this manual to your list of manuals |
Page 80 highlights
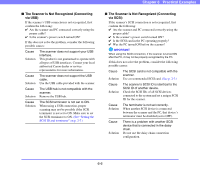
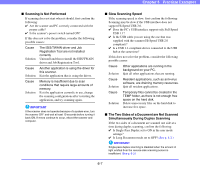
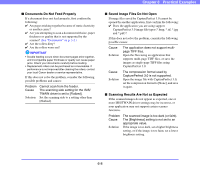
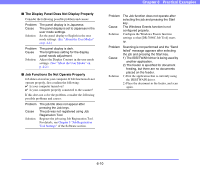
Problem Cause Solution Cause Solution Text or images from the back side of your document appear in the scanned image. Brightness may be set too low. Increase the Brightness setting. The paper is too thin. Photocopy the document, and scan the copy. Problem Cause Solution Double-sided scanning is not possible. Scanning Side is set to [Simplex]. Set Scanning Side to [Duplex]. If the Scanning Side is set to [Skip Blank Page], images of blank pages are not saved. Problem Cause Solution A black margin appears around the scanned document. A document smaller than the preset paper size has been scanned. Or, the loaded document has shifted out of position. Set the page size setting to [Auto Detection]. Problem Cause Solution The scanned image is skewed. The document has been fed at an angle. (skew) Slide the document guides to match the width of your document. Problem Cause Solution Lines, smudges, or dirt appear on the scanned image. The scanning glass or rollers inside the scanner are dirty. Clean the scanning glass and roller inside the feeder. (See "Daily Cleaning" on p. 5-4.) If lines still appear on the image even after you clean the scanning glass and rollers, the scanning glass inside the scanner may be scratched. Contact your local authorized Canon dealer or service representative. Chapter 6 Practical Examples Problem Cause Solution The scanned image is abnormal for certain documents. A detection function such as border removal is enabled when scanning a document that includes text or photos extending to the edge of the page (the scanner cannot accurately process the edges of documents). When a page has text or photos extending to its edges, turn the detection functions off or scan that page individually. Problem Cause Solution The scanned image is abnormal in some applications. A function not supported by the application was used. Some applications do not support functions such as auto-detection of page size, so scanning with such applications will produce abnormal scanned images. If abnormal image appearance seems to be application-dependent, try scanning with autodetection disabled. 6-9
-
 1
1 -
2
-
3
-
4
-
5
-
6
-
7
-
8
-
9
-
10
-
11
-
12
-
13
-
14
-
15
-
16
-
17
-
18
-
19
-
20
-
21
-
22
-
23
-
24
-
25
-
26
-
27
-
28
-
29
-
30
-
31
-
32
-
33
-
34
-
35
-
36
-
37
-
38
-
39
-
40
-
41
-
42
-
43
-
44
-
45
-
46
-
47
-
48
-
49
-
50
-
51
-
52
-
53
-
54
-
55
-
56
-
57
-
58
-
59
-
60
-
61
-
62
-
63
-
64
-
65
-
66
-
67
-
68
-
69
-
70
-
71
-
72
-
73
-
74
-
 75
75 -
 76
76 -
 77
77 -
 78
78 -
 79
79 -
 80
80 -
 81
81 -
 82
82 -
 83
83 -
 84
84 -
 85
85 -
86
-
87
-
88
-
89
-
90
-
91
-
92
-
93
-
94
-
95
-
96
-
97
-
98
-
99
-
100
-
101
-
102
-
103
-
104
-
105
-
106
-
107
-
108
-
109
-
110
-
111
-
112
-
113
-
114
-
115
-
116
-
117
-
118
-
119
-
120
-
121
-
122
-
123
-
124
-
125
-
126
-
127
-
128
-
129
 |
 |