Canon EOS 40D EOS Utility 2.4 for Windows Instruction Manual - Page 7
Batch Downloading Images to Your Computer, Select [Canon EOS Utility] and then click the [OK] button.
 |
UPC - 689076803281
View all Canon EOS 40D manuals
Add to My Manuals
Save this manual to your list of manuals |
Page 7 highlights
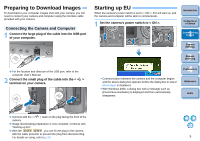
2 Select [Canon EOS Utility] and then click the [OK] button. EU Main window ¿ EU starts up, the main window appears, and your camera and computer can now communicate. Continue with "Batch Downloading Images to Your Computer". Batch Downloading Images to Your Computer You can batch download to your computer all the images saved in your camera's memory card. The downloaded images are sorted by date into folders and are then displayed in the main window of Digital Photo Professional (RAW image processing, viewing and editing software) (hereinafter DPP), which is linked to start up automatically, where you can check them immediately. 1 Click [Starts to download images]. Introduction Contents at a Glance 1 Downloading Images 2Camera Settings 3Remote Shooting 4 Preferences Reference Index ¿ With Windows 2000, the [Event on device] dialog box appears. Select [Canon EOS Utility] and then click the [OK] button to start up EU. O This procedure is only necessary when connecting your camera and computer for the first time. From the next time you connect, EU will start up when you set your camera's power switch to < ON >. O The camera's LCD monitor blinks when EU starts up. O With Windows Vista, if the window in step 2 is not displayed even when you set the camera's power switch to < ON >, double-click the [EOS Utility] icon on your desktop to start up EU. ¿ The [Save File] dialog box appears and image downloading to your computer begins. ¿ The downloaded images are saved in the [My Pictures] folder. O When all images have been downloaded, DPP starts up automatically and the downloaded images are displayed in DPP's main window. 6
-
 1
1 -
 2
2 -
 3
3 -
 4
4 -
 5
5 -
 6
6 -
 7
7 -
 8
8 -
 9
9 -
 10
10 -
 11
11 -
 12
12 -
13
-
14
-
15
-
16
-
17
-
18
-
19
-
20
-
21
-
22
-
23
-
24
-
25
-
26
-
27
-
28
-
29
-
30
-
31
-
32
-
33
-
34
-
35
-
36
-
37
-
38
-
39
-
40
-
41
-
42
-
43
-
44
-
45
-
46
-
47
-
48
-
49
-
50
-
51
-
52
-
53
-
54
-
55
 |
 |
