Canon EOS Rebel T2i EF-S 18-55mm IS Kit EOS REBEL T2i / EOS 550D Instruction M - Page 176
Preparing to Print
 |
View all Canon EOS Rebel T2i EF-S 18-55mm IS Kit manuals
Add to My Manuals
Save this manual to your list of manuals |
Page 176 highlights
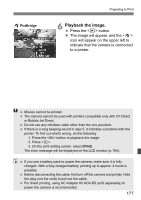
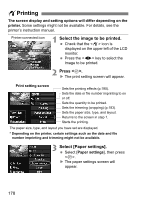
Preparing to Print The direct printing procedure is done entirely with the camera while you look at the LCD monitor. Connecting the Camera to a Printer 1 Set the camera's power switch to . 2 Set up the printer. For details, see the printer's instruction manual. 3 Connecting the camera to a printer. Use the interface cable provided with the camera. When connecting the cable plug to the camera's terminal, the cable plug's icon must face the front side of the camera. To connect to the printer, refer to the printer's instruction manual. 4 Turn on the printer. 5 Set the camera's power switch to . X Some printers may make a beeping sound. 176
-
 1
1 -
2
-
3
-
4
-
5
-
6
-
7
-
8
-
9
-
10
-
11
-
12
-
13
-
14
-
15
-
16
-
17
-
18
-
19
-
20
-
21
-
22
-
23
-
24
-
25
-
26
-
27
-
28
-
29
-
30
-
31
-
32
-
33
-
34
-
35
-
36
-
37
-
38
-
39
-
40
-
41
-
42
-
43
-
44
-
45
-
46
-
47
-
48
-
49
-
50
-
51
-
52
-
53
-
54
-
55
-
56
-
57
-
58
-
59
-
60
-
61
-
62
-
63
-
64
-
65
-
66
-
67
-
68
-
69
-
70
-
71
-
72
-
73
-
74
-
75
-
76
-
77
-
78
-
79
-
80
-
81
-
82
-
83
-
84
-
85
-
86
-
87
-
88
-
89
-
90
-
91
-
92
-
93
-
94
-
95
-
96
-
97
-
98
-
99
-
100
-
101
-
102
-
103
-
104
-
105
-
106
-
107
-
108
-
109
-
110
-
111
-
112
-
113
-
114
-
115
-
116
-
117
-
118
-
119
-
120
-
121
-
122
-
123
-
124
-
125
-
126
-
127
-
128
-
129
-
130
-
131
-
132
-
133
-
134
-
135
-
136
-
137
-
138
-
139
-
140
-
141
-
142
-
143
-
144
-
145
-
146
-
147
-
148
-
149
-
150
-
151
-
152
-
153
-
154
-
155
-
156
-
157
-
158
-
159
-
160
-
161
-
162
-
163
-
164
-
165
-
166
-
167
-
168
-
169
-
170
-
 171
171 -
 172
172 -
 173
173 -
 174
174 -
 175
175 -
 176
176 -
 177
177 -
 178
178 -
 179
179 -
 180
180 -
 181
181 -
182
-
183
-
184
-
185
-
186
-
187
-
188
-
189
-
190
-
191
-
192
-
193
-
194
-
195
-
196
-
197
-
198
-
199
-
200
-
201
-
202
-
203
-
204
-
205
-
206
-
207
-
208
-
209
-
210
-
211
-
212
-
213
-
214
-
215
-
216
-
217
-
218
-
219
-
220
-
221
-
222
-
223
-
224
-
225
-
226
-
227
-
228
-
229
-
230
-
231
-
232
-
233
-
234
-
235
-
236
-
237
-
238
-
239
-
240
-
241
-
242
-
243
-
244
-
245
-
246
-
247
-
248
-
249
-
250
-
251
-
252
-
253
-
254
-
255
-
256
-
257
-
258
-
259
-
260
 |
 |

176
The direct printing procedure is done entirely with the camera
while you look at the LCD monitor.
1
Set the camera’s power switch to
<
2
>.
2
Set up the printer.
For details, see the printer’s
instruction manual.
3
Connecting the camera to a
printer.
Use the interface cable provided with
the camera.
When connecting the cable plug to
the camera’s <
q
/
C
>
terminal, the cable plug’s <
D
> icon
must face the front side of the
camera.
To connect to the printer, refer to the
printer’s instruction manual.
4
Turn on the printer.
5
Set the camera’s power switch to
<
1
>.
Some printers may make a beeping
sound.
Preparing to Print
Connecting the Camera to a Printer