Canon EOS Rebel T3 18-55mm IS II Lens Kit EOS REBEL T3 / EOS 1100D Instruction - Page 149
Exposure compensation, Auto Lighting Optimizer, Highlight tone priority, Enable, Disable
 |
View all Canon EOS Rebel T3 18-55mm IS II Lens Kit manuals
Add to My Manuals
Save this manual to your list of manuals |
Page 149 highlights
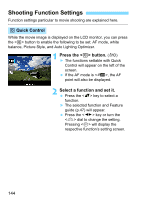
[y] tab 3 Menu Function Settings Exposure compensation You can set exposure compensation for movies up to ±3 stops in 1/3-stop increments. Auto Lighting Optimizer The Auto Lighting Optimizer can be set as explained on page 107. If the [w] menu tab's [kHighlight tone priority] is set to [Enable], the Auto Lighting Optimizer will be set automatically to [Disable] and cannot be changed. Custom White Balance As explained on page 115, the image for custom white balance can be selected. Note that still photos cannot be taken in the mode. Set a shooting mode other than and take a still photo. Then select it for the custom white balance. Picture Style The Picture Style can be set as explained on pages 79. 149
-
 1
1 -
2
-
3
-
4
-
5
-
6
-
7
-
8
-
9
-
10
-
11
-
12
-
13
-
14
-
15
-
16
-
17
-
18
-
19
-
20
-
21
-
22
-
23
-
24
-
25
-
26
-
27
-
28
-
29
-
30
-
31
-
32
-
33
-
34
-
35
-
36
-
37
-
38
-
39
-
40
-
41
-
42
-
43
-
44
-
45
-
46
-
47
-
48
-
49
-
50
-
51
-
52
-
53
-
54
-
55
-
56
-
57
-
58
-
59
-
60
-
61
-
62
-
63
-
64
-
65
-
66
-
67
-
68
-
69
-
70
-
71
-
72
-
73
-
74
-
75
-
76
-
77
-
78
-
79
-
80
-
81
-
82
-
83
-
84
-
85
-
86
-
87
-
88
-
89
-
90
-
91
-
92
-
93
-
94
-
95
-
96
-
97
-
98
-
99
-
100
-
101
-
102
-
103
-
104
-
105
-
106
-
107
-
108
-
109
-
110
-
111
-
112
-
113
-
114
-
115
-
116
-
117
-
118
-
119
-
120
-
121
-
122
-
123
-
124
-
125
-
126
-
127
-
128
-
129
-
130
-
131
-
132
-
133
-
134
-
135
-
136
-
137
-
138
-
139
-
140
-
141
-
142
-
143
-
 144
144 -
 145
145 -
 146
146 -
 147
147 -
 148
148 -
 149
149 -
 150
150 -
 151
151 -
 152
152 -
 153
153 -
 154
154 -
155
-
156
-
157
-
158
-
159
-
160
-
161
-
162
-
163
-
164
-
165
-
166
-
167
-
168
-
169
-
170
-
171
-
172
-
173
-
174
-
175
-
176
-
177
-
178
-
179
-
180
-
181
-
182
-
183
-
184
-
185
-
186
-
187
-
188
-
189
-
190
-
191
-
192
-
193
-
194
-
195
-
196
-
197
-
198
-
199
-
200
-
201
-
202
-
203
-
204
-
205
-
206
-
207
-
208
-
209
-
210
-
211
-
212
-
213
-
214
-
215
-
216
-
217
-
218
-
219
-
220
-
221
-
222
-
223
-
224
-
225
-
226
-
227
-
228
-
229
-
230
-
231
-
232
-
233
-
234
-
235
-
236
-
237
-
238
-
239
-
240
-
241
-
242
-
243
-
244
-
245
-
246
-
247
-
248
-
249
-
250
-
251
-
252
-
253
-
254
-
255
-
256
-
257
-
258
-
259
-
260
-
261
-
262
-
263
-
264
-
265
-
266
-
267
-
268
-
269
-
270
-
271
-
272
-
273
-
274
-
275
-
276
-
277
-
278
-
279
-
280
-
281
-
282
-
283
-
284
-
285
-
286
-
287
-
288
-
289
-
290
-
291
-
292
 |
 |

149
3
Menu Function Settings
[
y
] tab
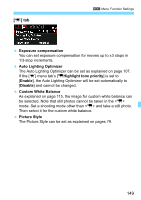
Exposure compensation
You can set exposure compensation for movies up to ±3 stops in
1/3-stop increments.
Auto Lighting Optimizer
The Auto Lighting Optimizer can be set as explained on page 107.
If the [
w
] menu tab’s [
k
Highlight tone priority
] is set to
[
Enable
], the Auto Lighting Optimizer will be set automatically to
[
Disable
] and cannot be changed.
Custom White Balance
As explained on page 115, the image for custom white balance can
be selected. Note that still photos cannot be taken in the <
k
>
mode. Set a shooting mode other than <
k
> and take a still photo.
Then select it for the custom white balance.
Picture Style
The Picture Style can be set as explained on pages 79.