Canon EOS50D Digital Photo Professional 3.5 for Macintosh Instruction Manual - Page 63
About Shooting Distance Information Slider, Correcting Multiple Images at a Time
 |
View all Canon EOS50D manuals
Add to My Manuals
Save this manual to your list of manuals |
Page 63 highlights
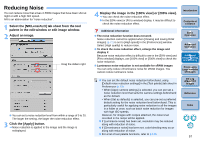
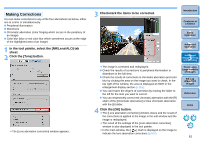
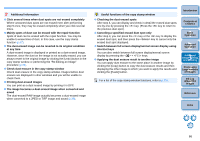
About Shooting Distance Information Slider O When correcting RAW images shot with EOS-1Ds Mark III, EOS-1D Mark III, EOS 50D, EOS 40D, EOS DIGITAL REBEL XSi/450D or EOS DIGITAL REBEL XS/1000D, if shooting distance information has been saved to the image, the slider is set automatically according to this shooting distance information. However, if no shooting distance information is saved to the image, the slider is set automatically to the right end at infinity position. If the image's shooting distance is not infinite, you can minutely adjust the distance by operating the slider while looking at the screen. O When correcting RAW images shot with EOS-1D Mark II N, EOS-1Ds Mark II, EOS-1D Mark II, EOS-1Ds, EOS-1D, EOS 5D, EOS 30D or EOS DIGITAL REBEL XTi/400D DIGITAL, it is set automatically to the right end at infinity position. You can then minutely adjust the distance by operating the slider while looking at the screen if the shooting distance is not infinite. O [Shooting distance information] slider is applied to all the correction items with check marks. Correcting Multiple Images at a Time Select multiple images to correct in the main window. Display tool palette by selecting [View] menu [Tool palette]. If you perform correction procedures (p.61) when tool palette is displayed, you can apply the same corrections to all the images selected in the main window. Also, you can apply same corrections by copying the recipe of the corrected image and pasting it onto the multiple images (p.37). Additional information O Some noise appeared in the periphery of an image after correcting [Peripheral illumination] You can reduce the noise by using luminance and/or chromatic noise reduction of the noise reduction function (p.57). However, if you had applied high amount of [Peripheral illumination] correction to the images that have been shot at night or with a high ISO speed, the noise might not be reduced. O The image appears with less resolution after correcting [Distortion] You can make the image similar to the one before correction by applying more sharpness with the sharpness adjusting function (p.29). O The colors of the image became weaker after correcting [Color blur] You can make the image similar to the one before correction by adjusting the color tone (p.27) and/or the color saturation (p.90) to make the color deeper. O The result of [Color blur] correction cannot be detected [Color blur] correction is effective for correcting blue or red color blur which occurs at the edge of the highlighted area of an image. If conditions do not match, correction cannot be made. Introduction Contents at a Glance 1Basic Operation 2Advanced Operation 3Advanced Image Editing and Printing 4 Processing Large Numbers of Images 5Editing JPEG/TIFF Images The periphery of the image may be truncated when [Distortion] correction is made. For a list of the [Lens aberration correction] window functions, refer to p.115. Reference Index 62
-
 1
1 -
2
-
3
-
4
-
5
-
6
-
7
-
8
-
9
-
10
-
11
-
12
-
13
-
14
-
15
-
16
-
17
-
18
-
19
-
20
-
21
-
22
-
23
-
24
-
25
-
26
-
27
-
28
-
29
-
30
-
31
-
32
-
33
-
34
-
35
-
36
-
37
-
38
-
39
-
40
-
41
-
42
-
43
-
44
-
45
-
46
-
47
-
48
-
49
-
50
-
51
-
52
-
53
-
54
-
55
-
56
-
57
-
 58
58 -
 59
59 -
 60
60 -
 61
61 -
 62
62 -
 63
63 -
 64
64 -
 65
65 -
 66
66 -
 67
67 -
 68
68 -
69
-
70
-
71
-
72
-
73
-
74
-
75
-
76
-
77
-
78
-
79
-
80
-
81
-
82
-
83
-
84
-
85
-
86
-
87
-
88
-
89
-
90
-
91
-
92
-
93
-
94
-
95
-
96
-
97
-
98
-
99
-
100
-
101
-
102
-
103
-
104
-
105
-
106
-
107
-
108
-
109
-
110
-
111
-
112
-
113
-
114
-
115
-
116
-
117
-
118
-
119
-
120
-
121
-
122
-
123
-
124
-
125
-
126
 |
 |