Canon Elura 65 DV NETWORK SOLUTION DISK Ver.2 Software Instruction Manual - Page 32
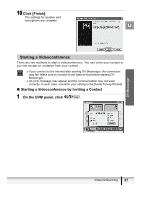
Videoconferencing
 |
UPC - 013803040159
View all Canon Elura 65 manuals
Add to My Manuals
Save this manual to your list of manuals |
Page 32 highlights
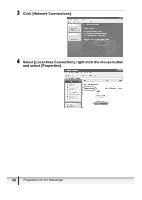
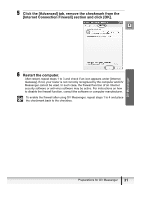
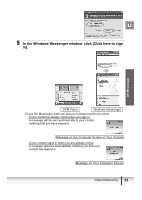
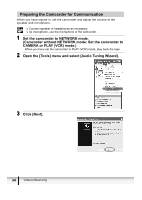
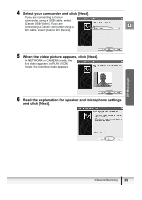
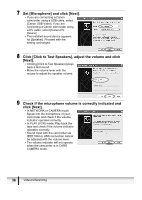
Videoconferencing Starting DV Messenger DV Messenger will not start when you have signed in to Windows Messenger. In such case, sign out of Windows Messenger first and start DV Messenger. Close all programs that are running before starting DV Messenger. Do not access the memory card using programs such as Windows Explorer while DV Messenger is started. Do not update Windows Messenger while DV Messenger is started. Do not connect two or more digital camcorders to the computer. Do not disconnect the interface cable while DV Messenger is started. If an anti-virus software is installed on your computer, the firewall of the software may be active. In such case, you need to deactivate its firewall function. For further details, consult your software or computer manufacturer. If you are using an UPnP-compliant router, you need to install UPnP ( 26) and disable Windows XP's firewall ( 29). 1 Set the camcorder to NETWORK mode. (Camcorder without NETWORK mode: Set the camcorder to CAMERA mode.) 2 Connect the camcorder to the computer ( 23). 3 Connect to the Internet. 4 Double-click the [DV Messenger] icon on the desktop, or select [DV Messenger] from the [start] menu. • The first time you start DV Messenger, it may take time until DV Messenger starts depending on the computer environment. • If the [Internet Sharing Configuration] window appears, click [Yes]. • DV Messenger starts. The DVM panel (DV Messenger panel) and Windows Messenger's sign-in window appears. • With Windows XP Service Pack 2: When the [Windows Security Alert] window appears, confirm that [DV Messenger] appears under [Name], and [Canon Inc.] under [Publisher] and click [Unblock]. 32 Videoconferencing
-
 1
1 -
2
-
3
-
4
-
5
-
6
-
7
-
8
-
9
-
10
-
11
-
12
-
13
-
14
-
15
-
16
-
17
-
18
-
19
-
20
-
21
-
22
-
23
-
24
-
25
-
26
-
 27
27 -
 28
28 -
 29
29 -
 30
30 -
 31
31 -
 32
32 -
 33
33 -
 34
34 -
 35
35 -
 36
36 -
 37
37 -
38
-
39
-
40
-
41
-
42
-
43
-
44
-
45
-
46
-
47
-
48
-
49
-
50
-
51
-
52
-
53
-
54
-
55
-
56
-
57
-
58
-
59
-
60
-
61
-
62
-
63
-
64
-
65
-
66
-
67
-
68
-
69
-
70
-
71
-
72
-
73
-
74
-
75
-
76
-
77
-
78
-
79
-
80
-
81
-
82
-
83
-
84
-
85
-
86
-
87
-
88
-
89
-
90
-
91
-
92
-
93
 |
 |
