Canon FS10 Pixela ImageMixer Software Instruction Manual - Page 5
Software Installation - windows 8 video
 |
UPC - 013803092523
View all Canon FS10 manuals
Add to My Manuals
Save this manual to your list of manuals |
Page 5 highlights
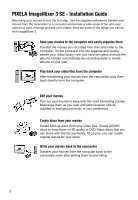
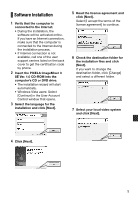
Software Installation 1 Verify that the computer is connected to the Internet. • During the installation, the software will be activated online. If you have an Internet connection, make sure that the computer is connected to the Internet during the installation process. • If Internet connection is not available, call one of the user support centers listed on the back cover to get the certification code by phone. 2 Insert the PIXELA ImageMixer 3 SE Ver. 1.0 CD-ROM into the computer's CD or DVD drive. • The installation wizard will start automatically. • Windows Vista users: Select [Continue] in the User Account Control window that opens. 3 Select the language for the installation and click [Next]. 5 Read the license agreement and click [Next]. Select [I accept the terms of the license agreement] to continue. 6 Check the destination folder for the installation files and click [Next]. If you want to change the destination folder, click [Change] and select a different folder. 7 Select your local video system and click [Next]. 4 Click [Next]. 5
-
 1
1 -
 2
2 -
 3
3 -
 4
4 -
 5
5 -
 6
6 -
 7
7 -
 8
8
 |
 |
