Canon MF5750 imageCLASS MF5700 Series Software Guide
Canon MF5750 - ImageCLASS B/W Laser Manual
 |
UPC - 013803045031
View all Canon MF5750 manuals
Add to My Manuals
Save this manual to your list of manuals |
Canon MF5750 manual content summary:
- Canon MF5750 | imageCLASS MF5700 Series Software Guide - Page 1
imageCLASS MF5700 Series Software Guide - Canon MF5750 | imageCLASS MF5700 Series Software Guide - Page 2
Printing Only for the MF5770 model. \ Basic Guide • Fax Instructions • Troubleshooting \ Facsimile Guide Only for the MF5750/MF5770 models. • Software Installation and Instructions • Printing, Scanning and PC Faxing Instructions • Troubleshooting Software Guide (This Manual) CD-ROM • Remote - Canon MF5750 | imageCLASS MF5700 Series Software Guide - Page 3
Chapter 1 Installation Chapter 2 Printing Chapter 3 Scanning Chapter 4 PC Faxing (MF5750/MF5770 Models Only) Chapter 5 Troubleshooting Chapter 6 Appendix Considerable effort has been made to ensure that this manual is free of inaccuracies and omissions. However, as we are constantly improving our - Canon MF5750 | imageCLASS MF5700 Series Software Guide - Page 4
1-5 Step 1 Install the MF Drivers (USB Connection 1-6 Step 2 Install the MF Toolbox 1-8 Step 3 Connect the USB Cable 1-10 Install Accompanying Applications 1-11 Read User's Manual 1-11 To Use the Machine as a Network Printer (Network Connection) (MF5770 Model Only 1-12 Step 1 Specifying - Canon MF5750 | imageCLASS MF5700 Series Software Guide - Page 5
57 Setting the Machine as a Shared Printer 2-57 Windows 2000/XP/Server 2003 Server Settings 2-57 Windows 98/Me Server Settings 2-61 Using the Shared Printer on Your Network 2-64 Network Download 2-64 Add Printer Wizard (Windows 2000/XP/Server 2003 2-65 Add Printer Wizard (Windows 98/Me 2-66 v - Canon MF5750 | imageCLASS MF5700 Series Software Guide - Page 6
10 Save Scanned Image to 3-12 Link Scanned Images to 3-13 Confirmation of the Scanned Image and Exif Settings (Confirm Scanned Image 3-13 Scanning an Image from an Application 3-15 Creating One Resolution 3-44 Scanning with the WIA Driver (Windows XP Only 3-46 Scanning from the [Scanner - Canon MF5750 | imageCLASS MF5700 Series Software Guide - Page 7
Box 4-13 From the [Printers and Faxes] (Windows 98/Me/2000: [Printers]) Folder . . . 4-14 Opening the Canon MF5700 Series (FAX) Properties Dialog Box 4-14 Opening the Canon MF5700 Series (FAX) Printing Preferences Dialog Box (Windows 2000/XP/Server 2003 Only 4-14 Windows 98/Me Fax Properties - Canon MF5750 | imageCLASS MF5700 Series Software Guide - Page 8
68 Registering an Original Cover Sheet as a Template 4-68 Chapter 5 Troubleshooting Printer Problems 5-1 Driver Problems 5-4 Scanning Problems 5-6 Installing and Uninstalling Problems 5-11 Chapter 6 Appendix Printer Specifications 6-1 Hardware 6-1 Software 6-2 Glossary 6-3 Index 6-13 viii - Canon MF5750 | imageCLASS MF5700 Series Software Guide - Page 9
to Canon imageCLASS MF5700 Series machine. A setting that remains in effect unless you change it. Buttons Used in This Manual A button or an item is referred to in [brackets] as follows in this manual. • A button or an item on the screen ........[OK] • Name of window or dialog box Add Printer - Canon MF5750 | imageCLASS MF5700 Series Software Guide - Page 10
operation screens used in this manual may differ from the ones you actually see depending on the model or options that come with your machine. Abbreviations Used in This Manual In this manual, product names and model names are abbreviated as follows: Microsoft® Windows® 98 operating system is - Canon MF5750 | imageCLASS MF5700 Series Software Guide - Page 11
Notices Trademarks Canon, the Canon Logo and imageCLASS are trademarks of Canon USA, Inc. Microsoft and Windows are either registered manual, Microsoft and Microsoft Windows are referred to as Microsoft and Windows respectively. Copyright Copyright © 2005 by Canon Inc. All rights reserved. No part - Canon MF5750 | imageCLASS MF5700 Series Software Guide - Page 12
the MF5750/MF5770 models. System Requirements The drivers can be installed and used in the following system environments. ■ Operating System Windows 98, Windows Me, Windows 2000, Windows XP, Windows Server 2003*. ■ Computer Any computer on which Windows 98, Windows Me, Windows 2000, Windows XP - Canon MF5750 | imageCLASS MF5700 Series Software Guide - Page 13
® 133 MHz or greater, or compatible micro processors (up to 2 processors are supported) 64 MB of RAM, 128 MB or greater is recommended At least 115 MB, 200 MB or greater is recommended Installation Windows XP* Pentium Family® 300 MHz or greater 64 MB of RAM, 128 MB At least 115 MB, 200 MB or - Canon MF5750 | imageCLASS MF5700 Series Software Guide - Page 14
to Find Help When you encounter a problem during installation of the driver software or while operating your machine, consult the following: 1 ■ In This Manual See Chapter 5, "Troubleshooting." ■ In the Basic Guide See Chapter 9, "Troubleshooting." ■ README. TXT File The hints, limitations - Canon MF5750 | imageCLASS MF5700 Series Software Guide - Page 15
Installing Software on Your Computer 1 This section provides installation procedure of drivers to use the Canon imageCLASS MF5700 Series as a network or a local printer, fax and a local scanner (connected directly to your computer). (Fax function is available for the MF5750/MF5770 models only.) - Canon MF5750 | imageCLASS MF5700 Series Software Guide - Page 16
Series Setup] screen appears. 1 Install the software following steps 1, 2 and 3 in the [Install Drivers] screen. [MF5700 Series Setup] screen If the [MF5700 Series Setup] screen is not displayed, on the Windows desktop, click [start] ➞ [My Computer] (Windows 98/Me/2000: double-click [My Computer - Canon MF5750 | imageCLASS MF5700 Series Software Guide - Page 17
Step 1 Install the MF Drivers (USB Connection) 1 In the [MF5700 Series Setup] screen, click [USB Connection]. 1 2 Click [Install Drivers]. Installation 3 Click [Install MF Drivers]. 1-6 Installing Software on Your Computer - Canon MF5750 | imageCLASS MF5700 Series Software Guide - Page 18
Installation 4 Read the License Agreement ➞ click [Yes]. 1 5 Click [Exit]. NOTE If you are using Windows 98/Me, a message recommending you to restart your computer may appear. In this case, continue installing after restarting your computer. Installing Software on Your Computer 1-7 - Canon MF5750 | imageCLASS MF5700 Series Software Guide - Page 19
Installation Step 2 Install the MF Toolbox 1 In the [Install Drivers] screen, click [Install MF Toolbox]. 1 If you have closed the [Install Drivers] screen, on the Windows desktop, click [start] ➞ [My Computer] (Windows 98/Me/2000: double-click [My Computer]). Open the CD-ROM icon ➞ double-click [ - Canon MF5750 | imageCLASS MF5700 Series Software Guide - Page 20
Installation 3 Click [Continue]. 1 4 Read the License Agreement ➞ click [Yes]. 5 When the [Choose Destination Location] dialog box appears, click [Next >]. Installing Software on Your Computer 1-9 - Canon MF5750 | imageCLASS MF5700 Series Software Guide - Page 21
, the machine is automatically detected as a new hardware. Wait for a while as your computer performs various settings. Depending on your computer, a message may display asking you to restart your computer. After restarting your computer, wait for a while for your computer to continue performing - Canon MF5750 | imageCLASS MF5700 Series Software Guide - Page 22
1 To read the PDF manual on the CD-ROM, click [Read Manuals] on the [MF5700 Series Setup] screen. Installation is now complete. In the [MF5700 Series Setup] screen, click [Exit] to close the screen. Then remove the CD-ROM from the disk drive. Installation Installing Software on Your Computer 1-11 - Canon MF5750 | imageCLASS MF5700 Series Software Guide - Page 23
• For additional network protocol settings, see the Network Guide. • For the values of the network settings, consult your network administrator or internet service provider (ISP). • The machine does not support Network Scanning or PC Faxing. The printer must be connected via USB for scanning and PC - Canon MF5750 | imageCLASS MF5700 Series Software Guide - Page 24
6 Press or to select ➞ press [Set]. DHCP ON 7 Press [Stop/Reset] to return to the standby display. 8 Restart the machine by disconnecting the power cord, and then reconnecting it. ■ To specify an IP address manually (static allocation): 4 Press or to select ➞ press [Set]. IP ADDRESS - Canon MF5750 | imageCLASS MF5700 Series Software Guide - Page 25
numeric keys ➞ press [Set]. Write down the gateway address you entered: , , , DEFAULT GATEWAY 000_.000.000.000 11 Press [Stop/Reset] to return to the standby display. 12 Restart the machine by disconnecting the power cord, and then reconnecting it. 1-14 Installing Software on Your Computer - Canon MF5750 | imageCLASS MF5700 Series Software Guide - Page 26
IP ADDRESS> ➞ press [Set]. NETWORK SETTINGS 2.VIEW IP ADDRESS 3 Press or to select the desired setting ➞ press [Set]. VIEW IP ADDRESS 1.IP ADDRESS 4 Press [Stop/Reset] to return to the standby display. Installing Software on Your Computer 1-15 - Canon MF5750 | imageCLASS MF5700 Series Software Guide - Page 27
Installation Step 4 Install the MF Network Drivers (Network Connection) NOTE For Windows 2000/XP/Server 2003, log on as Administrator to install the software. 1 1 Insert the CD-ROM into your CD-ROM drive. The [MF5700 Series Setup] screen appears. Install the software following steps in the [Install - Canon MF5750 | imageCLASS MF5700 Series Software Guide - Page 28
Installation 4 Click [Next >]. 1 5 [License Agreement] screen appears, then click [Yes]. Installing Software on Your Computer 1-17 - Canon MF5750 | imageCLASS MF5700 Series Software Guide - Page 29
target machine is not listed in the Device List, click [Search by IP Address] and enter the IP address ➞ click [OK]. If you do not know the machine's IP address, see Checking Network Settings on p. 1-15. 7 Select the driver(s) to install ➞ click [Next >]. 1-18 Installing Software on Your Computer - Canon MF5750 | imageCLASS MF5700 Series Software Guide - Page 30
or fax ➞ click [Next >]. 1 9 Select the driver type (Printer and/or Fax) ➞ click [Next >]. 10 Click [Exit]. NOTE When a screen prompting you to restart your computer is appeared instead of the screen above, select [Yes, I want to restart my computer - Canon MF5750 | imageCLASS MF5700 Series Software Guide - Page 31
machine is set as the default printer. 1 Open the [Printers and Faxes] (Windows 98/Me/2000: [Printers]) folder. Click [start] on the Windows task bar ➞ select [Printers and Faxes] (Windows 98/Me/ 2000: [Start] ➞ [Settings] ➞ [Printers]). Make sure the driver icon is displayed. 2 Select the default - Canon MF5750 | imageCLASS MF5700 Series Software Guide - Page 32
Toolbox, click [X] at the top right of the MF Toolbox window. 2 Click [start] on the Windows task bar ➞ [(All) Programs] ➞ [Canon] ➞ [MF Toolbox 4.7] ➞ [Uninstall Toolbox]. 3 Follow the on-screen instructions. When the Repair or Remove program selection screen is displayed, check [Remove] ➞ click - Canon MF5750 | imageCLASS MF5700 Series Software Guide - Page 33
Removing the MF Drivers 1 Click [start] on the Windows task bar ➞ [(All) Programs] ➞ [Canon] ➞ [MF Drivers] ➞ [Uninstall Drivers]. The [MF Drivers Uninstaller] dialog box appears. 1 2 Select the corresponding printer ➞ click [Perform]. Installation The confirmation message dialog box appears. 3 - Canon MF5750 | imageCLASS MF5700 Series Software Guide - Page 34
Installation Reinstalling the Software On the Windows desktop, click [start] ➞ [My Computer] (Windows 98/Me/2000: double-click [My Computer]). Open the CD-ROM icon ➞ double-click [Setup(Setup.exe)]. The MF Setup screen appears. Go back to the "Step 1 Install the MF Drivers (USB Connection)," on P. - Canon MF5750 | imageCLASS MF5700 Series Software Guide - Page 35
from a Windows application. If you want to change print settings, you can access the properties dialog box of the printer driver. Printing a Document 1 Load paper in the cassette or the multi-purpose feeder. For details on loading paper, see Chapter 2, "Paper Handling," in the Basic Guide. 2 Open - Canon MF5750 | imageCLASS MF5700 Series Software Guide - Page 36
2 Printing 4 From the [Select Printer] list box or the [Name] pull-down list in the [Print] dialog box, select the printer to be used. 5 Click [ printer to be used in the [General] tab sheet in the [Print] dialog box, then specify the print settings in the corresponding tab sheet (only for Windows - Canon MF5750 | imageCLASS MF5700 Series Software Guide - Page 37
Canceling Printing 1 Open the [Printers and Faxes] (Windows 98/Me/2000: [Printers]) folder. Click [start] on the Windows task bar ➞ select [Printers and Faxes] (Windows 98/Me/ 2000: [Start] ➞ [Settings] ➞ [Printers]). 2 Double-click the corresponding printer driver icon. 2 3 Right click the print - Canon MF5750 | imageCLASS MF5700 Series Software Guide - Page 38
up the printer configuration and configure the print settings for all Windows applications. The printing preferences dialog box enables you to specify the default settings for the printing options available when you print with the Canon imageCLASS MF5700 Series (only for Windows 2000/XP/Server 2003 - Canon MF5750 | imageCLASS MF5700 Series Software Guide - Page 39
printer driver icon and selecting [Properties] from the pop-up menu. The [Canon MF5700 Series Properties] dialog box appears. Opening the Printing Preferences Dialog Box (Windows 2000/XP/ Server 2003) 1 Open the [Printers and Faxes] (Windows 2000: [Printers]) folder. Click [start] on the Windows - Canon MF5750 | imageCLASS MF5700 Series Software Guide - Page 40
when you open [Canon MF5700 Series Properties] from the [Printers] folder. 2 • The number of tabs displayed in the properties dialog box depends on how you have your system set up. Printing General Tab Lets you print a test page or define separator pages. Refer to your Windows operating system - Canon MF5750 | imageCLASS MF5700 Series Software Guide - Page 41
Printing Details Tab Specifies the printer port and time-out settings. Refer to your Windows operating system documentation for more information. 2 ■ Spool Settings The installer sets the following defaults. Windows 98/Me Properties 2-7 - Canon MF5750 | imageCLASS MF5700 Series Software Guide - Page 42
Sharing Tab Specifies the printer sharing settings. This tab sheet is available only when the printer sharing is enabled (see p. 2-60). Refer to your Windows operating system documentation for more information. 2 Printing 2-8 Windows 98/Me Properties - Canon MF5750 | imageCLASS MF5700 Series Software Guide - Page 43
other than [Match Paper Size], the original page size is automatically reduced or enlarged to fit the selected output paper size when printed. NOTE Up to 50 sizes can be defined for [Custom Paper Size] with the [Custom Paper Size Settings] option (see p. 2-13). Windows 98/Me Properties 2-9 - Canon MF5750 | imageCLASS MF5700 Series Software Guide - Page 44
software, select 100% on printer setup. [Page Order] Selects the order in which original pages are placed on each sheet of the output paper when more than one page is printed per sheet. [Paper Type] Specifies the type of paper to be used as follow. - Plain Paper (64~90 g/m2) - Plain Paper - Canon MF5750 | imageCLASS MF5700 Series Software Guide - Page 45
only when you open the [Canon MF5700 Series Printing Preferences] dialog box from the [Printers] folder. [Layout Options...]Opens the [Layout Options] dialog box (see p. 2-14). NOTE This option is disabled when [Page Layout] is set to [Poster]. [Restore Defaults] Resets all the current settings to - Canon MF5750 | imageCLASS MF5700 Series Software Guide - Page 46
Setup] tab sheet (see p. 2-9). 2 Printing [Watermark List] Displays the names of registered watermarks. The preview image in the upper left part of the dialog box displays the selected watermark with the and +50), or use the X and Y slide bars to move the position. 2-12 Windows 98/Me Properties - Canon MF5750 | imageCLASS MF5700 Series Software Guide - Page 47
register new custom paper sizes to the [Paper List] box. You can specify the name, width, and height of each size. Up to 50 custom paper sizes can be defined. NOTE • This setting is not available when the [Canon MF5700 Series Properties] dialog box is opened from a Windows application. • Use the - Canon MF5750 | imageCLASS MF5700 Series Software Guide - Page 48
Paper List] Displays the paper sizes actually available. Selects a paper size from which you can create a custom paper size. NOTE You can share the custom paper sizes with all printers connected to your computer. Up to 50 sizes can be defined for [Custom Paper Size]. [Name of Custom Paper 2-10). - Canon MF5750 | imageCLASS MF5700 Series Software Guide - Page 49
page or not. Six positions to print the page number are available. [Restore Defaults] Resets all the current settings to their default values. Finishing Tab Specifies the finishing settings for the ], the image on the left bottom of the preview image will change. Windows 98/Me Properties 2-15 - Canon MF5750 | imageCLASS MF5700 Series Software Guide - Page 50
box allows you to view and confirm all of the current page settings in a listed form (see p. 2-26). ■ Gutter Settings 2 Clicking [Gutter...] in the Super Smoothing function of the printer. [Restore Defaults] Resets all the current settings to their default values. 2-16 Windows 98/Me Properties - Canon MF5750 | imageCLASS MF5700 Series Software Guide - Page 51
see p. 2-19). NOTE This option is enabled only when [Manual Grayscale Settings] is selected. [View Settings] Click this button listed form (see p. 2-26). [About] Displays the version information on the driver. [Restore Defaults] Resets all the current settings to their default values. Windows - Canon MF5750 | imageCLASS MF5700 Series Software Guide - Page 52
a software application. [Toner Save] Modifies print data to print lighter and conserve toner. Printer Default: Prints using the settings in the operation panel of the printer. Off: Prints using normal density. On: Prints text lighter in printouts for proofreading and checking. 2-18 Windows 98 - Canon MF5750 | imageCLASS MF5700 Series Software Guide - Page 53
to control the brightness and contrast of images. This function is enabled only when [Manual Grayscale Setting] is selected in the [Quality] tab sheet (see p. 2-17). range between -5 and 5. [Restore Defaults] Resets all the current settings to their default values. Windows 98/Me Properties 2-19 - Canon MF5750 | imageCLASS MF5700 Series Software Guide - Page 54
can specify the procedure for Color correction. Driver Matching Mode: Processes Color in the printer driver. The settings specified in Matching Method in matching. NOTE This option can be selected only when Driver Matching Mode is selected for Matching Mode. [Monitor Profile] Specifies the - Canon MF5750 | imageCLASS MF5700 Series Software Guide - Page 55
In the case where several gamma values are provided for one option, to obtain better results select the higher gamma value , the darker the printout is. 1.0 1.4 Default value 1.8 2.2 [Restore Defaults] Resets all the current settings to their default values. Printing Windows 98/Me Properties 2-21 - Canon MF5750 | imageCLASS MF5700 Series Software Guide - Page 56
] Preview image Stores various printer driver settings, each suitable for certain print jobs, as pre-defined Profiles. Selecting Profiles from the drop-down list enables the printer to perform a variety of of the preview image of the page changes the binding location. 2-22 Windows 98/Me Properties - Canon MF5750 | imageCLASS MF5700 Series Software Guide - Page 57
print job. [Edit and Preview] Saves the data in the [Canon PageComposer] dialog box. If you open [Canon MF5700 Series Properties] from the [Printers] folder and select the [Edit and Preview] mode, (Lock all of the current page settings in a listed form (see p. 2-26). Windows 98/Me Properties 2-23 - Canon MF5750 | imageCLASS MF5700 Series Software Guide - Page 58
this button to display the [View Settings] dialog box. This dialog box allows you to view and confirm all of the current page settings in a listed form (see p. 2-26). ■ Edit Profile Clicking (Edit Profile) opens the [Edit Profile] dialog box. This dialog box enables you to edit the profile selected - Canon MF5750 | imageCLASS MF5700 Series Software Guide - Page 59
List] one position up. (Move Down) Moves the profile selected in the [Profile List] one position down. [Delete] Removes the selected profile from [Profile List]. [Name] NOTE When one selected profile. NOTE When one of the pre-defined profiles [Export...] NOTE When one of the pre-defined - Canon MF5750 | imageCLASS MF5700 Series Software Guide - Page 60
NOTE When one of the pre-defined profiles is selected, this button is disabled. [Apply Settings from Application] Applies the selected profile Setup], [Finishing] and [Quality] tab sheets. Printing [Copy] Copies the contents of the current settings to the clipboard. 2-26 Windows 98/Me Properties - Canon MF5750 | imageCLASS MF5700 Series Software Guide - Page 61
Printing Windows 2000/XP/Server 2003 Properties and Printing Preferences The printer driver for Windows 2000/XP/Server 2003 has the following two main dialog boxes: ■ The Properties Dialog Box 2 This dialog box enables you to set up the printer configuration and configure the print settings - Canon MF5750 | imageCLASS MF5700 Series Software Guide - Page 62
Printing General Tab Lets you print a test page and define printing preferences. Refer to your Windows operating system documentation for more information. 2 2-28 Windows 2000/XP/Server 2003 Properties and Printing Preferences - Canon MF5750 | imageCLASS MF5700 Series Software Guide - Page 63
Printing Sharing Tab Specifies the printer sharing settings. This tab sheet is available only when the printer sharing is enabled (see p. 2-60). Refer to your Windows operating system documentation for more information. 2 Windows 2000/XP/Server 2003 Properties and Printing Preferences 2-29 - Canon MF5750 | imageCLASS MF5700 Series Software Guide - Page 64
Printing Ports Tab Specifies the port to which the printer is attached. Refer to your Windows operating system documentation for more information. 2 2-30 Windows 2000/XP/Server 2003 Properties and Printing Preferences - Canon MF5750 | imageCLASS MF5700 Series Software Guide - Page 65
spooling. Refer to your Windows operating system documentation for more information. 2 NOTE [Spool print documents so program finishes printing faster] and [Start printing immediately] are set automatically when you install the printer driver. Windows 2000/XP/Server 2003 Properties and Printing - Canon MF5750 | imageCLASS MF5700 Series Software Guide - Page 66
Printing Color Management Tab Associates color profiles with your color printer. Refer to your Windows operating system documentation for more information. 2 2-32 Windows 2000/XP/Server 2003 Properties and Printing Preferences - Canon MF5750 | imageCLASS MF5700 Series Software Guide - Page 67
Printing Security Tab Specifies security settings. Refer to your operating system documentation for more information. 2 Windows 2000/XP/Server 2003 Properties and Printing Preferences 2-33 - Canon MF5750 | imageCLASS MF5700 Series Software Guide - Page 68
] dialog box which enables you to edit the registered profiles (see p. 2-36). NOTE When one of the pre-defined profile ([Default Settings], [2 on 1] or [Confidential]) is selected in [Profile List], this button is disabled. 2-34 Windows 2000/XP/Server 2003 Properties and Printing Preferences - Canon MF5750 | imageCLASS MF5700 Series Software Guide - Page 69
[Delete] Removes the selected profile from [Profile List]. [Import...] [Export...] NOTE When one of the pre-defined profiles is selected, this button is Selection] is cleared, [Allow Setting Edition] is disabled. Printing Windows 2000/XP/Server 2003 Properties and Printing Preferences 2-35 - Canon MF5750 | imageCLASS MF5700 Series Software Guide - Page 70
selected in the [Profile] tab sheet. [Comment] NOTE When one of the pre-defined profiles is selected, the name cannot be one of the pre-defined profiles is selected, the name cannot be changed. [Restore Defaults] Resets all the current settings to their default values. 2-36 Windows 2000/XP - Canon MF5750 | imageCLASS MF5700 Series Software Guide - Page 71
Specifies the page settings including the paper size, scaling, number of copies, and contrast (see p. 2-47). Printing Preferences The [Canon MF5700 Series Printing Preferences] dialog box contains three tab are from Windows XP. Windows 2000/XP/Server 2003 Properties and Printing Preferences 2-37 - Canon MF5750 | imageCLASS MF5700 Series Software Guide - Page 72
is automatically reduced or enlarged to fit the selected output paper size when printed. Specifies the number of copies to be printed (1 to 99). Selects the direction of printing relative to the paper ([Portrait] or [Landscape]). 2-38 Windows 2000/XP/Server 2003 Properties and Printing Preferences - Canon MF5750 | imageCLASS MF5700 Series Software Guide - Page 73
application software, select 100% on printer setup. [Page Order] Selects the order in which original pages are placed on each sheet of the output paper when more than one page is disabled when [Page Layout] is set to [Poster]. Windows 2000/XP/Server 2003 Properties and Printing Preferences 2-39 - Canon MF5750 | imageCLASS MF5700 Series Software Guide - Page 74
2-42). NOTE You can specify the dimensions for a paper size only in the Printer Properties dialog box (Windows - [start] - [Printers and Faxes]). You cannot specify the dimensions from the Document Properties dialog box (software application). [Layout Options...]Click this button to select options - Canon MF5750 | imageCLASS MF5700 Series Software Guide - Page 75
(see p. 2-38). 2 Printing [Watermark List] Displays the names of registered watermarks. The preview image in the upper left part of the dialog box displays the selected watermark with edit box (in a range between -180 and 180). Windows 2000/XP/Server 2003 Properties and Printing Preferences 2-41 - Canon MF5750 | imageCLASS MF5700 Series Software Guide - Page 76
from the [Printers and Faxes] (Windows 98/Me/2000: [Printers]) folder. • Use the multi-purpose feeder when printing on custom-sized paper. [Paper List] Displays the paper sizes actually available. Selects a paper size from which you can create a custom paper size. 2-42 Windows 2000/XP/Server 2003 - Canon MF5750 | imageCLASS MF5700 Series Software Guide - Page 77
to log on as a member of Administrators (Windows 2000/XP/Server 2003) or Power User (Windows 2000 only). To change the paper size for the existing custom paper size, be sure to log on as a member of Administrators. Removes the selected custom paper from [Paper List]. NOTE • You cannot delete a pre - Canon MF5750 | imageCLASS MF5700 Series Software Guide - Page 78
Page Number] Selects if the page number is printed on each page or not. Six positions to print the page number are available. [Restore Defaults] Resets all the current settings to their default values. 2-44 Windows 2000/XP/Server 2003 Properties and Printing Preferences - Canon MF5750 | imageCLASS MF5700 Series Software Guide - Page 79
). [Restore Defaults] Resets all the current settings to their default values. [View Settings] Click this button to display the [View Settings] dialog box. This dialog box allows you to view and confirm all of the current page settings in a listed form (see p. 2-56). Windows 2000/XP/Server 2003 - Canon MF5750 | imageCLASS MF5700 Series Software Guide - Page 80
...] in the [Finishing] tab sheet opens the [Advanced Settings] dialog box. [Image Refinement] Sets the Super Smoothing function of the printer. [Restore Defaults] Resets all the current settings to their default values. 2-46 Windows 2000/XP/Server 2003 Properties and Printing Preferences - Canon MF5750 | imageCLASS MF5700 Series Software Guide - Page 81
Settings check box to manually adjust the grayscale settings. The [Grayscale Settings] dialog box allows you to specify Brightness, Contrast, and Matching (see p. 2-49). NOTE This option is enabled only when [Manual Grayscale Settings] is selected. Windows 2000/XP/Server 2003 Properties and - Canon MF5750 | imageCLASS MF5700 Series Software Guide - Page 82
the current page settings in a listed form (see p. 2-56). [About] Displays the version information on the driver. [Restore Defaults] Resets all the current settings to their files and photographs using a software application. 2-48 Windows 2000/XP/Server 2003 Properties and Printing Preferences - Canon MF5750 | imageCLASS MF5700 Series Software Guide - Page 83
and conserve toner. Printer Default: Prints using the settings in the operation panel of the printer. Off and contrast of images. This function is enabled only when [Manual Grayscale Settings] is selected in the [Quality] tab sheet Windows 2000/XP/Server 2003 Properties and Printing Preferences 2-49 - Canon MF5750 | imageCLASS MF5700 Series Software Guide - Page 84
Resets all the current settings to their default values. ● Matching Tab 2 Printing [Matching Mode] Specifies the procedure for color correction. Driver Matching Mode: Processes color in the printer driver vividness in matching. 2-50 Windows 2000/XP/Server 2003 Properties and Printing Preferences - Canon MF5750 | imageCLASS MF5700 Series Software Guide - Page 85
when the Driver Matching Mode is selected in the Matching Mode box. NOTE In the case where several gamma values are provided for one option, value 1.8 2.2 [Restore Defaults] Resets all the current settings to their default values. Windows 2000/XP/Server 2003 Properties and Printing Preferences - Canon MF5750 | imageCLASS MF5700 Series Software Guide - Page 86
image Stores various printer driver settings, each suitable for certain print jobs, as pre-defined Profiles. Selecting Profiles from the drop-down list enables the printer to perform a of the page changes the binding location. 2-52 Windows 2000/XP/Server 2003 Properties and Printing Preferences - Canon MF5750 | imageCLASS MF5700 Series Software Guide - Page 87
Saves the data in the [Canon PageComposer] dialog box. If you open [Canon MF5700 Series Properties] from the [Printers and Faxes] (Windows 2000: [Printers]) folder and select the [Edit page settings in a listed form (see p. 2-56). Windows 2000/XP/Server 2003 Properties and Printing Preferences 2-53 - Canon MF5750 | imageCLASS MF5700 Series Software Guide - Page 88
this button to display the [View Settings] dialog box. This dialog box allows you to view and confirm all of the current page settings in a listed form (see p. 2-56). ■ Edit Profile Clicking (Edit Profile) opens the [Edit Profile] dialog box. This dialog box enables you to edit the profile selected - Canon MF5750 | imageCLASS MF5700 Series Software Guide - Page 89
Down) Moves the profile selected in the [Profile List] one position down. [Delete] Removes the selected profile from [Profile List]. NOTE When one of the pre-defined profiles or the profiles you defined in the [Profile] 2 tab of the printer properties dialog box is selected, you cannot delete - Canon MF5750 | imageCLASS MF5700 Series Software Guide - Page 90
the current settings in the [Page Setup], [Finishing] and [Quality] tab sheets. 2 Printing [Copy] Copies the contents of the current settings to the clipboard. 2-56 Windows 2000/XP/Server 2003 Properties and Printing Preferences - Canon MF5750 | imageCLASS MF5700 Series Software Guide - Page 91
started. If the server is running on Windows 2000/XP/Server 2003, you can print even if no one is logged into the server. For more information, see the Network Guide. Setting the Machine as a Shared Printer If you plan to share your Canon imageCLASS MF5700 Series machine on a network, install the - Canon MF5750 | imageCLASS MF5700 Series Software Guide - Page 92
[Local Area Connection Properties] dialog box appears. 4 Select [File and Printer Sharing for Microsoft Networks] ➞ click [OK]. 2 The server service is added. ■ Adding Server Service (Windows 2000) 1 Click [Start] on the Windows task bar ➞ select [Settings] ➞ [Network and Dial-up Connections]. The - Canon MF5750 | imageCLASS MF5700 Series Software Guide - Page 93
Printing 3 Select [File and Printer Sharing for Microsoft Networks] ➞ click [OK]. 2 The server service is added. Using the Machine on Your Network 2-59 - Canon MF5750 | imageCLASS MF5700 Series Software Guide - Page 94
Printer Sharing 1 Open the printer properties dialog box ➞ select [Share this printer] (Windows 2000: [Shared as]) in the [Sharing] tab sheet. 2 NOTE On how to open the printer name] edit box. 3 Click [OK]. The printer driver icon changes to indicate sharing. 2-60 Using the Machine on Your Network - Canon MF5750 | imageCLASS MF5700 Series Software Guide - Page 95
is the procedure to make your machine available to your network users, under Windows 98/Me. The screen shots shown are from Windows 98. ■ Adding Server Service 1 Click [Start] on the Windows task bar ➞ select [Settings] ➞ [Control Panel]. 2 The [Control Panel] folder appears. 2 Double-click - Canon MF5750 | imageCLASS MF5700 Series Software Guide - Page 96
Printing 4 Select [Service] ➞ click [Add...]. 2 The [Select Network Service] dialog box appears. 5 Select [File and printer sharing for Microsoft Networks] ➞ click [OK]. 2-62 Using the Machine on Your Network - Canon MF5750 | imageCLASS MF5700 Series Software Guide - Page 97
Printing 6 Click [File and Print Sharing...]. 2 The [File and Print Sharing] dialog box appears. 7 Select [I want to be able to allow others to print to my printer(s).] ➞ click [OK]. Using the Machine on Your Network 2-63 - Canon MF5750 | imageCLASS MF5700 Series Software Guide - Page 98
. In that case, use [Add Printer Wizard]. Network Download The following is the procedure to connect to the shared printer on your network using network download. NOTE Windows 2000/XP/Server 2003 clients cannot download the driver from Windows 98/Me servers. 2-64 Using the Machine on Your Network - Canon MF5750 | imageCLASS MF5700 Series Software Guide - Page 99
icon, or drag the machine icon to your [Printers and Faxes] (Windows 98/Me/2000: [Printers]) folder. The [Add Printer Wizard] dialog box appears. 2 3 Follow the instructions on the screen to complete the installation. Add Printer Wizard (Windows 2000/XP/Server 2003) The following is the procedure to - Canon MF5750 | imageCLASS MF5700 Series Software Guide - Page 100
means the client cannot connect to the shared printer. • If a suitable driver is not found, it probably means the server is a Windows 98/Me computer. Printing 6 Follow the instructions on the screen to complete the installation. Add Printer Wizard (Windows 98/Me) The following is the procedure to - Canon MF5750 | imageCLASS MF5700 Series Software Guide - Page 101
out automatically. In this case you need not perform steps 7 through 10 below. 6 Click [Next >]. 2 7 Click [Have Disk...]. Printing The [Install From Disk] dialog box appears. 8 Select the location containing the printer driver. ● To specify in the default location: ❑ Go to step 9. ● To change - Canon MF5750 | imageCLASS MF5700 Series Software Guide - Page 102
containing the printer driver ➞ click [OK]. You can also enter the path name directly in the edit box. 9 Click [OK]. 10 Enter the name of the printer you want to install the printer but you will not be able to use the printer until it comes back online. Printing 11 Follow the instructions on the - Canon MF5750 | imageCLASS MF5700 Series Software Guide - Page 103
you use the ADF, the scanned image might not be clear. • Your machine must be connected via USB and the USB printer driver loaded to scan. This machine does not support network scanning. Scanning with [Start] on the Machine By pressing [SCAN] ➞ [Start] on the operation panel of the machine, you can - Canon MF5750 | imageCLASS MF5700 Series Software Guide - Page 104
2 Press [SCAN] ➞ [Start] on the machine. If you are asked to select a program to launch, select "MF Toolbox Ver4.7." Scanning starts. The MF Toolbox and the [Save] dialog box will open, but the document will be scanned without pressing [Start] in the [Save] dialog box. The scanned document will be - Canon MF5750 | imageCLASS MF5700 Series Software Guide - Page 105
. Setting Up [Start] to Operate in a Different Way from [Save] 3 1 On the Windows desktop, double-click [Canon MF Toolbox 4.7]. Alternatively, on the Windows desktop, click [start] ➞ [(All) Programs] ➞ [Canon] ➞ [MF Toolbox 4.7] ➞ [Toolbox 4.7]. The MF Toolbox will open. 2 Drag the mark over - Canon MF5750 | imageCLASS MF5700 Series Software Guide - Page 106
Setting Up [Start] in the [Settings] Dialog Box In the MF Toolbox, click [Settings]. In the [Settings] dialog box, from the pull-down list for [Start], select the button you want to link [Start] to, then click [OK]. 3 You can also set up [Start], in the [Scanners and Cameras] - Canon MF5750 | imageCLASS MF5700 Series Software Guide - Page 107
Properties] dialog box). Click [start] on the Windows task bar, select [Control Panel] ➞ [Scanners and Cameras] (Windows 98/Me/2000: [Settings] ➞ [Control Panel] ➞ double-click the [Scanners and Cameras] icon). 2 Click the corresponding scanner driver name or icon. 3 3 From the [File] menu - Canon MF5750 | imageCLASS MF5700 Series Software Guide - Page 108
action for [Start]. ● On Windows XP: ❑ Select the [Events] tab ➞ select [Canon MF5730 Scan Button] , [Canon MF5750 Scan Button] or [Canon MF5770 Scan Button] in the [Select an event] pull-down list ➞ select the operation for [Start] in [Actions] ➞ click [OK]. 3 ● On Windows 98/2000/Me: ❑ Select the - Canon MF5750 | imageCLASS MF5700 Series Software Guide - Page 109
Alternatively, on the Windows desktop, click [start] ➞ [(All) Programs] ➞ [Canon] ➞ [MF Toolbox 4.7] ➞ [Toolbox 4.7]. The MF Toolbox will open. [MF Toolbox] buttons 3 Click one of the scanning buttons below. [Mail] The document will be scanned and attached to an e-mail message in your e-mail - Canon MF5750 | imageCLASS MF5700 Series Software Guide - Page 110
dialog box 4 Adjust the settings. For details, see "MF Toolbox Settings," on p. 3-10. If you clicked a button other than [Mail], [Save] or [PDF] and no Start]. 5 Click [Start]. If you checked the [Use the Scanner Driver to Make Advanced Settings] checkbox in step 4, the [ScanGear MF] dialog box - Canon MF5750 | imageCLASS MF5700 Series Software Guide - Page 111
e-mail message or perform OCR conversion. (The scanned image will not be displayed if you have not installed the applications on the imageCLASS MF5700 ScanSoft OmniPage [PDF]Presto! PageManager NOTE If white lines appear on one edge of the scanned image, check that the document is correctly placed - Canon MF5750 | imageCLASS MF5700 Series Software Guide - Page 112
, the document in the ADF is automatically scanned. If there is no document in the ADF, the document on the platen glass will be scanned. 3-10 MF Toolbox Settings - Canon MF5750 | imageCLASS MF5700 Series Software Guide - Page 113
black and white image for OCR software. (OCR)] [Grayscale] Scans value, select [Custom] to display the [Paper Size Settings] dialog box. Select the [Unit the value set.) For an ordinary mail message, a file size of [150 KB] File]. ■ [Use the Scanner Driver to Make Advanced Settings] If you - Canon MF5750 | imageCLASS MF5700 Series Software Guide - Page 114
[PDF Settings]. For details on [PDF Settings] dialog box, see "Creating One PDF File from Two or more Pages," on p. 3-16. The type of [Save as Type], depending on the output settings in the Advanced Mode, an error message may appear indicating that the image size is too large. In such cases, reduce - Canon MF5750 | imageCLASS MF5700 Series Software Guide - Page 115
the file manually. 3 The software is compatible with the e-mail software such as [PDF]. The available file types are the same as those listed in [Save as Type] of the [Save Scanned Image make advanced settings with the [PDF Settings] (see "Creating One PDF File from Two or more Pages," on p. 3-16 - Canon MF5750 | imageCLASS MF5700 Series Software Guide - Page 116
to] settings. When scanning with the [Mail] button and [None (Attach Manually)] is selected for [Link Scanned Images to], pressing [Forward] opens the folder to the JPEG files. Select a scanned image from the pull-down list to view and add information for the image. Scanning [Basic information - Canon MF5750 | imageCLASS MF5700 Series Software Guide - Page 117
to be used. With Windows XP, you can use the ScanGear MF or the WIA driver as the scanner driver. To use ScanGear MF, select [Canon MF5730], [Canon MF5750] or [Canon MF5770]. To use the WIA driver, select [WIA Canon MF5730], [WIA Canon MF5750] or [WIA Canon MF5770]. 5 Specify the scanner settings - Canon MF5750 | imageCLASS MF5700 Series Software Guide - Page 118
pages and make them into one PDF file. 1 Place the document face-down on the platen glass or load it face-up in the ADF. 3 2 On the Windows desktop, double-click [Canon MF Toolbox 4.7]. Alternatively, on the Windows desktop, click [start] ➞ [(All) Programs] ➞ [Canon] ➞ [MF Toolbox 4.7] ➞ [Toolbox - Canon MF5750 | imageCLASS MF5700 Series Software Guide - Page 119
The [ScanGear MF] dialog box will open if you selected [Use the Scanner Driver to 3 Make Advanced Settings] in step 3. Adjust your settings, then click MF," on p. 3-19. Scanning starts. NOTE If white lines appear on one edge of the scanned image, check that the document is correctly placed on the - Canon MF5750 | imageCLASS MF5700 Series Software Guide - Page 120
making a Multiple PDF with color documents ([Image Quality] set to [300 dpi]), it is recommended that the PDF have fewer than 20 pages. 3-18 Creating One PDF File from Two or more Pages - Canon MF5750 | imageCLASS MF5700 Series Software Guide - Page 121
ScanGear MF, you can review with the preview image a document, you can either check the [Use the Scanner Driver to Make Advanced Settings] checkbox in the MF Toolbox before 3 NOTE If you are scanning from an application in Windows XP, select ScanGear MF in the application before scanning. For - Canon MF5750 | imageCLASS MF5700 Series Software Guide - Page 122
Using Simple Mode 3 Scanning 1 Place the document face-down on the platen glass or load it face-up in the ADF. 2 In [Select Document Type], select the document type. [Photo (Color)] To scan color photos (300dpi). [Magazine (Color)]To scan color magazines (150dpi, with the Descreen function). - Canon MF5750 | imageCLASS MF5700 Series Software Guide - Page 123
[Preview]. A preview of the document will be scanned and appear in the preview window. 4 Select the destination of the scanned image. You can select from [Print 6 Click [Scan]. Scanning starts. NOTE If white lines appear on one edge of the scanned image, check that the document is correctly placed - Canon MF5750 | imageCLASS MF5700 Series Software Guide - Page 124
]. Deletes the selected output size from the [Output Size List]. Simple Mode Toolbar With the Simple Mode Toolbar, you can make adjustments to the preview image 3 and also select a part of the image displayed. Scanning This button is disabled for this model. (Auto Crop) Crops the image border - Canon MF5750 | imageCLASS MF5700 Series Software Guide - Page 125
3-26. 3 Click [Preview]. NOTE • Selecting the range in the preview window and clicking [Zoom] reloads the selected image to enlarge it. When enlarged when asked to confirm, click [OK]. 4 If you want to scan only part of the document, specify the parameters. For details, see "Advanced Mode - - Canon MF5750 | imageCLASS MF5700 Series Software Guide - Page 126
If white lines appear on one edge of the scanned click . Then drag the image across the screen until the part you want to see is displayed. You can move the image edges of the preview to make accurate measurements. (Information) Lists the scanning information. ■ To Detach and Move the Toolbar - Canon MF5750 | imageCLASS MF5700 Series Software Guide - Page 127
of a Scan You can specify the parameters of a scan by selecting a part of the image. When you scan again, only the part of the image you have specified is scanned. You can specify the parameters of a scan with one of the following methods. To Select the Parameters of a Scan Automatically After - Canon MF5750 | imageCLASS MF5700 Series Software Guide - Page 128
preview area size (height-to-width ratio) will change to the paper size you selected. Change this setting to set up the machine large size. You can specify the parameters after previewing. If you change [Paper Size] setting after previewing, the preview image will be deleted. NOTE If you selected - Canon MF5750 | imageCLASS MF5700 Series Software Guide - Page 129
photos and other documents to monochrome printer. The image is displayed in black bit) of R(ed), G(reen) and B(lue). [Text Enhanced] Select this mode to scan texts crisply, particularly to process it with OCR software 2400 dpi (in 1 dpi increments), or enter one of the values 4800, 7200 or 9600 dpi. - Canon MF5750 | imageCLASS MF5700 Series Software Guide - Page 130
■ [Output Size] For setting the print size (output size) of the scanning parameters you have specified. Specify by entering a value in either (Width), (Height) or [%] (Scale), or click a [%] (Scale) value. After adjusting the settings, either click on another area or press the Enter key, and the - Canon MF5750 | imageCLASS MF5700 Series Software Guide - Page 131
Scanning ■ [Unsharp Mask] Set to [ON] to emphasize and make sharper the outline of an image. This setting is selected by default. It is effective for scanning photos etc., which have a soft focus. IMPORTANT You cannot set [Unsharp Mask] to [ON] if [Black and White] or [Text Enhanced] is selected in - Canon MF5750 | imageCLASS MF5700 Series Software Guide - Page 132
Normally this setting is recommended. Reduces large dust and scratch marks but evidence of the reduction process may remain and may also remove delicate parts of the image. 3 IMPORTANT Scanning • You cannot set [Descreen] to [ON] if [Black and White] or [Text Enhanced] is selected in [Color Mode - Canon MF5750 | imageCLASS MF5700 Series Software Guide - Page 133
setting is recommended. Corrects highly faded images, but it may change the tone of the image. NOTE 3 • This setting is not available when [Canon ColorGear] is selected in the [Color Settings] tab in the [Preferences] dialog box. • This setting is reflected also in the preview image. • This - Canon MF5750 | imageCLASS MF5700 Series Software Guide - Page 134
Color Settings buttons will be displayed when [Text Enhanced] mode or [Canon ColorGear] is selected. When you use the Color Settings buttons, when [Black and White] is selected in [Color Mode] (Save) (Load) [Reset] Saves settings to a color adjustment file. You can save the color settings for use - Canon MF5750 | imageCLASS MF5700 Series Software Guide - Page 135
if [Color] or [Grayscale] is selected in [Color Mode]. To adjust the brightness and contrast diagrammatically, press . 3 Scanning [Channel] [Brightness] [Contrast] [Reset] Adjust the elements of grayscale when [Color Mode] is set to [Grayscale]. Selects a color to adjust either [Red], [Green], or - Canon MF5750 | imageCLASS MF5700 Series Software Guide - Page 136
■ [Gamma] By clicking , you can access the [Gamma] dialog box. The gamma allows you to adjust the brightness of the image viewed on the computer monitor to the brightness of the original document. The default is 2.2. You will have to change this value if you are using a monitor with a different - Canon MF5750 | imageCLASS MF5700 Series Software Guide - Page 137
range (midtones) of the image. You can also enter values (0.10 to 10.00). Resets all the current settings to their default values. ■ [Histogram] By -level), mid-point (midtone-level), or white-point (highlight-level), do one of the following. ❑ Click (Black-point eyedropper tool) then click a - Canon MF5750 | imageCLASS MF5700 Series Software Guide - Page 138
click a point in the preview image to specify the highlighted point. You can also enter a value (10 to 255). ❑ Drag the triangles at the bottom of the histogram to an appropriate level. Areas on the left of (parts darker than the value specified in [Black-point]) will turn black. The area at - Canon MF5750 | imageCLASS MF5700 Series Software Guide - Page 139
of tone input and output. The tone curve is active if [Color] or [Grayscale] is selected in [Color Mode]. 3 [Channel] [Select Tone Curve] [Reset] Adjust the elements of grayscale when [Color Mode] is set to [Grayscale]. Selects a color to adjust either [Red], [Green], or [Blue], or select [Master - Canon MF5750 | imageCLASS MF5700 Series Software Guide - Page 140
Scanning ■ [Final Review] By clicking , you can access the [Final Review] dialog box. In this dialog box, you can confirm the color settings you have made. 3 3-38 Setting Preferences and Scanning with ScanGear MF - Canon MF5750 | imageCLASS MF5700 Series Software Guide - Page 141
of black and white images is expressed in terms of either black or white including the parts of an image which are a color between the two. The boundary at which black can also enter a value (0 to 255). [Reset] Resets all the current settings to their default values. Setting Preferences and Scanning with - Canon MF5750 | imageCLASS MF5700 Series Software Guide - Page 142
Scanning [Preferences] Dialog Box Clicking [Preferences...] on [Advanced Mode] tab opens the [Preferences] dialog box. In this dialog box, you can adjust settings for scanning and previewing. ■ [Preview] Tab 3 [Preview at the Start of ScanGear MF] Selects the preview operation when you open - Canon MF5750 | imageCLASS MF5700 Series Software Guide - Page 143
Thumbnail View] This setting is not available for this model. 3 ■ [Scan] Tab Scanning [Scan without using ScanGear's Window] Color mode cannot be changed in applications such as OCR software which will not display the [ScanGear MF] dialog box (UI off mode), and consequently the document will be - Canon MF5750 | imageCLASS MF5700 Series Software Guide - Page 144
in which the [ScanGear MF] dialog box is displayed). [Enable 48/16 bit This setting is not available for this model. Output] 3 [Automatically Quit ScanGear of this setting. Scanning ■ [Color Settings] Tab Click one of the following. The default setting is [Recommended]. [Recommended - Canon MF5750 | imageCLASS MF5700 Series Software Guide - Page 145
Select to automatically match the scanner, monitor and color printer colors, thus reducing time and trouble to manually match the monitor and printer colors. This setting is available when [Color] is selected in [Color Mode]. If [Canon ColorGear] is selected, the Color Settings buttons are disabled - Canon MF5750 | imageCLASS MF5700 Series Software Guide - Page 146
"dpi" (dots per inch) refers to the number of dots in one inch. Resolution will determine the amount of detail your image contains. The scanning resolution that corresponds to your final output device such as a monitor or printer. ■ Images for Display on a Monitor Images for display on a monitor - Canon MF5750 | imageCLASS MF5700 Series Software Guide - Page 147
document will be 150 dpi. If you print the document with a 600 dpi color printer, the lack of detail in the image may be obvious. In such a case, slow down significantly, and you may experience malfunctions such as lack of memory. Make sure the resolution corresponds to the 3 purpose of use of - Canon MF5750 | imageCLASS MF5700 Series Software Guide - Page 148
folder, see "Setting Up [Start] in the [Scanners and Cameras] Folder (Windows 98/2000: the [Scanners and Cameras Properties] Dialog Box)," on p. 3-5 2 Double-click the [WIA Canon MF5730], [WIA Canon MF5750] or [WIA Canon MF5770]. 3 Click [Next >]. 3-46 Scanning with the WIA Driver (Windows XP Only) - Canon MF5750 | imageCLASS MF5700 Series Software Guide - Page 149
white picture or text] - [Custom] NOTE When selecting [Custom], click [Custom settings] to make detailed settings in the [Properties] dialog box. Scanning with the WIA Driver (Windows XP Only) 3-47 - Canon MF5750 | imageCLASS MF5700 Series Software Guide - Page 150
3 5 Select the paper source ([Flatbed] or [Document Feeder]). NOTE If you selected [Document Feeder], select paper size from [Page size] and proceed to step 7. 6 Specify the scanned area. Click [Preview] ➞ drag to specify the scanned area. 3-48 Scanning with the WIA Driver (Windows XP Only) - Canon MF5750 | imageCLASS MF5700 Series Software Guide - Page 151
the group of pictures. 3 ❑ Type a name for the group of pictures. When you save more than one picture in the same location, sequential numbers are automatically added at the ends of file names. (e.g. numbers 001 the new location ➞ click [OK]. Scanning with the WIA Driver (Windows XP Only) 3-49 - Canon MF5750 | imageCLASS MF5700 Series Software Guide - Page 152
Scanning 9 Click [Next >]. 3 Scanning starts. NOTE To cancel scanning, click [Cancel]. 3-50 Scanning with the WIA Driver (Windows XP Only) - Canon MF5750 | imageCLASS MF5700 Series Software Guide - Page 153
3 If you want to publish these pictures to a Web site or order printouts online, select the corresponding option. For more information, see the Windows operating system documentation. 11 Click [Finish]. The location selected in step 8 will appear. Scanning with the WIA Driver (Windows XP Only) 3-51 - Canon MF5750 | imageCLASS MF5700 Series Software Guide - Page 154
listed above in the edit box directly. If you enter an invalid value, the error message will appear and the resolution will be corrected to the closest one. [Picture type] Selects the scanning color type ([Color picture], [Grayscale picture], or [Black and white picture or text]). [Reset] Resets - Canon MF5750 | imageCLASS MF5700 Series Software Guide - Page 155
Feeder], select paper size from [Page size] and proceed to step 4. 2 Select the type of picture you want to scan. You can select from the following: - [Color picture] - [Grayscale picture] - [Black and white picture or text] - [Custom Settings] Scanning with the WIA Driver (Windows XP Only) 3-53 - Canon MF5750 | imageCLASS MF5700 Series Software Guide - Page 156
have selected [Document Feeder] as the paper source, select the page size from the pull down menu. Scanning 6 Click [Scan]. Scanning starts. When the scanning is completed, the scanned image will appear in the display area of the application. 3-54 Scanning with the WIA Driver (Windows XP Only) - Canon MF5750 | imageCLASS MF5700 Series Software Guide - Page 157
PC Faxing (MF5750/MF5770 Models Only) 4 CHAPTER This chapter explains the procedure to fax documents from your computer. You can send faxes using the fax driver from applications that support document printing. Sending a Fax You can send a fax to multiple recipients in one operation. NOTE • You - Canon MF5750 | imageCLASS MF5700 Series Software Guide - Page 158
2 From the [Select Printer] list box or the [Name] pull-down list in the [Print] dialog box, select [Canon Canon MF5700 Series (FAX)]. 4 3 Click [Print] or [OK]. The [Fax Sending Settings] dialog box appears. PC Faxing (MF5750/MF5770 Models Only) 4 In the [Fax Sending Settings] dialog box, - Canon MF5750 | imageCLASS MF5700 Series Software Guide - Page 159
] dialog box has three tab sheets. NOTE • For more information about the following features, see the Online Help (see p. 1-3). • The screen shots shown are from Windows XP. PC Faxing (MF5750/MF5770 Models Only) Sending a Fax 4-3 - Canon MF5750 | imageCLASS MF5700 Series Software Guide - Page 160
the recipient name and fax number of the destination to which you send a fax. You can specify multiple destinations in one operation. 4 PC Faxing (MF5750/MF5770 Models Only) [Recipient Name] Specifies the recipient's name. [Fax Number] Specifies the fax/telephone number of the recipient. For - Canon MF5750 | imageCLASS MF5700 Series Software Guide - Page 161
■ Select Recipient from Address Book PC Faxing (MF5750/MF5770 Models Only) 4 [Address Books] Shows the available Adds the recipient names and fax numbers you entered in List] [Recipient List]. [Recipient List] Shows the list of the recipient names and fax numbers of the destinations you - Canon MF5750 | imageCLASS MF5700 Series Software Guide - Page 162
Edit Address Book Tab Allows you to edit the Address Book. For details, see "Edit Address Book Tab," on p. 4-32. 4 PC Faxing (MF5750/MF5770 Models Only) 4-6 Sending a Fax - Canon MF5750 | imageCLASS MF5700 Series Software Guide - Page 163
Selects the style of the cover sheet from the list of the cover sheet templates supplied with the fax driver, or the cover sheets you registered in the [Register Cover Sheet] dialog box (for Windows 98/Me, see p. 4-24, for Windows 2000/XP/Server 2003, see p. 4-37). [Items to Include] Displays the - Canon MF5750 | imageCLASS MF5700 Series Software Guide - Page 164
tab sheets. ● Sender Tab The [Sender] tab sheet enables you to edit the sender information to be included in the cover sheets. 4 PC Faxing (MF5750/MF5770 Models Only) [Sender Name] Enables you to enter the sender name in [Sender Name] text box up to 85 characters. [Company] Enables you to enter - Canon MF5750 | imageCLASS MF5700 Series Software Guide - Page 165
's fax number. For details on the characters and symbols you can use for fax numbers, see "Characters and Symbols for Fax Numbers," on p. 4-3. PC Faxing (MF5750/MF5770 Models Only) Sending a Fax 4-9 - Canon MF5750 | imageCLASS MF5700 Series Software Guide - Page 166
(MF5750/MF5770 Models Only) [Print with Logo] Attaches the logo to the cover sheet. [File Name] Selects the data file of the logo to be attached to the cover sheet. You can select a bitmap data only. [Browse...] Allows you to search for the logo file in your computer. [Manual - Canon MF5750 | imageCLASS MF5700 Series Software Guide - Page 167
PC Faxing (MF5750/MF5770 Models Only) ● Signature Tab The [Signature] tab sheet enables you to . You can select a bitmap data only. Allows you to search for the signature file in your computer. [Manual Scaling] Enables you to specify the size of the logo in [Scaling] from 50% to 200%. [Position] - Canon MF5750 | imageCLASS MF5700 Series Software Guide - Page 168
PC Faxing (MF5750/MF5770 Models Only) ● Sheets to Send Tab The [Sheets to Send] tab sheet enables you to select whether the number of sheets to send is included - Canon MF5750 | imageCLASS MF5700 Series Software Guide - Page 169
preferences dialog box enables you to specify the default settings for the faxing options available when you fax with the Canon imageCLASS Canon MF5700 Series (only for Windows 2000/XP/Server 2003). • The number of tabs displayed in the properties dialog box will vary, depending on the type of - Canon MF5750 | imageCLASS MF5700 Series Software Guide - Page 170
[start] on the Windows task bar ➞ select [Printers and Faxes] (Windows 98/Me/ 2000: [Start] ➞ [Settings] ➞ [Printers]). 2 Click the corresponding printer driver icon. PC Faxing (MF5750/MF5770 Models Only) 3 From the [File] menu, click [Properties]. You can also open the [Canon MF5700 Series (FAX - Canon MF5750 | imageCLASS MF5700 Series Software Guide - Page 171
(MF5750/MF5770 Models Only) 3 From the [File] menu, click [Printing Preferences]. You can also open the [Canon MF5700 Series (FAX) Printing Preferences] dialog box by right-clicking the corresponding printer driver icon and selecting [Printing Preferences] from the pop-up menu. The [Canon Canon - Canon MF5750 | imageCLASS MF5700 Series Software Guide - Page 172
PC Faxing (MF5750/MF5770 Models Only) Windows 98/Me Fax Properties General Tab Lets you print a test page or define separator pages. Refer to your Windows operating system documentation for more information. 4 4-16 Windows 98/Me Fax Properties - Canon MF5750 | imageCLASS MF5700 Series Software Guide - Page 173
PC Faxing (MF5750/MF5770 Models Only) Details Tab Specifies the printer port and time-out settings. Refer to your Windows operating system documentation for more information. 4 ■ Spool Settings The installer sets the following defaults. Windows 98/Me Fax Properties 4-17 - Canon MF5750 | imageCLASS MF5700 Series Software Guide - Page 174
PC Faxing (MF5750/MF5770 Models Only) Sharing Tab Specifies the printer sharing settings. This tab sheet is available only when the printer sharing is enabled. (See "Setting Printer Sharing," on p. 2-60.) Refer to your Windows operating system documentation for more information. 4 4-18 Windows 98/ - Canon MF5750 | imageCLASS MF5700 Series Software Guide - Page 175
MF5750/MF5770 Models Only) 4 [Address Book] [Show] [Add Person...] [Add Group...] [Edit...] [Delete] [Specify a Folder...] [Import...] [Export...] Displays the list of the list displayed in entry in the Address Book list. If you select a Canon Data Files (with file extension "*.abk"). Exports the - Canon MF5750 | imageCLASS MF5700 Series Software Guide - Page 176
you to register a person and his/her information in the Address Book. 4 PC Faxing (MF5750/MF5770 Models Only) You can register the following information: [Prefix] Enters the prefix to the recipient Notes] Enters the additional information about the recipient. 4-20 Windows 98/Me Fax Properties - Canon MF5750 | imageCLASS MF5700 Series Software Guide - Page 177
Book. PC Faxing (MF5750/MF5770 Models Only) 4 You list of recipients already registered in the Address Books. Adds a person/group to the group. Deletes a person/group from the group. Displays the members currently registered in the group. Enters the additional information about the group. Windows - Canon MF5750 | imageCLASS MF5700 Series Software Guide - Page 178
. 4 PC Faxing (MF5750/MF5770 Models Only) You can edit the following information: [Prefix] Enters the prefix to the recipient's name, or selects the prefix from the pull-down list. ([Dr.], [Mr.], [Notes] Enters the additional information about the recipient. 4-22 Windows 98/Me Fax Properties - Canon MF5750 | imageCLASS MF5700 Series Software Guide - Page 179
Book. PC Faxing (MF5750/MF5770 Models Only) 4 You list of recipients already registered in the Address Books. Adds a person/group to the group. Deletes a person/group from the group. Displays the members currently registered in the group. Enters the additional information about the group. Windows - Canon MF5750 | imageCLASS MF5700 Series Software Guide - Page 180
create your original cover sheets using the Canon Cover Sheet Editor. For details, see "Canon Cover Sheet Editor," on p. 4-41. 4 PC Faxing (MF5750/MF5770 Models Only) Preview image [Style] . Select a cover sheet template from [Style], then press [Delete]. 4-24 Windows 98/Me Fax Properties - Canon MF5750 | imageCLASS MF5700 Series Software Guide - Page 181
the paper size, orientation, and resolution. You can also specify the outside dialing prefix if you dial through a switchboard. PC Faxing (MF5750/MF5770 Books] dialog box (see p. 4-26). [Restore Defaults] Resets all the current settings to their default values. Windows 98/Me Fax Properties 4-25 - Canon MF5750 | imageCLASS MF5700 Series Software Guide - Page 182
Books. Opens the [Register Address Book] dialog box. (See below.) Opens the [Add/Edit Canon Fax Driver Address Book] dialog box. (See p. 4-27.) Deletes the selected Address Book from the [Address Book List]. ● Register Address Book This dialog box enables you to register the Address Books to be - Canon MF5750 | imageCLASS MF5700 Series Software Guide - Page 183
properties of the Address Books to be used when you send a fax. [Name] Changes the name of the Address Book. You can enter up to 64 characters. Configuration Tab 4 PC Faxing (MF5750/MF5770 Models Only) [About] Displays the version information on the driver. Windows 98/Me Fax Properties 4-27 - Canon MF5750 | imageCLASS MF5700 Series Software Guide - Page 184
PC Faxing (MF5750/MF5770 Models Only) Windows 2000/XP/Server 2003 FAX Properties and FAX Printing Preferences The FAX driver for Windows 2000/XP/Server 2003 has the following two main dialog boxes: The FAX Properties Dialog Box This dialog box enables you to set up the fax configuration - Canon MF5750 | imageCLASS MF5700 Series Software Guide - Page 185
PC Faxing (MF5750/MF5770 Models Only) General Tab Lets you print a test page and define faxing preferences. Refer to your Windows operating system documentation for more information. Sharing Tab 4 Specifies the printer sharing settings. This tab sheet is available only when the printer sharing - Canon MF5750 | imageCLASS MF5700 Series Software Guide - Page 186
set automatically when you install the printer driver. Color Management Tab Associates color profiles with your color printer. Refer to your Windows operating system documentation for more information. PC Faxing (MF5750/MF5770 Models Only) 4-30 Windows 2000/XP/Server 2003 FAX Properties and FAX - Canon MF5750 | imageCLASS MF5700 Series Software Guide - Page 187
PC Faxing (MF5750/MF5770 Models Only) [About] Displays the version information on the driver. FAX Printing Preferences The [Canon Canon MF5700 Series (FAX (see p. 1-3). • The screen shots shown are from Windows XP. Windows 2000/XP/Server 2003 FAX Properties and FAX Printing Preferences 4-31 - Canon MF5750 | imageCLASS MF5700 Series Software Guide - Page 188
MF5750/MF5770 Models Only) [Address Book] [Show] [Add Person...] [Add Group...] [Edit...] [Delete] [Specify a Folder...] [Import...] [Export...] Displays the list and some Canon Data Files (with file extension "*.abk"). Exports the address book data to an outside file. 4-32 Windows 2000/XP/Server - Canon MF5750 | imageCLASS MF5700 Series Software Guide - Page 189
driver software. ■ Add Person The [Add Person] dialog box enables you to register a person and his/her information in the Address Book. 4 PC Faxing (MF5750/MF5770 ] Enters the additional information about the recipient. Windows 2000/XP/Server 2003 FAX Properties and FAX Printing Preferences 4-33 - Canon MF5750 | imageCLASS MF5700 Series Software Guide - Page 190
PC Faxing (MF5750/MF5770 Models Only) list of recipients already registered in the Address Books. Adds a person/group to the group. Deletes a person/group from the group. Displays the members currently registered in the group. Enters the additional information about the group. 4-34 Windows 2000/XP - Canon MF5750 | imageCLASS MF5700 Series Software Guide - Page 191
Faxing (MF5750/MF5770 Models Only) 4 You can edit the following information: [Prefix] Enters the prefix to the recipient's name, or selects the prefix from the pull-down list. information about the recipient. Windows 2000/XP/Server 2003 FAX Properties and FAX Printing Preferences 4-35 - Canon MF5750 | imageCLASS MF5700 Series Software Guide - Page 192
PC Faxing (MF5750/MF5770 Models Only) list of recipients already registered in the Address Books. Adds a person/group to the group. Deletes a person/group from the group. Displays the members currently registered in the group. Enters the additional information about the group. 4-36 Windows 2000/XP - Canon MF5750 | imageCLASS MF5700 Series Software Guide - Page 193
original cover sheets using the Canon Cover Sheet Editor. For details, see "Canon Cover Sheet Editor," on p. 4-41. 4 PC Faxing (MF5750/MF5770 Models Only) Preview image [ sheet template from [Style], then press [Delete]. Windows 2000/XP/Server 2003 FAX Properties and FAX Printing Preferences 4-37 - Canon MF5750 | imageCLASS MF5700 Series Software Guide - Page 194
paper size, orientation, and resolution. You can also specify the outside dialing prefix if you dial through a switchboard. 4 PC Faxing (MF5750/MF5770 p. 4-39). [Restore Defaults] Resets all the current settings to their default values. 4-38 Windows 2000/XP/Server 2003 FAX Properties and FAX - Canon MF5750 | imageCLASS MF5700 Series Software Guide - Page 195
Opens the [Add/Edit Canon Fax Driver Address Book] dialog box. Deletes the selected Address Book from the [Address Book List]. ● Register Address Book PC Faxing (MF5750/MF5770 Models Only) [Available Address Books] Displays the list of the available Address Books. Windows 2000/XP/Server 2003 FAX - Canon MF5750 | imageCLASS MF5700 Series Software Guide - Page 196
Add/Edit Canon Fax Driver Address Book This dialog box enables you to edit the properties of the Address Books to be used when you send a fax. [Name] Changes the name of the Address Book. You can enter up to 64 characters. 4 PC Faxing (MF5750/MF5770 Models Only) 4-40 Windows 2000/XP/Server 2003 - Canon MF5750 | imageCLASS MF5700 Series Software Guide - Page 197
PC Faxing (MF5750/MF5770 Models Only) Canon Cover Sheet Editor This section describes instructions for installing Canon Cover Sheet Editor, launching the editor, and creating and registering original cover sheets. The Canon Cover Sheet Editor is software for creating original fax cover sheet - Canon MF5750 | imageCLASS MF5700 Series Software Guide - Page 198
PC Faxing (MF5750/MF5770 Models Only) 4 Double-click the [setup (setup.exe)] icon to start the installation process. 5 Click [Next >] ➞ follow the instructions on the screen to continue the installation. 4 The [License Agreement] dialog box is displayed. 6 Read the CANON SOFTWARE LICENSE AGREEMENT - Canon MF5750 | imageCLASS MF5700 Series Software Guide - Page 199
>]. 4 NOTE If you select [Custom] in the dialog box for selecting [Setup Type], you can specify the directory into which Canon Cover Sheet Editor is to be installed. 8 Click [Install] to start copying the files. PC Faxing (MF5750/MF5770 Models Only) 9 Click [Finish]. Canon Cover Sheet Editor 4-43 - Canon MF5750 | imageCLASS MF5700 Series Software Guide - Page 200
PC Faxing (MF5750/MF5770 Models Only) Launching To start the Cover Sheet Editor, follow the procedure below. 1 Click [start] on the Windows task bar ➞ [(All) Programs] ➞ [Canon] ➞ [CSE] ➞ [Cover Sheet Editor]. The Canon Cover Sheet Editor will open. 4 Uninstalling If it becomes necessary to - Canon MF5750 | imageCLASS MF5700 Series Software Guide - Page 201
the [File] menu. The [New] dialog box appears. 2 Select a paper size for the new cover sheet ➞ click [OK]. 4 PC Faxing (MF5750/MF5770 Models Only) The New Cover Sheet screen appears. ■ Opening a Saved Cover [Preview] displays an image of the selected cover sheet. Canon Cover Sheet Editor 4-45 - Canon MF5750 | imageCLASS MF5700 Series Software Guide - Page 202
New File If you save a cover sheet, you can register it later in the fax driver for use as an original cover sheet. PC Faxing (MF5750/MF5770 Models Only) 1 Click [ ] (Save) on the toolbar. Alternatively, select [Save] or a different location to save the cover sheet. 4-46 Canon Cover Sheet Editor - Canon MF5750 | imageCLASS MF5700 Series Software Guide - Page 203
PC Faxing (MF5750/MF5770 Models Only) ■ Closing a File Follow the procedure below to close a currently open cover sheet without exiting the Canon Cover Sheet Editor. 1 Click the lower [ ] (Close) at the top-right corner of the Canon Cover Sheet Editor main window. Alternatively, select [Close] - Canon MF5750 | imageCLASS MF5700 Series Software Guide - Page 204
PC Faxing (MF5750/MF5770 Models Only) 4 Enter the desired text. Adjusting Text Properties You can change text properties whenever you want. When you change text is now ready for editing. 2 Select the desired font color from the Font Color drop-down menu on the toolbar. 4-48 Canon Cover Sheet Editor - Canon MF5750 | imageCLASS MF5700 Series Software Guide - Page 205
PC Faxing (MF5750/MF5770 Models Only) ■ Bold Formatting 1 Click inside the text box. The text box is now ready for editing. 2 Click [ ] (Bold) box. The text box is now ready for editing. 2 Click [ ] (Align Left), [ ] (Align Center), or [ ] (Align Right) on the toolbar. Canon Cover Sheet Editor 4-49 - Canon MF5750 | imageCLASS MF5700 Series Software Guide - Page 206
how the text would appear with the currently selected settings. Use it as a guide if you are specifying settings. 1 Click inside the text box. The text box [Font Style], and [Size] from the respective list boxes. PC Faxing (MF5750/MF5770 Models Only) Alternatively, enter the desired font size - Canon MF5750 | imageCLASS MF5700 Series Software Guide - Page 207
[Text Box Properties] dialog box by double-clicking anywhere on the border of the text box. The [Text Box Properties] dialog box opens. PC Faxing (MF5750/MF5770 Models Only) 3 Select the desired border type from [Line Style]. Canon Cover Sheet Editor 4-51 - Canon MF5750 | imageCLASS MF5700 Series Software Guide - Page 208
PC Faxing (MF5750/MF5770 Models Only) 4 Specify the [Width] setting to set the thickness of the border (0.1 to 50.0). NOTE The [Width] setting is color of the border from [Color]. 6 Select the desired background color for the text box from [Fill in]. 7 Click [OK]. 4 4-52 Canon Cover Sheet Editor - Canon MF5750 | imageCLASS MF5700 Series Software Guide - Page 209
MF5750/MF5770 Models Only) Specifying Fields You can show sender or fax recipient information, such as the name, fax number, company name, and department/division name on the cover sheet using a feature called a "field." Fields are objects in the cover sheet that you can replace the fax driver. FAX - Canon MF5750 | imageCLASS MF5700 Series Software Guide - Page 210
], and [Dept./Div.]. You can change the position of the fields as needed. PC Faxing (MF5750/MF5770 Models Only) ■ Inserting Sender and Recipient Information Fields When Not Editing Text 1 Click the [Insert such as [Name], [Fax Number], [Company], and [Dept./Div.]. 4-54 Canon Cover Sheet Editor - Canon MF5750 | imageCLASS MF5700 Series Software Guide - Page 211
field is inserted. The field between the [Begin Repeat] and [End Repeat] fields is replaced with multiple recipients' information when sending a fax. NOTE The text box may not be able ]. The [Border Settings] dialog box opens. PC Faxing (MF5750/MF5770 Models Only) Canon Cover Sheet Editor 4-55 - Canon MF5750 | imageCLASS MF5700 Series Software Guide - Page 212
to use as the border from [Line Style]. PC Faxing (MF5750/MF5770 Models Only) 4 Specify the [Width] setting to set the thickness of the borders (0.1 to 10.0). NOTE The [Width] setting is available only if [Line Style to Send]. The [Sheets to Send] field is inserted. 4-56 Canon Cover Sheet Editor - Canon MF5750 | imageCLASS MF5700 Series Software Guide - Page 213
PC Faxing (MF5750/MF5770 Models Only) ■ Inserting Sheets to Send Field When Not Editing Text 1 Form the [Insert] menu, select [Sheets to Send]. draw the line. ■ Rectangles 1 Click [ ] (Rectangle) on the toolbar. You can also select [Rectangle] from the [Drawing] menu. Canon Cover Sheet Editor 4-57 - Canon MF5750 | imageCLASS MF5700 Series Software Guide - Page 214
click and drag the inner handle in its upper right corner to change the degree of the curve. PC Faxing (MF5750/MF5770 Models Only) ■ Ovals 1 Click [ ] (Oval) on the toolbar. You can also select [Oval] from where an image of the highlighted bitmap file is displayed. 4-58 Canon Cover Sheet Editor - Canon MF5750 | imageCLASS MF5700 Series Software Guide - Page 215
PC Faxing (MF5750/MF5770 Models Only) 3 Click [Open]. Editing Objects You can copy, move, and delete objects such as lines, rectangles, rounded rectangles, on the keyboard while pressing an arrow key moves the object in the direction of the arrow in 2.0 mm increments. Canon Cover Sheet Editor 4-59 - Canon MF5750 | imageCLASS MF5700 Series Software Guide - Page 216
cover sheet. 4 NOTE If the second cover sheet is open, you can select it from the [Window] menu. PC Faxing (MF5750/MF5770 Models Only) 4 Click [ ] (Paste) on the toolbar. Alternatively, select [Paste] from the multiple objects and copy them at the same time. 4-60 Canon Cover Sheet Editor - Canon MF5750 | imageCLASS MF5700 Series Software Guide - Page 217
PC Faxing (MF5750/MF5770 Models Only) 2 Hold down [CTRL] second cover sheet. NOTE If the second cover sheet is open, you can select it from the [Window] menu. 4 Click [ ] (Paste) on the toolbar. Alternatively, select [Paste] from the [ while dragging the selected text. Canon Cover Sheet Editor 4-61 - Canon MF5750 | imageCLASS MF5700 Series Software Guide - Page 218
in one operation. 1 Select the object to duplicate. NOTE You can select multiple objects and duplicate them at the same time. 2 Click [ ] (Duplicate) on the toolbar. Alternatively, select [Duplicate] from the [Edit] menu. The selected object is duplicated. PC Faxing (MF5750/MF5770 Models Only - Canon MF5750 | imageCLASS MF5700 Series Software Guide - Page 219
PC Faxing (MF5750/MF5770 Models Only) Specifying Object Properties Follow the procedure below to change the line style, line color, and background color of objects such as lines, rectangles, rounded rectangles, ovals, images, and text boxes on the cover sheet. Canon Cover Sheet Editor 4-63 - Canon MF5750 | imageCLASS MF5700 Series Software Guide - Page 220
down [SHIFT] on the keyboard while pressing [TAB] on the keyboard. PC Faxing (MF5750/MF5770 Models Only) 2 Click [ ] (Bring to Front), [ ] (Send to Back right edge, top edge, bottom edge, or center in one operation. The position of the last selected object becomes the 64 Canon Cover Sheet Editor - Canon MF5750 | imageCLASS MF5700 Series Software Guide - Page 221
PC Faxing (MF5750/MF5770 Models Only) • [Align Bottom]: Aligns the bottom edge of all objects along the bottom edge of the last selected object. 1 the grid by clicking the activated [ ] (Show Grids) to deactivate it or by clicking [Show Grids] from the [View] menu. Canon Cover Sheet Editor 4-65 - Canon MF5750 | imageCLASS MF5700 Series Software Guide - Page 222
to snap objects to the grid. 1 Select [Grid Properties] from the [View] menu. The [Grid Properties] dialog box appears. 2 Select [Show Grids]. PC Faxing (MF5750/MF5770 Models Only) Deselect the check box if you do not want to display the grid. NOTE Deselecting this check box disables the [Type - Canon MF5750 | imageCLASS MF5700 Series Software Guide - Page 223
PC Faxing (MF5750/MF5770 Models Only) 3 Select [Dotted] or [Dashed]. 4 Click the button to the right of [Color]. The [Color Setting] dialog box appears. 5 of measure for the spacing in the [Unit Setting] dialog box displayed by selecting [Unit] from the [View] menu. Canon Cover Sheet Editor 4-67 - Canon MF5750 | imageCLASS MF5700 Series Software Guide - Page 224
only one page. 4 Click [OK]. Registering an Original Cover Sheet as a Template You can register the cover sheet created with the Canon Cover Sheet Editor with the fax driver for use as a template. 1 Click [start] on the Windows task bar ➞ [Settings] ➞ [Printers]. NOTE If you are using Windows XP - Canon MF5750 | imageCLASS MF5700 Series Software Guide - Page 225
PC Faxing (MF5750/MF5770 Models Only) 2 In the [Printers] folder, right-click the printer icon for your fax ➞ click [Properties] (Windows 98/Me), or [Printing Preferences] (Windows 2000/XP/Server 2003). 3 Click , you can add up to 30 templates to the fax driver. Canon Cover Sheet Editor 4-69 - Canon MF5750 | imageCLASS MF5700 Series Software Guide - Page 226
through Friday and 10:00 A.M. to 8:00 P.M. on Saturday. For 24 hour interactive troubleshooting, e-mail technical support, the latest driver downloads and answers to frequently asked questions please visit the Canon Support site at www.canontechsupport.com. Printer Problems Printer does not print - Canon MF5750 | imageCLASS MF5700 Series Software Guide - Page 227
the correct printer driver in Windows. Q Is a wrong printer driver selected in the [Printers and Faxes] (Windows 98/Me/ 2000: [Printers]) folder? A Make sure the corresponding printer driver is selected in the [Printers and Faxes] (Windows 98/Me/2000: [Printers]) folder. 5-2 Printer Problems - Canon MF5750 | imageCLASS MF5700 Series Software Guide - Page 228
problem might be in your BIOS. Verify that your BIOS setup is correct. (See your computer's documentation for details.) A Verify that your physical memory and the computer. A Make sure paper is properly loaded from the cassette or multi-purpose feeder. A Reset the machine and the computer. A - Canon MF5750 | imageCLASS MF5700 Series Software Guide - Page 229
not supported. Replace Adobe Type Manager (ATM) fonts to other appropriate fonts. Troubleshooting Cannot print with a printer driver other than the MF5700 Series printer. Q Is the printer driver connected to the same port as the MF5700 Series printer driver? A Connect the printer driver to - Canon MF5750 | imageCLASS MF5700 Series Software Guide - Page 230
Close the [Control Panel] folder ➞ unplug the USB cable. 6. Restart your computer. 7. For instructions on installing the printer driver, see "Installing Software on Your Computer," on p. 1-4. NOTE The procedure for Windows XP/Server 2003 is given for the Category 5 View mode. Strings of garbled - Canon MF5750 | imageCLASS MF5700 Series Software Guide - Page 231
Problems Cannot scan a document. Q Is there anything displayed in the LCD? A If nothing is displayed in the LCD, see Chapter 9, "Troubleshooting," in the Basic Guide. Q Is the Alarm indicator blinking? A If the Alarm indicator is blinking, see Chapter 9, "Troubleshooting the printer and - Canon MF5750 | imageCLASS MF5700 Series Software Guide - Page 232
.ini Windows XP/Server 2003: windows\system32\CNCMFP12.ini 2. In the [ScanSize] section, change "Read512Bytes=0" to "Read512Bytes=1," then save the file. Take care not to modify any other parts. Q Is the [Select Source] setting in the MF Toolbox. ScanGear MF, or WIA driver set correctly - Canon MF5750 | imageCLASS MF5700 Series Software Guide - Page 233
and Cameras].) 3. If [WIA Canon MF5730], [WIA Canon MF5750] or [WIA Canon MF5770] (Windows 98/Me/2000: [Canon MF5730], [Canon MF5750]) or [Canon MF5770] is present in the [Scanners and Cameras] folder or dialog box, the machine is recognized. If not, remove the software (see "Uninstalling and - Canon MF5750 | imageCLASS MF5700 Series Software Guide - Page 234
24-bit color or higher. White lines appear on one edge of the image you scan. Q Is the document placed on the platen glass correctly? A Place the document approximately 1/8" (3 mm) from the front edge (i.e., the edge closest to the operation panel) of the platen glass. Scanning Problems 5-9 - Canon MF5750 | imageCLASS MF5700 Series Software Guide - Page 235
larger (smaller) size on the computer screen. Q Is the resolution setting correct? A Do one of the following: 1. Enlarge or reduce the image display in the application. However, if you if resolution is low. (See "Determining Resolution," on p. 3-44.) 5 Troubleshooting 5-10 Scanning Problems - Canon MF5750 | imageCLASS MF5700 Series Software Guide - Page 236
Troubleshooting Installing and Uninstalling Problems Cannot install the software. Q Have you followed the instructions to install the software? A Try reinstalling the software. If an error occurred and installation was not complete, restart your computer and try reinstalling the software. Q - Canon MF5750 | imageCLASS MF5700 Series Software Guide - Page 237
], green mark "?" is displayed (Windows Me). Q Is green mark "?" displayed on [USB Composite Device] in [USB (Universal Serial Bus) Controller] in [Device Manager] in Windows Me? A As this is not a problem, you can continue to use it as is. 5 Troubleshooting 5-12 Installing and Uninstalling - Canon MF5750 | imageCLASS MF5700 Series Software Guide - Page 238
) paper 81/2" × 14" (216 mm × 356 mm) [max.] to 3" × 5" (76 mm × 127 mm) [min.] Plain paper, transparencies, envelopes, and heavy paper (up to 34 lb (128 g/m2)) Maximum capacity: 1 sheet 60 sheets (17 to 20 lb (64 to 75 g/m2)) USB interface Network interface card (only for the MF5770 model) Printer - Canon MF5750 | imageCLASS MF5700 Series Software Guide - Page 239
Software Printing Software Canon Printer Driver for MF5700 Series Valid Printing Area Max. 13/64" (5 mm) blank margins at each edge 6 Appendix 6-2 Printer Specifications - Canon MF5750 | imageCLASS MF5700 Series Software Guide - Page 240
application software." Software designed for a specific purpose such as word processing software, spreadsheet software, database software, Canon products. Client A computer that is connected to the printer over a network. A client does not control the printer directly. It interacts with the printer - Canon MF5750 | imageCLASS MF5700 Series Software Guide - Page 241
printer's resolution. The Canon imageCLASS MF5700 Series prints at a resolution of 600 dpi. Driver A program that controls how the computer and an external device interact. For example, the printer driver supplies Windows read by any application supporting "JPEG." EXIF supports the storage of extra - Canon MF5750 | imageCLASS MF5700 Series Software Guide - Page 242
to fix the toner onto the paper (or other media) through applying heat and pressure. The assembly, located inside the printer, gets extremely hot changing the brightness of an image. With gamma correction, the brightness of parts of an image in the middle of the tonal range is changed without - Canon MF5750 | imageCLASS MF5700 Series Software Guide - Page 243
Install To copy software to a designated location on a computer's hard disk so that it can be used at any time. Interface The connection between two devices through which they communicate with each other. The Canon imageCLASS MF5700 Series features USB interface, which makes it compatible with IBM - Canon MF5750 | imageCLASS MF5700 Series Software Guide - Page 244
software. Orientation The printing of text either along the width (portrait) or length (landscape) of the page. P Paper feed The act of guiding a sheet of paper into the machine's paper path. Paper jams A situation created when paper becomes caught along the paper path. You must remove jammed paper - Canon MF5750 | imageCLASS MF5700 Series Software Guide - Page 245
. Print queue A list of files that are either waiting to be printed or are currently printing. Once a file has been printed, it is removed from the print queue. Printer driver A program that controls how the computer and printer interact. The printer driver supplies Windows with information such - Canon MF5750 | imageCLASS MF5700 Series Software Guide - Page 246
as a printer. Proportional Resetting or shutting off the computer clears all information from RAM. Printing very complicated documents might require closing other running programs or adding more RAM to the computer. See also Physical RAM, Virtual memory. Reinstall To remove installed software - Canon MF5750 | imageCLASS MF5700 Series Software Guide - Page 247
TWAIN and the WIA driver (for use with Windows XP). Separator page Optional pages printed at the beginning of each document to help separate one print job from another. Server A network computer that is directly attached to the printer. The server controls the printer and handles print jobs sent - Canon MF5750 | imageCLASS MF5700 Series Software Guide - Page 248
software, you can start the scanner's TWAIN driver from the software's Windows with more usable memory, but reduces speed of access to it when the swap file must be used. See also Physical RAM. W Weight Refers to the thickness of a font: light, medium, or bold. Also refers to the thickness of paper - Canon MF5750 | imageCLASS MF5700 Series Software Guide - Page 249
) Standard for downloading images from scanners or digital cameras. The machine includes a TWAIN-compliant driver and a WIA-compliant driver. The WIA driver can only be used with Windows XP. With either driver, you can scan documents with the machine in applications which support the TWAIN interface - Canon MF5750 | imageCLASS MF5700 Series Software Guide - Page 250
/Edit Canon Fax Driver Address Paper Size Settings, 2-13 D Default setting, 6-4 Descreen, 3-29 Detailed Settings Windows 2000/XP/Server 2003, 2-48 Windows 98/Me, 2-18 Details tab, Windows 98/Me, 2-7, 4-17 Dialog boxes Windows 2000/XP/Server 2003 printer properties, 2-27, 4-28 Windows 98/Me printer - Canon MF5750 | imageCLASS MF5700 Series Software Guide - Page 251
Driver installing, 1-6, 1-16 problems, 5-4 uninstall, 1-22 E Edit Address Book tab, 4-6, 4-19, 4-32 Edit Group dialog box, 4-23, 4-36 Edit Person dialog box, 4-22, 4-35 Edit Profiles Windows 2000/XP/Server 2003, 2-54 Windows 98/Me, 2-24 Edit Watermark Windows 2000/XP/Server 2003, 2-41 Windows - Canon MF5750 | imageCLASS MF5700 Series Software Guide - Page 252
shared printer, 2-57 using shared printer, 2-64 Windows 2000/XP/Server 2003 server settings, 2-57 Windows 98/Me server settings, 2-61 O Orientation, 6-7 Output Settings, 3-27 P Page Setup tab Windows 2000/XP/Server 2003, 2-37, 2-38 Windows 98/Me, 2-9 Paper delivery, 6-1 feed, 6-7 size - Canon MF5750 | imageCLASS MF5700 Series Software Guide - Page 253
settings Windows 2000/XP/Server 2003, 2-57 Windows 98/Me, 2-17 settings Windows 98/Me, 2-61 Queue, 6-9 Shared printer, 2-57 Add Printer Wizard (Windows 2000/XP/Server 6R 2003), 2-65 Add Printer Wizard (Windows 98/Me), 2-66 network download, 2-64 Appendix Random Access Memory, 6-9 Sharing - Canon MF5750 | imageCLASS MF5700 Series Software Guide - Page 254
roller, 6-10 Troubleshooting, 5-1 driver problems, 5-4 installing and uninstalling problems, 5-11 scanning problems, 5-6 U Uninstall, 6-11 drivers, 1-22 Unsharp Mask, 3-29 USB 2.0, 1-2, 5-6 USB cable connecting, 1-10 USB interface, 6-11 V Version conflict, 5-11 View Settings Windows 2000/XP/Server - Canon MF5750 | imageCLASS MF5700 Series Software Guide - Page 255
, Ohta-ku, Tokyo 146-8501, Japan CANON U.S.A., INC. One Canon Plaza, Lake Success, NY 11042, U.S.A. CANON CANADA INC. 6390 Dixie Road Mississauga, Ontario L5T 1P7, Canada CANON EUROPA N.V. Bovenkerkerweg 59-61 P.O. Box 2262, 1180 EG Amstelveen, The Netherlands CANON FRANCE S.A. 17, quai du President
-
 1
1 -
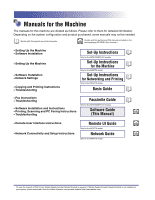 2
2 -
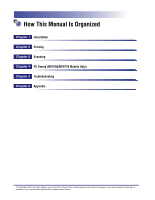 3
3 -
 4
4 -
 5
5 -
 6
6 -
 7
7 -
8
-
9
-
10
-
11
-
12
-
13
-
14
-
15
-
16
-
17
-
18
-
19
-
20
-
21
-
22
-
23
-
24
-
25
-
26
-
27
-
28
-
29
-
30
-
31
-
32
-
33
-
34
-
35
-
36
-
37
-
38
-
39
-
40
-
41
-
42
-
43
-
44
-
45
-
46
-
47
-
48
-
49
-
50
-
51
-
52
-
53
-
54
-
55
-
56
-
57
-
58
-
59
-
60
-
61
-
62
-
63
-
64
-
65
-
66
-
67
-
68
-
69
-
70
-
71
-
72
-
73
-
74
-
75
-
76
-
77
-
78
-
79
-
80
-
81
-
82
-
83
-
84
-
85
-
86
-
87
-
88
-
89
-
90
-
91
-
92
-
93
-
94
-
95
-
96
-
97
-
98
-
99
-
100
-
101
-
102
-
103
-
104
-
105
-
106
-
107
-
108
-
109
-
110
-
111
-
112
-
113
-
114
-
115
-
116
-
117
-
118
-
119
-
120
-
121
-
122
-
123
-
124
-
125
-
126
-
127
-
128
-
129
-
130
-
131
-
132
-
133
-
134
-
135
-
136
-
137
-
138
-
139
-
140
-
141
-
142
-
143
-
144
-
145
-
146
-
147
-
148
-
149
-
150
-
151
-
152
-
153
-
154
-
155
-
156
-
157
-
158
-
159
-
160
-
161
-
162
-
163
-
164
-
165
-
166
-
167
-
168
-
169
-
170
-
171
-
172
-
173
-
174
-
175
-
176
-
177
-
178
-
179
-
180
-
181
-
182
-
183
-
184
-
185
-
186
-
187
-
188
-
189
-
190
-
191
-
192
-
193
-
194
-
195
-
196
-
197
-
198
-
199
-
200
-
201
-
202
-
203
-
204
-
205
-
206
-
207
-
208
-
209
-
210
-
211
-
212
-
213
-
214
-
215
-
216
-
217
-
218
-
219
-
220
-
221
-
222
-
223
-
224
-
225
-
226
-
227
-
228
-
229
-
230
-
231
-
232
-
233
-
234
-
235
-
236
-
237
-
238
-
239
-
240
-
241
-
242
-
243
-
244
-
245
-
246
-
247
-
248
-
249
-
250
-
251
-
252
-
253
-
254
-
255
 |
 |

imageCLASS
MF5700 Series
Software Guide