Canon MultiPASS MP730 MultiPASS MP730 Quick Reference Guide - Page 79
If the power disconnects unexpectedly, Removing jammed paper, Removing jams in the paper output tray
 |
View all Canon MultiPASS MP730 manuals
Add to My Manuals
Save this manual to your list of manuals |
Page 79 highlights
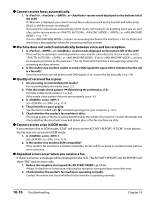
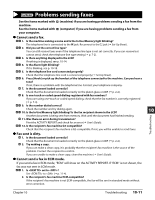
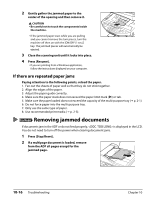
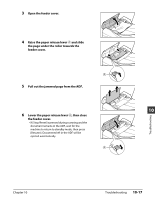
If the power disconnects unexpectedly User data and speed dialing settings are stored using the internal battery if there is a power failure or if you accidentally disconnect the power cord. However, all documents stored in memory will be deleted. If the power disconnects, the following will apply: • You will not be able to send or receive faxes, or make copies. • If a telephone is connected to the machine, you may be able to receive and/or make voice calls (depending on your telephone). When power is restored, the MEMORY CLEAR REPORT will be printed automatically listing the documents deleted from memory. Note however that this report will not be printed if the print media size is set to a setting other than , , or , or if black ink or paper has run out. Removing jammed paper If is displayed in the LCD, follow this procedure to clear the paper jam. Fax Model If a paper jam occurs when receiving a fax, that fax will be stored in memory and printed automatically when you clear the jam and press [Resume]. Removing jams in the paper output tray Follow this procedure to remove jams from the paper output tray: 1 Gently pull any jammed paper out of the paper output tray. • If you cannot see any jammed paper in the paper 10 output tray, remove it from the machine's interior ( below). Troubleshooting 2 Press [Resume]. • If you are printing from a Windows application, follow the instructions displayed on your computer. Removing jams from the machine's interior Follow this procedure to remove jams from the machine's interior: 1 Press [Open] q and lift up the scanning unit w. w Chapter 10 q Troubleshooting 10-15
-
 1
1 -
2
-
3
-
4
-
5
-
6
-
7
-
8
-
9
-
10
-
11
-
12
-
13
-
14
-
15
-
16
-
17
-
18
-
19
-
20
-
21
-
22
-
23
-
24
-
25
-
26
-
27
-
28
-
29
-
30
-
31
-
32
-
33
-
34
-
35
-
36
-
37
-
38
-
39
-
40
-
41
-
42
-
43
-
44
-
45
-
46
-
47
-
48
-
49
-
50
-
51
-
52
-
53
-
54
-
55
-
56
-
57
-
58
-
59
-
60
-
61
-
62
-
63
-
64
-
65
-
66
-
67
-
68
-
69
-
70
-
71
-
72
-
73
-
 74
74 -
 75
75 -
 76
76 -
 77
77 -
 78
78 -
 79
79 -
 80
80 -
 81
81 -
 82
82 -
 83
83 -
 84
84 -
85
-
86
-
87
-
88
-
89
-
90
-
91
-
92
-
93
-
94
-
95
-
96
-
97
-
98
-
99
-
100
-
101
-
102
-
103
-
104
-
105
-
106
-
107
 |
 |