Canon Optura 100MC Optura 100MC Instruction Manual - Page 106
Recording from Another DV Device as a Still Image
 |
View all Canon Optura 100MC manuals
Add to My Manuals
Save this manual to your list of manuals |
Page 106 highlights
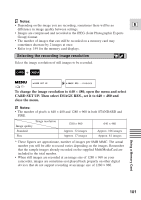
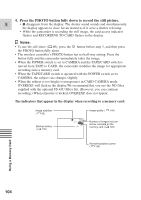
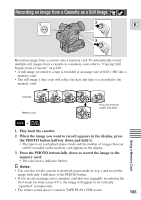
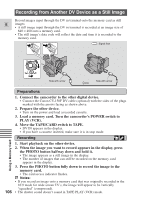
Recording from Another DV Device as a Still Image Record images input through the DV in terminal onto the memory card as still E images. • A still image input through the DV in terminal is recorded at an image size of 640 × 480 onto a memory card. • The still image's data code will reflect the date and time it is recorded to the memory card. : Signal flow PHOTO PHOTO CAMERA POWER OFF PLAY( VCR) CARD TAPE Side with arrow Side with arrow Using a Memory Card Preparations 1. Connect the camcorder to the other digital device. • Connect the Canon CV-150F DV cable (optional) with the sides of the plugs marked with the arrows facing as shown above. 2. Prepare the other device. • Turn on the power and load a recorded cassette. 3. Load a memory card. Turn the camcorder's POWER switch to PLAY (VCR). 4. Move the TAPE/CARD switch to TAPE. • DV IN appears in the display. • If you have a cassette inserted, make sure it is in stop mode. Recording 1. Start playback on the other device. 2. When the image you want to record appears in the display, press the PHOTO button halfway down and hold it. • The image appears as a still image in the display. • The number of images that can still be recorded on the memory card appears in the display. 3. Press the PHOTO button fully down to record the image to the memory card. • The card access indicator flashes. Notes: • If you record an image onto a memory card that was originally recorded in the 16:9 mode for wide screen TV's, the image will appear to be vertically "squashed" (compressed). 106 • The shutter sound doesn't sound in TAPE PLAY (VCR) mode.
-
 1
1 -
2
-
3
-
4
-
5
-
6
-
7
-
8
-
9
-
10
-
11
-
12
-
13
-
14
-
15
-
16
-
17
-
18
-
19
-
20
-
21
-
22
-
23
-
24
-
25
-
26
-
27
-
28
-
29
-
30
-
31
-
32
-
33
-
34
-
35
-
36
-
37
-
38
-
39
-
40
-
41
-
42
-
43
-
44
-
45
-
46
-
47
-
48
-
49
-
50
-
51
-
52
-
53
-
54
-
55
-
56
-
57
-
58
-
59
-
60
-
61
-
62
-
63
-
64
-
65
-
66
-
67
-
68
-
69
-
70
-
71
-
72
-
73
-
74
-
75
-
76
-
77
-
78
-
79
-
80
-
81
-
82
-
83
-
84
-
85
-
86
-
87
-
88
-
89
-
90
-
91
-
92
-
93
-
94
-
95
-
96
-
97
-
98
-
99
-
100
-
 101
101 -
 102
102 -
 103
103 -
 104
104 -
 105
105 -
 106
106 -
 107
107 -
 108
108 -
 109
109 -
 110
110 -
 111
111 -
112
-
113
-
114
-
115
-
116
-
117
-
118
-
119
-
120
-
121
-
122
-
123
-
124
-
125
-
126
-
127
-
128
-
129
-
130
-
131
-
132
-
133
-
134
-
135
-
136
-
137
-
138
-
139
-
140
-
141
-
142
-
143
-
144
-
145
-
146
-
147
-
148
-
149
-
150
-
151
-
152
-
153
-
154
-
155
-
156
-
157
-
158
 |
 |
