Canon PIXMA MG2220 w/ PP-201 Getting Started - Page 2
Open the Paper Output Tray
 |
View all Canon PIXMA MG2220 w/ PP-201 manuals
Add to My Manuals
Save this manual to your list of manuals |
Page 2 highlights
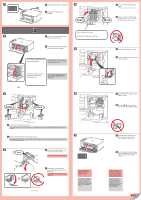
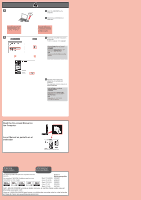
7 7 Check that this screen is displayed. 4 7 Compruebe si aparece esta pantalla. 1 2 1 2 1 Open the Paper Output Tray and the Paper Output Cover. Insert it straight until it stops. Insértelo recto hasta que se detenga. 1 Abra la bandeja de salida del papel y la tapa de salida del papel. 5 Check that the Head Cover has opened automatically. If the Head Cover is closed, close the Paper Output Cover and open it again to open the Head Cover. Asegúrese de que la cubierta del cabezal se ha abierto automáticamente. Si la cubierta del cabezal está cerrada, cierre la tapa de salida del papel y vuelva a abrirla para abrir la cubierta del cabezal. 2 6 4 Insert the FINE Cartridge until it stops. Do not knock it against the sides! 4 Inserte el cartucho FINE (FINE Cartridge) hasta que se detenga. ¡No lo golpee contra los lados! 5 Lift the Ink Cartridge Lock Lever. 5 Levante la palanca de bloqueo del cartucho de tinta. 6 Repeat to to install the other FINE Cartridge. 6 Repita de a para instalar el otro cartucho FINE (FINE Cartridge). 2 Lower the Ink Cartridge Lock Lever. The left is where the Color FINE Cartridge is to be installed and the right is where the Black FINE Cartridge is to be installed. 7 2 Baje la palanca de bloqueo del cartucho de tinta. A la izquierda debe instalarse el cartucho FINE (FINE Cartridge) de color y a la derecha debe instalarse el cartucho FINE (FINE Cartridge) negro. 3 3 Unpack the FINE Cartridge, then remove the protective tape. Be careful of ink on the protective tape. 3 Desembale el cartucho FINE (FINE Cartridge) y retire la cinta protectora. Tenga cuidado con la tinta de la cinta protectora. Do not touch! ¡No tocar! If the Alarm lamp is lit orange, check that the FINE Cartridges are installed correctly. The screen turns off if the machine is not operated for about 5 minutes. To restore the display, press any button (except the ON button) on the Operation Panel. 7 Close the Paper Output Cover. Wait for about 20 seconds until this screen is displayed, then proceed. 7 Cierre la tapa de salida del papel. Espere aproximadamente 20 segundos hasta que aparezca esta pantalla y continúe. Si la luz de Alarma (Alarm) está encendida en naranja, compruebe que los cartuchos FINE (FINE Cartridges) estén instalados correctamente. Cuando el equipo no se utiliza durante unos 5 minutos, la pantalla se desconecta. Para reactivarla, pulse cualquier botón (excepto el botón ACTIVADO (ON)) en el panel de control.
-
 1
1 -
 2
2 -
 3
3 -
 4
4
 |
 |