Canon PIXMA MG3222 Getting Started - Page 3
When An Error
 |
View all Canon PIXMA MG3222 manuals
Add to My Manuals
Save this manual to your list of manuals |
Page 3 highlights
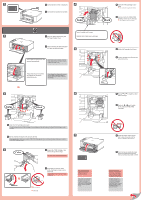
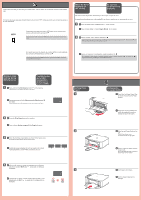
3 If the access point that you are using has a WPS button, use that button to connect the machine to the wireless LAN. Si el punto de acceso que está utilizando dispone de un botón WPS, utilice ese botón para conectar el equipo a la LAN inalámbrica. WPS If the access point does not have a WPS button or you are not using wireless LAN connection, proceed to . For the details of how to press the WPS button, refer to the manual of the access point. When An Error Appears on the screen Si aparece un error en la pantalla If E and a numeric figure flash alternatively on the screen, it means an error. Si parpadean alternativamente en la pantalla E y un número, significa que se ha producido un error. 1 1 Press the Color button or Black button of the machine. 1 Pulse el botón Color o el botón Negro (Black) del equipo. 2 2 Wait for a while. Then, redo the operation of . If the error persists, turn off and then turn on the access point and redo the operation of . Or proceed to and follow the instruction shown on the computer screen. Si el punto de acceso no dispone de un botón WPS o no está utilizando una conexión LAN inalámbrica, continúe con . Para obtener información detallada sobre cómo pulsar el botón WPS, consulte el manual del punto de acceso. 2 Espere un momento. A continuación, repita la operación de . Si se mantiene el error, apague y encienda el punto de acceso y repita la operación de . O continúe con y siga las instrucciones que aparecen en la pantalla del equipo. Wireless LAN Setting Using WPS function Configuración de la LAN inalámbrica utilizando la función WPS 1 1 Press and hold the Maintenance button of the machine. Check that the screen flashes as shown in the figure. 1 Mantenga pulsado el botón Mantenimiento (Maintenance) del equipo. Compruebe que la pantalla parpadea tal como se muestra en la figura. 2 2 Press the Fit to Page button of the machine. 2 Pulse el botón Ajustar a página (Fit to Page) del equipo. 3 3 When the machine screen flashes as shown in the figure, press and hold the WPS button of the access point. 3 Cuando el equipo parpadee tal como se muestra en la figura, mantenga pulsado el botón WPS del punto de acceso. 4 4 After a while, when this screen is displayed and the flashing light of the machine Wi-Fi lamp turns solid, the setting is completed. 4 Transcurrido un tiempo, cuando aparece esta pantalla y la luz parpadeante de Wi-Fi se queda fija, la configuración ha finalizado. Setting Plain Paper 1 2 3 4 Configuración para papel normal 1 Check that the Paper Output Tray is closed, then pull out the Paper Support. 1 Asegúrese de que la bandeja de salida del papel está cerrada y extraiga el soporte del papel. 2 Slide the right Paper Guide to the end. The left Paper Guide moves simultaneously with the right guide. 2 Deslice la guía del papel derecha hacia el lado. La guía del papel izquierda se mueve al mismo tiempo que la derecha. 3 Insert paper until it stops. 3 Inserte el papel hasta que se detenga.
-
 1
1 -
 2
2 -
 3
3 -
 4
4
 |
 |