Canon PIXMA MG5220 MG5220 series Gu쟠de inicio [Spanish Version] - Page 51
Print Photos from a Computer
 |
View all Canon PIXMA MG5220 manuals
Add to My Manuals
Save this manual to your list of manuals |
Page 51 highlights
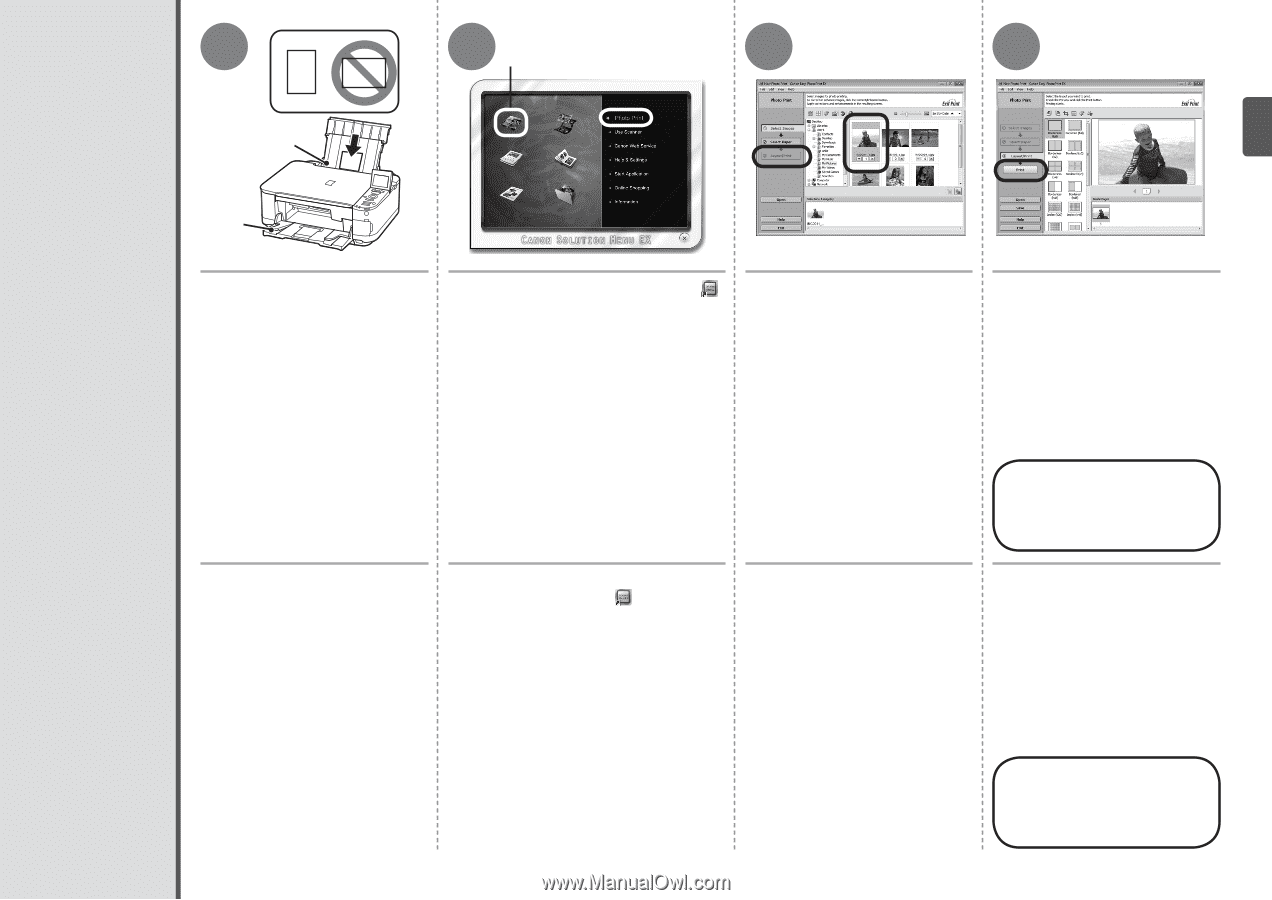
1 A 2C 3 4 Print Photos from a Computer Impresión de fotografías desde un ordenador B Load 4" x 6" (10 x 15 cm) photo paper in the Rear Tray (A) in portrait orientation with the printing side facing up. (For details, refer to page 15.) 1. To start Solution Menu EX, click the (Solution Menu EX) icon on the desktop (Windows) or on the Dock (Macintosh). 2. Click Photo Print, then click Photo Print (C). Select the image you want to print, then click Layout/Print. When a photo is selected, the number of copies is set to "1". Click Print. If you are using Windows, printing will start. If you are using Macintosh, click Print on the Print dialog box to start printing. Make sure that the Paper Output Tray (B) is open. If printing starts while the Paper Output Tray is closed, it will automatically open. This section explains how to print borderless photos using 4" x 6" (10 x 15 cm) Photo Paper Plus Glossy II. Easy-PhotoPrint EX starts. For more information, refer to the on-screen manual: Advanced Guide. Cargue papel fotográfico de tamaño 4" x 6" (10 x 15 cm) en la bandeja posterior (A) con orientación vertical y la superficie de impresión hacia arriba. (Para conocer los detalles, consulte la página 15.) Asegúrese de que la bandeja de salida del papel (B) está abierta. Si la impresión comienza con la bandeja de salida del papel cerrada, se abrirá automáticamente. En esta sección se explica cómo imprimir fotografías sin bordes en Papel Fotográfico Brillo II (Photo Paper Plus Glossy II) de tamaño 4" x 6" (10 x 15 cm). 1. Para iniciar Solution Menu EX, haga clic en el icono (Solution Menu EX) del escritorio (Windows) o en el Dock (Macintosh). 2. Haga clic en Impresión fotográfica (Photo Print) y, a continuación, haga clic en Impresión fotográfica (Photo Print) (C). Se iniciará Easy-PhotoPrint EX. Seleccione la imagen que desee imprimir y, a continuación, haga clic en Diseño/Imprimir (Layout/Print). Cuando se selecciona una fotografía, el número de copias se establece en "1". Haga clic en Imprimir (Print). Si utiliza Windows, se iniciará la impresión. Si utiliza Macintosh, haga clic en Imprimir (Print) en el cuadro de diálogo Imprimir (Print) para iniciar la impresión. Para obtener más información, consulte el manual en pantalla: Guía avanzada. 49
-
 1
1 -
2
-
3
-
4
-
5
-
6
-
7
-
8
-
9
-
10
-
11
-
12
-
13
-
14
-
15
-
16
-
17
-
18
-
19
-
20
-
21
-
22
-
23
-
24
-
25
-
26
-
27
-
28
-
29
-
30
-
31
-
32
-
33
-
34
-
35
-
36
-
37
-
38
-
39
-
40
-
41
-
42
-
43
-
44
-
45
-
 46
46 -
 47
47 -
 48
48 -
 49
49 -
 50
50 -
 51
51 -
 52
52 -
 53
53 -
 54
54
 |
 |