Canon PIXMA MP190 Easy Setup Instructions - Page 2
Software Installation - windows me driver
 |
View all Canon PIXMA MP190 manuals
Add to My Manuals
Save this manual to your list of manuals |
Page 2 highlights
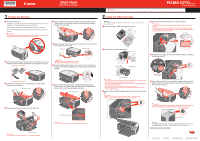
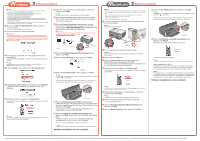
3 Software Installation Note • The screens below refer to Windows Vista operating system Ultimate Edition (hereafter referred to as "Windows Vista") installation. Screens may vary depending on the operating system you are using. • Log into a user account with the administrator privilege. • Do not switch users during the installation process. • Quit all running applications before installation. • A message asking for your confirmation to restart your computer may appear during the installation process. If this message is displayed, follow the on-screen instructions and click OK. The installation resumes from where it left off when your computer has been restarted. While restarting, do not remove the Setup CD-ROM. a Be sure to TURN THE MACHINE OFF before continuing. (1) Press the ON button. (2) Make sure that the Power lamp stops flashing. b Turn the computer on and start Windows®. Important If the Found New Hardware or Found New Hardware Wizard screen appears automatically, remove the USB cable connected to your computer. Click Cancel to quit the screen. In Windows Vista, the screen may close automatically when the USB cable is unplugged. Then turn off the machine and proceed from step c to install the software. g When the list of applications to install appears, confirm the contents, click Install. Note Move the cursor over items to display explanations of each application. h When the License Agreement is displayed, read it carefully and click Yes. Two License Agreement screens may appear. The software installation starts. i When the Printer Connection screen appears, connect one end of the USB cable to the computer, the other to the machine, then TURN THE MACHINE ON. The MP Drivers will begin identifying the printer port being used. Important If you cannot go to the next procedure after three minutes, refer to "Troubleshooting" instructions in the Quick Start Guide. USB → To Computer c Insert the Setup CD-ROM. The setup program should run automatically. In Windows Vista, go to Step d. In Windows XP and Windows 2000, go to Step f. Note If installation does not start automatically, double-click the CD-ROM icon or MSETUP4.EXE contained on the Setup CD-ROM. d If the AutoPlay screen appears, click Run Msetup4.exe. e If the User Account Control screen appears, click Continue. If the same screen reappears in subsequent steps, click Continue. j When the Print Head Alignment Recommended screen appears, click Next. k When the Setup Complete screen appears, click Next. l When the User Registration screen appears, click Next. Note To register later, click Cancel and go to Step m. After software installation is complete, double-click on the desktop. Follow on-screen instructions to register your product. You will need your product serial number, which is located on the inside of the machine. f When the main menu appears, click Easy Install. The MP Drivers, On-screen Manuals, and application software are installed automatically. Note If you want to select particular items to install, click Custom Install and follow the onscreen instructions to proceed the installation. Serial Number m When the Extended Survey Program screen appears, confirm the message. We would appreciate it if you would take part in this program regarding the use of Canon printers. If you can agree, click Agree. If Do not agree is clicked, the Extended Survey Program will not be installed but you can use the machine normally. n When the Installation completed successfully screen appears, click Exit. Remove the Setup CD-ROM after clicking Exit. If Restart is displayed, make sure that the Restart the system now (recommended) check box is selected, then click Restart. Remove the Setup CD-ROM after restarting the computer. Note Keep the Setup CD-ROM in a safe place in case you need to reinstall the software. Software installation is now complete. 3 Software Installation Note • Since Mac® OS 9, Mac OS X Classic environments, or Mac OS X v.10.3.8 or earlier are not supported, do not connect the machine to these. Use Mac OS X v.10.3.9 or later. • The screens below refer to Mac OS X v.10.4.x installation. Screens may vary depending on the operating system you are using. • Log on as an Administrator. • Quit all running applications before installation. a Connect one end of the USB cable to the computer and the other to the machine. Note Make sure the machine is turned on. j When the User Registration screen appears, click Next. Note To register later, click Cancel and go to Step k. After software installation is complete, double-click on the desktop. Follow on-screen instructions to register your product. You will need your product serial number, which is located on the inside of the machine. USB Serial Number k When the Installation completed successfully screen appears, click Restart. Remove the Setup CD-ROM after restarting the computer. b Turn on your Mac and insert the Setup CD-ROM. Note If the CD-ROM folder does not open automatically, double-click the CD-ROM icon on the desktop. c Double-click the Setup icon. d When the Authenticate screen appears, enter your administrator name and password. Click OK. If you do not know your administrator name or password, click , then follow the on-screen instructions. e When the main menu appears, click Easy Install. The MP Drivers, On-screen Manuals, and application software are installed automatically. The system is restarted automatically. Note Keep the Setup CD-ROM in a safe place in case you need to reinstall the software. When using Mac OS X v.10.3.9: Restarting the computer while connected to the machine may cause the machine not to be detected. To resolve this, either unplug the USB cable then plug it back in again, or turn the machine off then back on again. Note When using Mac OS X v.10.3.9, before using the Operation Panel on the machine to save originals scanned from the Platen Glass to the computer, it is necessary to select MP Navigator EX as the launch application on Image Capture under Applications. For details, refer to "Scanning Images" in the User's Guide on-screen manual. Software installation is now complete. Note If you want to select particular items to install, click Custom Install and follow the onscreen instructions to proceed the installation. f When the list of applications to install appears, confirm the contents, then click Install. Note Move the cursor over items to display explanations of each application. g Read the License Agreement carefully and click Yes. The software installation starts. h When the Print Head Alignment Recommended screen appears, click Next. i When the Setup Complete screen appears, click Next. Microsoft is a registered trademark of Microsoft Corporation. Windows is a trademark or registered trademark of Microsoft Corporation in the U.S. and/or other countries. Windows Vista is a trademark or registered trademark of Microsoft Corporation in the U.S. and/or other countries. Macintosh and Mac are trademarks of Apple Inc., registered in the U.S. and other countries.
-
 1
1 -
 2
2
 |
 |
