Canon PIXMA MX432 Configuraci?n del FAX [Spanish Version] - Page 1
Canon PIXMA MX432 Manual
 |
View all Canon PIXMA MX432 manuals
Add to My Manuals
Save this manual to your list of manuals |
Page 1 highlights
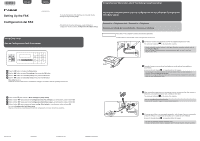
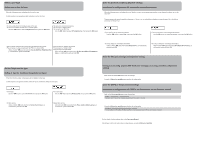
ENGLISH ESPAÑOL Setting Up the FAX Configuración del FAX K10375/K10374 Using Easy setup Uso de Configuración fácil (Easy setup) Complementary Information about Fax Setting Using Easy setup To use the fax features of the machine, you can enter the fax settings through the Easy setup. Información complementaria sobre la configuración del fax utilizando Configuración fácil (Easy setup) Para utilizar las funciones del equipo, puede introducir la configuración del fax mediante Configuración fácil (Easy setup). Connect to a Telephone Jack / Connect to a Telephone Conecte una clavija de línea telefónica / Conecte un teléfono When this screen is displayed, perform the following operations. Cuando aparezca esta pantalla, realice las siguientes operaciones. 1 Connect the machine to a telephone jack with the supplied telephone line cable. The connector is labeled on the back of the machine. • A basic connection method is shown in this figure. For other connection methods, refer to the On-screen Manual. • Users in Europe: If you prepare your own telephone line cable, be sure it is a 6-wire telephone line cable. 1 Press the button to display the Setup menu. 2 Use the [] button to select Fax settings, then press the OK button. 3 Use the [] button to select Easy setup, then press the OK button. 4 Use the [] button to select Start setup, then press the OK button. Easy setup starts up. Follow the on-screen instruction to complete the settings in accordance with the operating environment. 1 Pulse el botón para mostrar el Menú Configurar (Setup menu). 2 Utilice el botón [] para seleccionar Configuración fax (Fax settings) y, a continuación, pulse el botón OK. 3 Utilice el botón [] para seleccionar Configuración fácil (Easy setup) y, a continuación, pulse el botón OK. 4 Utilice el botón [] para seleccionar Iniciar config. (Start setup) y, a continuación, pulse el botón OK. Se inicia la Configuración fácil (Easy setup). Siga las instrucciones en pantalla para finalizar la configuración en función del entorno operativo. QT5-4770-V01 XXXXXXXX ©CANON INC.2012 PRINTED IN XXXXXXXX 1 Conecte el equipo a una clavija de línea telefónica con el cable de línea telefónica suministrado. El conector lleva la etiqueta en la parte posterior del equipo. • En esta figura se muestra un método de conexión básico. Para ver otros métodos de conexión, consulte el Manual en pantalla. • Usuarios en Europa: si utiliza su propio cable de línea telefónica, asegúrese de que es un cable de línea telefónica de 6 hilos. 1 2 When connecting a telephone or an answering machine, remove the Cap, then connect a telephone or an answering machine with a telephone line cable. The connector is labeled on the back of the machine. • Do not use a telephone jack line duplexer. • Users in UK: Use a B.T. adapter for connection as required. 2 2 Al conectar un teléfono o un contestador automático, retire la tapa (Cap) y, a continuación, conecte el teléfono o el contestador automático con un cable de línea telefónica. El conector lleva la etiqueta en la parte posterior del equipo. • No utilice un adaptador de clavija telefónica doble. • Usuarios de Reino Unido: utilice un adaptador de B.T. para la conexión, si fuera necesario.
-
 1
1 -
 2
2
 |
 |