Canon PIXMA MX439 MX432 Getting Started - Page 3
Configuración
 |
View all Canon PIXMA MX439 manuals
Add to My Manuals
Save this manual to your list of manuals |
Page 3 highlights
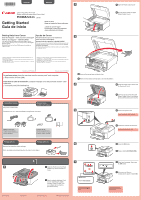
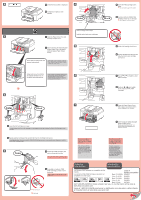
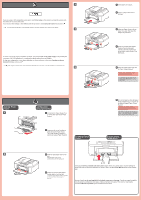
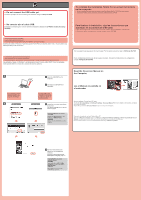
3 3 If you are using a WPS-compatible access point, select Start setup on the screen to connect to wireless LAN, then follow the on-screen instruction. If you choose other settings or have difficulty with the procedure, select Cancel for now, then proceed to . * In , you can follow the instruction on the computer screen to connect to wireless LAN or other kind of network. 4 Si utiliza un punto de acceso compatible con WPS, seleccione Iniciar config. (Start setup) en la pantalla para conectarse a la LAN inalámbrica y, a continuación siga las instrucciones en pantalla. Si elige otra configuración o tiene alguna dificultad con el procedimiento, seleccione Cancelar por ahora (Cancel for now) y continúe con . * En , puede seguir las instrucciones de la pantalla del ordenador para conectarse a la LAN inalámbrica o a otro tipo de red. 5 1 2 1 2 3 Insert paper until it stops. 3 Inserte el papel hasta que se detenga. 4 Adjust the Paper Guide to fit the paper size used, then open the Output Tray Extension. 4 Ajuste la guía del papel (Paper Guide) al tamaño del papel utilizado y abra la extensión de la bandeja de salida (Output Tray Extension). 5 Open the Paper Output Tray and the Paper Output Support. Printing without opening the Paper Output Tray causes an error. For information about paper, refer to the On-screen Manual which will be installed later. Setting Plain Paper 1 4 Configuración para papel normal 1 Check that the Paper Output Tray is closed, then pull out the Paper Support. 5 Abra la bandeja de salida del papel (Paper Output Tray) y el soporte de la salida del papel (Paper Output Support). Si imprime sin abrir la bandeja de salida del papel (Paper Output Tray), provocará un error. Para obtener más información sobre el papel, consulte el Manual en pantalla que se instalará posteriormente. 1 Asegúrese de que la bandeja de salida del papel (Paper Output Tray) está cerrada y extraiga el soporte del papel (Paper Support). Loading Photo Paper Cargar papel fotográfico 2 2 Slide the right Paper Guide to the end. The left Paper Guide moves simultaneously with the right guide. 2 Deslice la guía del papel (Paper Guide) derecha hacia el lado. La guía del papel (Paper Guide) izquierda se mueve al mismo tiempo que la derecha. Insert paper with the printable side down until it stops. When using photo paper, machine settings for media type and size should be adjusted. For details, refer to the On-screen Manual which will be installed later. Inserte el papel con la cara imprimible hacia abajo hasta que se detenga. Cuando use papel fotográfico, deberá ajustar la configuración del equipo al tipo y al tamaño del soporte. Para obtener más detalles, consulte el Manual en pantalla que se instalará posteriormente.
-
 1
1 -
 2
2 -
 3
3 -
 4
4
 |
 |
