Canon PIXMA MX712 Guide for Printer Setup for Network - Page 3
Setup Procedure Selection - wireless all in one printer
 |
View all Canon PIXMA MX712 manuals
Add to My Manuals
Save this manual to your list of manuals |
Page 3 highlights
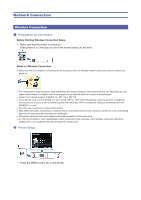
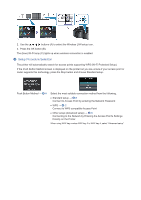
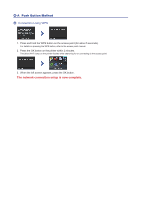
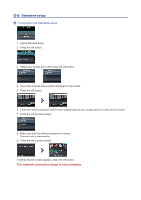
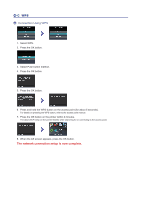
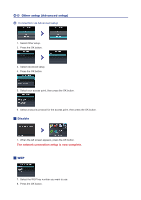
2. Use the buttons (A) to select the Wireless LAN setup icon. 3. Press the OK button (B). The (blue) Wi-Fi lamp (C) lights up when wireless connection is enabled. c Setup Procedure Selection The printer will automatically search for access points supporting WPS (Wi-Fi Protected Setup). If the Push Button Method screen is displayed on the printer but you are unsure if your access point or router supports this technology, press the Stop button and choose Standard setup. Push Button Method → d-A Select the most suitable connection method from the following. • Standard setup → d-B Connect to Access Point by entering the Network Password • WPS → d-C Connect to WPS-compatible Access Point • Other setup (Advanced setup) → d-D Connecting to the Network by Entering the Access Point's Settings Directly on the Printer When using WEP key number WEP key 2 to WEP key 4, select "Advanced setup".
-
 1
1 -
 2
2 -
 3
3 -
 4
4 -
 5
5 -
 6
6 -
 7
7 -
 8
8 -
 9
9 -
10
-
11
-
12
-
13
-
14
-
15
-
16
-
17
-
18
-
19
-
20
-
21
-
22
 |
 |
