Canon PIXMA Pro9000 Quick Start Guide - Page 16
Basic Printing, Prepare to load paper., Load the paper., Pull out the Front Tray - front feed
 |
View all Canon PIXMA Pro9000 manuals
Add to My Manuals
Save this manual to your list of manuals |
Page 16 highlights
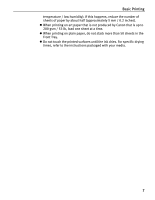
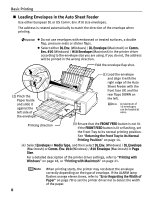
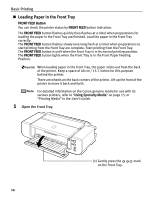
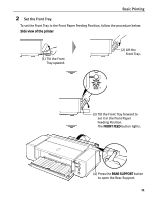
Basic Printing 3 Prepare to load paper. (2) Press the right corner of the Rear Support to open the Rear Support Extension. When loading paper that is Letter size or smaller, this procedure is not necessary. (1) Pull out the Front Tray Extension completely. (3) Press the FRONT FEED button. The printer starts making operating noises and then the POWER lamp flashes for about 20 seconds. Do not load paper when the POWER lamp is flashing. Otherwise, the paper or the printer may be damaged. 4 Load the paper. (1) Ensure that the POWER lamp is lit and the FRONT FEED button is flashing quickly. If the POWER lamp is flashing green, wait until it stops flashing. (2) Load the paper straight into the Front Tray with the print side facing UP. Align the front edge of the paper with the mark on the Front Tray. When printing from the Front Tray, load one sheet in the Front Tray at a time. Align the right edge of the paper against the right side of the Front Tray. If the printer is not used for 5 minutes or more while it is as described in (1) above, then the FRONT FEED button stops flashing and stays lit and you cannot set the paper. If this happens, return to (3) in step 3. 12
-
 1
1 -
2
-
3
-
4
-
5
-
6
-
7
-
8
-
9
-
10
-
 11
11 -
 12
12 -
 13
13 -
 14
14 -
 15
15 -
 16
16 -
 17
17 -
 18
18 -
 19
19 -
 20
20 -
 21
21 -
22
-
23
-
24
-
25
-
26
-
27
-
28
-
29
-
30
-
31
-
32
-
33
-
34
-
35
-
36
-
37
-
38
-
39
-
40
-
41
-
42
-
43
-
44
-
45
-
46
-
47
-
48
-
49
-
50
-
51
-
52
-
53
-
54
-
55
-
56
-
57
-
58
-
59
-
60
-
61
-
62
-
63
-
64
-
65
-
66
-
67
-
68
-
69
-
70
-
71
-
72
-
73
-
74
-
75
-
76
-
77
-
78
-
79
-
80
-
81
-
82
-
83
-
84
-
85
-
86
-
87
-
88
-
89
-
90
-
91
-
92
-
93
-
94
-
95
-
96
-
97
-
98
-
99
-
100
 |
 |
