Canon PowerShot S50 Software Starter Guide (For the Canon Digital Camera Solut - Page 53
Adding New Data to the My Camera Window
 |
View all Canon PowerShot S50 manuals
Add to My Manuals
Save this manual to your list of manuals |
Page 53 highlights
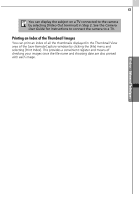
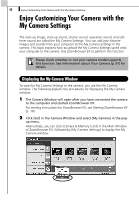
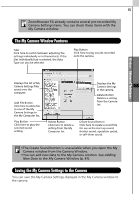
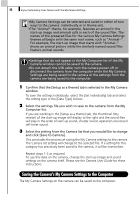
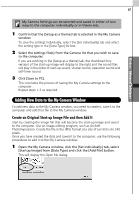
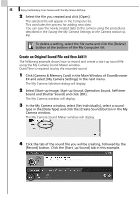
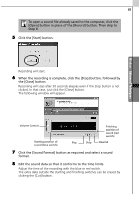
Windows - Advanced Techniques - 47 My Camera Settings can be selected and saved in either of two ways to the computer: individually or in theme sets. 1 Confirm that the [Setup as a theme] tab is selected in the My Camera window. To save the settings individually, select the [Set individually] tab and select the setting type in the [Data Type] list box. 2 Select the settings file(s) from the Camera list that you wish to save to the computer. If you are working in the [Setup as a theme] tab, the thumbnail (tiny version) of the start-up image will display to the right and the sound files will play in the order of start-up sound, shutter sound, operation sound and self-timer sound. 3 Click [Save to PC]. This concludes the process of saving the My Camera settings to the computer. Repeat steps 1-3 as required. Adding New Data to the My Camera Window To add new data to the My Camera window, you need to create it, save it to the computer and add that file to the My Camera window. Create an Original Start-up Image File and then Add It Start by creating the image file that will become the start-up image and save it to the computer. Use an image editing program, such as ArcSoft PhotoImpression. Create the file in the JPEG format at a size of (w) 320 x (h) 240 pixels. Once you have created the data and saved it to the computer, use the following procedures to add it to the My Camera window. 1 Open the My Camera window, click the [Set individually] tab, select [Startup Image] from [Data Type] and click the [Add File] button. This will display the Open file dialog.
-
 1
1 -
2
-
3
-
4
-
5
-
6
-
7
-
8
-
9
-
10
-
11
-
12
-
13
-
14
-
15
-
16
-
17
-
18
-
19
-
20
-
21
-
22
-
23
-
24
-
25
-
26
-
27
-
28
-
29
-
30
-
31
-
32
-
33
-
34
-
35
-
36
-
37
-
38
-
39
-
40
-
41
-
42
-
43
-
44
-
45
-
46
-
47
-
 48
48 -
 49
49 -
 50
50 -
 51
51 -
 52
52 -
 53
53 -
 54
54 -
 55
55 -
 56
56 -
 57
57 -
 58
58 -
59
-
60
-
61
-
62
-
63
-
64
-
65
-
66
-
67
-
68
-
69
-
70
-
71
-
72
-
73
-
74
-
75
-
76
-
77
-
78
-
79
-
80
-
81
-
82
-
83
-
84
-
85
-
86
-
87
-
88
-
89
-
90
-
91
-
92
-
93
-
94
-
95
-
96
-
97
-
98
-
99
-
100
-
101
-
102
-
103
-
104
-
105
-
106
-
107
-
108
-
109
-
110
-
111
-
112
-
113
-
114
-
115
-
116
-
117
-
118
-
119
-
120
-
121
-
122
-
123
-
124
-
125
-
126
-
127
-
128
-
129
-
130
-
131
-
132
-
133
-
134
-
135
-
136
-
137
-
138
 |
 |