Canon PowerShot SX610 HS User Guide - Page 106
Printing Images Wirelessly from a, Connected Printer
 |
View all Canon PowerShot SX610 HS manuals
Add to My Manuals
Save this manual to your list of manuals |
Page 106 highlights
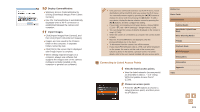
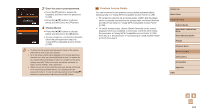
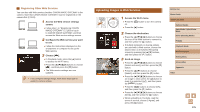
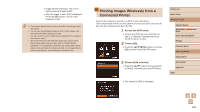
●●Image transfer will begin. The screen darkens during image transfer. ●●After the image is sent, [OK] is displayed. Press the [ ] button to return to the playback screen. ●● Connections require that a memory card with saved images be in the camera. ●● You can also send multiple images at once, resize images, and add comments before sending (=109). ●● You can send the current image by choosing [Send this image] on the screen in step 3. ●● We recommend using the dedicated application Canon Online Photo Album when viewing images sent to CANON iMAGE GATEWAY on a smartphone. Search for the Canon Online Photo Album in the App Store for iPhone and iPad, or in Google Play for Android smartphones, and download and install the app. Printing Images Wirelessly from a Connected Printer Connect the camera to a printer via Wi-Fi to print as follows. These steps show how to use the camera as an access point, but you can also use an existing access point (=96). 1 Access the Wi-Fi menu. ●●Access the Wi-Fi menu as described in step 2 in "Adding a Smartphone Using the Wi-Fi Menu" (= 94). 2 Choose [ ]. ●●Press the buttons to choose [ ], and then press the [ ] button. 3 Choose [Add a Device]. ●●Press the [ ][ ] buttons to choose [Add a Device], and then press the [ ] button. ●●The camera's SSID is displayed. Before Use Basic Guide Advanced Guide Camera Basics Auto Mode / Hybrid Auto Mode Other Shooting Modes P Mode Playback Mode Wi-Fi Functions Setting Menu Accessories Appendix Index 106
-
 1
1 -
2
-
3
-
4
-
5
-
6
-
7
-
8
-
9
-
10
-
11
-
12
-
13
-
14
-
15
-
16
-
17
-
18
-
19
-
20
-
21
-
22
-
23
-
24
-
25
-
26
-
27
-
28
-
29
-
30
-
31
-
32
-
33
-
34
-
35
-
36
-
37
-
38
-
39
-
40
-
41
-
42
-
43
-
44
-
45
-
46
-
47
-
48
-
49
-
50
-
51
-
52
-
53
-
54
-
55
-
56
-
57
-
58
-
59
-
60
-
61
-
62
-
63
-
64
-
65
-
66
-
67
-
68
-
69
-
70
-
71
-
72
-
73
-
74
-
75
-
76
-
77
-
78
-
79
-
80
-
81
-
82
-
83
-
84
-
85
-
86
-
87
-
88
-
89
-
90
-
91
-
92
-
93
-
94
-
95
-
96
-
97
-
98
-
99
-
100
-
 101
101 -
 102
102 -
 103
103 -
 104
104 -
 105
105 -
 106
106 -
 107
107 -
 108
108 -
 109
109 -
 110
110 -
 111
111 -
112
-
113
-
114
-
115
-
116
-
117
-
118
-
119
-
120
-
121
-
122
-
123
-
124
-
125
-
126
-
127
-
128
-
129
-
130
-
131
-
132
-
133
-
134
-
135
-
136
-
137
-
138
-
139
-
140
-
141
-
142
-
143
-
144
-
145
-
146
-
147
-
148
-
149
-
150
-
151
-
152
-
153
-
154
-
155
-
156
-
157
-
158
-
159
-
160
-
161
-
162
 |
 |
