Canon Powershot S2 IS ImageBrowser 5.2 Software User Guide - Page 97
Printing Images 8/8
 |
UPC - 490561006106
View all Canon Powershot S2 IS manuals
Add to My Manuals
Save this manual to your list of manuals |
Page 97 highlights
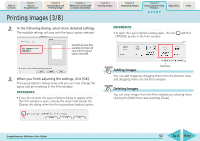
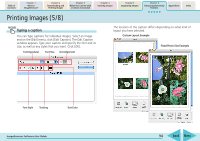
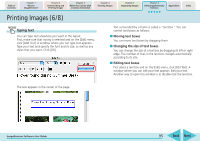
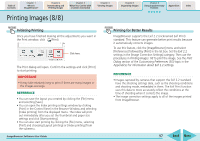
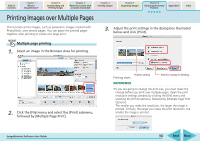
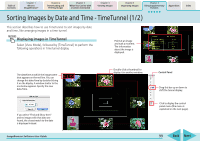
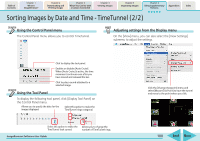
Table of Contents Chapter 1 What is ImageBrowser? Chapter 2 Downloading and Printing Images Chapter 3 What You Can Do with a Camera Connected Chapter 4 Viewing Images Printing Images (8/8) Chapter 5 Organizing Images Chapter 6 Using Supplementary Features Appendices Index Initiating Printing Once you have finished making all the adjustments you want in the Print window, click (Print). Click here. The Print dialog will open. Confirm the settings and click [Print] to start printing. IMPORTANT • It may take relatively long to print if there are many images or the images are large. REFERENCE • You can save the layout you created by clicking the [File] menu and selecting [Save]. • You can open the Index printing settings window by clicking [Print] in the Control Panel in the Browser Window and selecting [Index printing] from the displayed menu. The index will print out immediately after you set the thumbnail and paper size settings and click [Start printing]. • You can also start printing by clicking the [File] menu, selecting [Print] and choosing [Layout printing] or [Index printing] from the submenu. ImageBrowser Software User Guide Printing for Better Results ImageBrowser supports the Exif 2.2 (nicknamed Exif Print) standard. This feature can generate better print results because it automatically corrects images. To use this feature, click the [ImageBrowser] menu and select [Preferences] followed by [Print] in the list box. Set the Exif 2.2 settings in the [Image Correction Settings] category. Then use the procedures in Printing Images 1/8 to print the image. See the Print Dialog section of the Customizing Preferences (3/3) topic in the Appendices for information about Exif 2.2 settings. REFERENCE • Images captured by cameras that support the Exif 2.2 standard have the shooting settings data, such as the shooting conditions and shooting mode, embedded in them. The Exif Print function uses this data to more accurately reflect the conditions at the time of shooting when it corrects the image. • The image correction settings apply to all of the images printed from ImageBrowser. 97 Back Next
-
 1
1 -
2
-
3
-
4
-
5
-
6
-
7
-
8
-
9
-
10
-
11
-
12
-
13
-
14
-
15
-
16
-
17
-
18
-
19
-
20
-
21
-
22
-
23
-
24
-
25
-
26
-
27
-
28
-
29
-
30
-
31
-
32
-
33
-
34
-
35
-
36
-
37
-
38
-
39
-
40
-
41
-
42
-
43
-
44
-
45
-
46
-
47
-
48
-
49
-
50
-
51
-
52
-
53
-
54
-
55
-
56
-
57
-
58
-
59
-
60
-
61
-
62
-
63
-
64
-
65
-
66
-
67
-
68
-
69
-
70
-
71
-
72
-
73
-
74
-
75
-
76
-
77
-
78
-
79
-
80
-
81
-
82
-
83
-
84
-
85
-
86
-
87
-
88
-
89
-
90
-
91
-
 92
92 -
 93
93 -
 94
94 -
 95
95 -
 96
96 -
 97
97 -
 98
98 -
 99
99 -
 100
100 -
 101
101 -
 102
102 -
103
-
104
-
105
-
106
-
107
-
108
-
109
-
110
-
111
-
112
-
113
-
114
-
115
-
116
-
117
-
118
-
119
 |
 |