Canon VB-R12VE Mobile Camera Viewer Operation Guide
Canon VB-R12VE Manual
 |
View all Canon VB-R12VE manuals
Add to My Manuals
Save this manual to your list of manuals |
Canon VB-R12VE manual content summary:
- Canon VB-R12VE | Mobile Camera Viewer Operation Guide - Page 1
in this manual. Tap Touch and hold The screen images used in this manual are samples used for explanation purposes. They may differ from the actual screens that are displayed. Screens from iOS are used as an example. Be sure to read this Operation Guide before using the network camera. ENGLISH - Canon VB-R12VE | Mobile Camera Viewer Operation Guide - Page 2
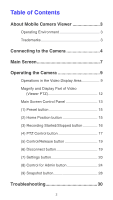
Viewer 3 Operating Environment 3 Trademarks 3 Connecting to the Camera 4 Main Screen 7 Operating the Camera 9 Operations in the Video Display Area 9 Magnify and Display Part of Video 19 (7) Settings button 20 (8) Control for Admin button 24 (9) Snapshot button 28 Troubleshooting 30 2 - Canon VB-R12VE | Mobile Camera Viewer Operation Guide - Page 3
Camera Viewer is a viewer for Canon network cameras that runs on mobile devices. Note that some functions may not be available depending on your user privileges. For details, consult the camera's administrator. Operating Environment Surface, iPad, iPhone, Nexus, and Galaxy devices are supported - Canon VB-R12VE | Mobile Camera Viewer Operation Guide - Page 4
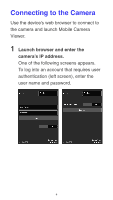
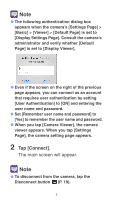
Connecting to the Camera Use the device's web browser to connect to the camera and launch Mobile Camera Viewer. 1 Launch browser and enter the camera's IP address. One of the following screens appears. To log into an account that requires user authentication (left screen), enter the user name and - Canon VB-R12VE | Mobile Camera Viewer Operation Guide - Page 5
and password. ● Set [Remember user name and password] to [Yes] to remember the user name and password. ● When you tap [Camera Viewer], the camera viewer appears. When you tap [Settings Page], the camera setting page appears. 2 Tap [Connect]. The main screen will appear. Note ● To disconnect from the - Canon VB-R12VE | Mobile Camera Viewer Operation Guide - Page 6
● If you open another window or tab to access the camera while an authenticated web page is displayed, the authentication information of the displayed web page may be discarded. In this case, enter the authentication information again. 6 - Canon VB-R12VE | Mobile Camera Viewer Operation Guide - Page 7
Main Screen (1) (2) (3) (1) Video Display Area Displays video received from the camera. (2) Information bar Displays information, warnings, and error messages. (3) Control panel (P. 13) Displays buttons for controlling the camera. 7 - Canon VB-R12VE | Mobile Camera Viewer Operation Guide - Page 8
Viewer's video cannot rotate even when the camera's [Settings Page] > [Basic] > [Viewer] > [Rotate Video Display] is set to [Rotate clockwise 90 degrees] or [Rotate counterclockwise 90 degrees]. If you want to display video - Canon VB-R12VE | Mobile Camera Viewer Operation Guide - Page 9
control privileges are required to operate the camera. You have camera control privileges when [Release] is displayed. When [Control] is displayed, tap it to obtain camera control privileges. Operations in the Video Display Area ●Scroll Bar Controls (1) (3) (2) (1) Scroll bar for tilt (2) Scroll - Canon VB-R12VE | Mobile Camera Viewer Operation Guide - Page 10
the video quality becomes. (ii) Position where zooming pauses (iii) Enhanced digital zoom range ●Screen Tap Operations When you tap the video display area, the camera will move so that the location that was tapped is centered in the screen. 10 - Canon VB-R12VE | Mobile Camera Viewer Operation Guide - Page 11
Note ● You can also operate the camera with the PTZ control panel (P. 17). ● When multiple tabs are open in the browser on an iPhone 6 Plus and it is turned to landscape orientation, - Canon VB-R12VE | Mobile Camera Viewer Operation Guide - Page 12
●Drag to Move In the video display area, swipe in the direction you would like to change the camera angle. An arrow will appear and the camera angle will change in the direction of the arrow. Increasing the length of the arrow will increase the movement speed. Note This function is not - Canon VB-R12VE | Mobile Camera Viewer Operation Guide - Page 13
the upper part of the video display area while viewing magnified video. Main Screen Control Panel (1) (2) (3) (4) (9) (5) (8) (6) (7) (1) Preset button (P. 15) Camera settings, such as the camera angle or exposure, are changed to presets registered in advance. (2) Home Position button (P. 15 - Canon VB-R12VE | Mobile Camera Viewer Operation Guide - Page 14
Control button (P. 17) Displays the PTZ Control panel. (5) Control/Release button (P. 19) Enables or disables camera control privileges. (6) Disconnect button (P. 19) Disconnects from the camera. (7) Settings button (P. 20) Allows you to configure preset, video capture size, and maximum frame rate - Canon VB-R12VE | Mobile Camera Viewer Operation Guide - Page 15
settings, such as the camera angle or exposure, are changed to presets registered in advance. (2) Home Position button Camera settings, such as the camera angle or exposure, are returned to the home position registered in advance. Note Register the preset or home position beforehand using [Register - Canon VB-R12VE | Mobile Camera Viewer Operation Guide - Page 16
● When there is 20 MB or less available space on a memory card, a message appears and recording stops. ● The recorded video cannot be viewed in Mobile Camera Viewer. To view the video, use the Recorded Video Utility included on the Setup CD-ROM. 16 - Canon VB-R12VE | Mobile Camera Viewer Operation Guide - Page 17
) (v) (i) Scroll Bar button Displays/hides scroll bars in the video display area for controlling pan, tilt, and zoom operations (P. 9). (ii) Center Position button Moves the camera position to the center of the pan and tilt range. 17 - Canon VB-R12VE | Mobile Camera Viewer Operation Guide - Page 18
button Moves to the position set as the Home Position (P. 21). Note The Pan/Tilt and Zoom control buttons cannot be used when the camera's [Settings Page] > [Security] > [SSL/TLS] > [HTTPS Connection Policy] is set to use [HTTPS] or [HTTP and HTTPS], and an HTTPS connection is established. Use - Canon VB-R12VE | Mobile Camera Viewer Operation Guide - Page 19
again to release control. Displayed when camera control privileges have been obtained Note The camera cannot be controlled by multiple users simultaneously. Only the user with control privileges can control the camera. (6) Disconnect button Disconnects from the camera. The login screen will appear - Canon VB-R12VE | Mobile Camera Viewer Operation Guide - Page 20
(7) Settings button Allows you to configure preset, incoming video size, and maximum frame rate settings. ●Preset Settings You can register current camera settings, such as the camera angle or exposure, as presets. Presets can also be deleted. 20 - Canon VB-R12VE | Mobile Camera Viewer Operation Guide - Page 21
[Register Preset] Select a preset number from [Register to], select [Registered Content], enter a preset name, and then tap [Register]. Note If you select [Home Position] in [Register to], you can set the home position. 21 - Canon VB-R12VE | Mobile Camera Viewer Operation Guide - Page 22
[Delete Preset] Select a preset to delete and then tap [Delete]. ●Incoming Video Settings Select whether to receive digital PTZ cropped video and select the size of the received video. 22 - Canon VB-R12VE | Mobile Camera Viewer Operation Guide - Page 23
●Maximum Frame Rate Settings You can set a maximum frame rate for video received from the camera. 23 - Canon VB-R12VE | Mobile Camera Viewer Operation Guide - Page 24
(8) Control for Admin button Allows you to configure focus, exposure, Clear IR Mode, day/night, and external device output settings. ●Focus [Auto] Automatically focuses on the subject. 24 - Canon VB-R12VE | Mobile Camera Viewer Operation Guide - Page 25
[Manual] Touch and hold the (Far) or (Near) buttons to adjust the focus. [Fixed at infinity] Fixes the focus at infinity, where camera focus adjustment is not required. ●Exposure To darken the video, set a negative value. To brighten the video, set a positive value. 25 - Canon VB-R12VE | Mobile Camera Viewer Operation Guide - Page 26
Note This cannot be configured when [Settings Page] > [Camera] > [Initial Settings] > [Exposure] is set to [Manual] or [Smart Shade Control] is set to [Auto]. ●Clear IR Mode Select whether to use Clear IR Mode. Selecting [ON] changes the video to monochrome - Canon VB-R12VE | Mobile Camera Viewer Operation Guide - Page 27
be configured when [Clear IR Mode] is set to [OFF]. ●External Device Output You can control the output to an external device connected to the camera. 27 - Canon VB-R12VE | Mobile Camera Viewer Operation Guide - Page 28
(9) Snapshot button Captures the image in the video display area, and saves the still image to the device. Snapshot panel 28 - Canon VB-R12VE | Mobile Camera Viewer Operation Guide - Page 29
●Saving a Snapshot ●Closing the Snapshot Panel Tap . 29 - Canon VB-R12VE | Mobile Camera Viewer Operation Guide - Page 30
Troubleshooting Cannot connect to camera ● Check to make sure the user name and password are correct. ● . Try connecting again after the panoramic screen has been created. Cannot control the camera ● Multiple users cannot obtain control privileges simultaneously. ● Control privileges may be revoked - Canon VB-R12VE | Mobile Camera Viewer Operation Guide - Page 31
panoramic screen. Try connecting again after the panoramic screen has been created. ● Check the camera, network and device for any abnormality. ● Reboot the device and connect. Cannot register settings ● for approximately the first minute using an SSL connection. BIE-7099-002 © CANON INC. 2017
-
 1
1 -
 2
2 -
 3
3 -
 4
4 -
 5
5 -
 6
6 -
 7
7 -
8
-
9
-
10
-
11
-
12
-
13
-
14
-
15
-
16
-
17
-
18
-
19
-
20
-
21
-
22
-
23
-
24
-
25
-
26
-
27
-
28
-
29
-
30
-
31
 |
 |
Be sure to read this Operation Guide
before using the network camera.
Mobile Camera Viewer
Operation Guide
How to Read This Manual
This manual contains instructions on Mobile Camera
Viewer operations.
For details on camera settings, camera precautions
and limitations, refer to the camera Operation Guide.
Available functions will differ depending on the
camera. Some operations will not be available on
unsupported cameras even when functions are
mentioned in this manual.
The following icons are used to represent tap
gestures in this manual.
The screen images used in this manual are samples used for
explanation purposes. They may differ from the actual
screens that are displayed.
Screens from iOS are used as an example.
Tap
Touch and hold
ENGLISH