Canon VB-S31D Mark II Network Camera Operation Guide - Page 53
Configuring Initial Camera Settings, Flow of Configuration Using the Camera Management Tool
 |
View all Canon VB-S31D Mark II manuals
Add to My Manuals
Save this manual to your list of manuals |
Page 53 highlights
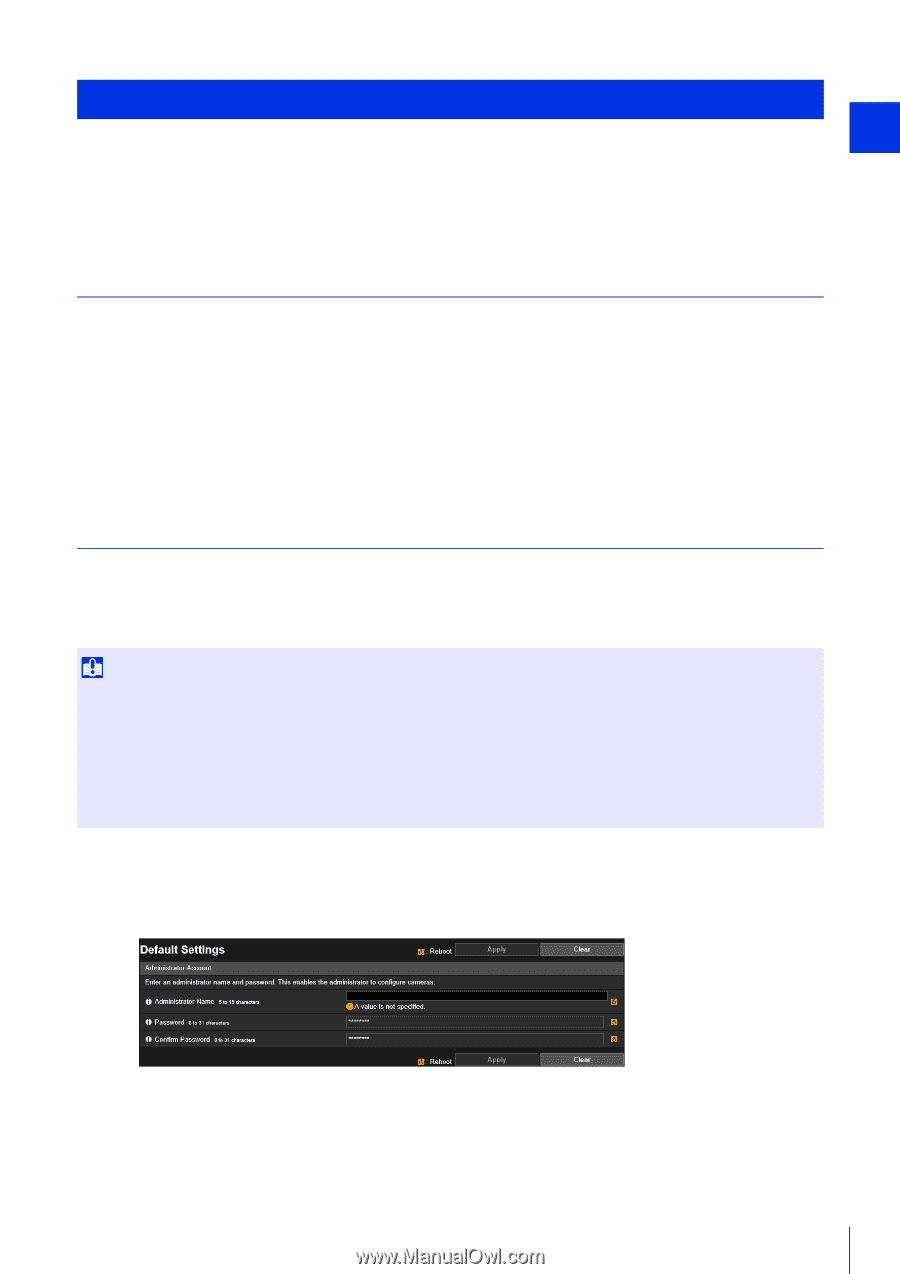
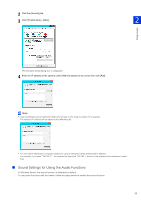
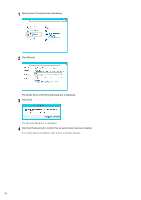
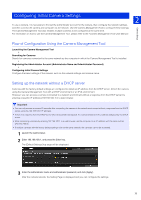
Configuring Initial Camera Settings 2 To use a camera, it is necessary to first set the administrator account for the camera, then configure the network settings, and then connect the camera and computer via the network. Use the Camera Management Tool to configure these settings. The Camera Management Tool also enables multiple cameras to be configured at the same time. For information on how to use the Camera Management Tool, please refer to the "Camera Management Tool User Manual". Camera Setup Flow of Configuration Using the Camera Management Tool Launching the Camera Management Tool Searching for Cameras Search for cameras connected to the same network as the computer in which the Camera Management Tool is installed. Registering the Administrator Account (Administrator Name and Administrator Password) Configuring Initial Camera Settings Configure the basic settings of the camera, such as the network settings and camera name. Setting up the network without a DHCP server Cameras with the factory default settings are configured to obtain an IP address from the DHCP server. Detect the camera using the Camera Management Tool with a DHCP environment or an IPv6 environment. However, you can access a camera connected to a network environment without a response from the DHCP server by entering a specific IP address (192.168.100.1) in a web browser. Important • You can only access a camera 30 seconds after connecting the camera to the network environment without a response from the DHCP server using the 192.168.100.1 IP address. • If there is a response from the DHCP server after 30 seconds has elapsed, the camera switches to the address assigned by the DHCP server. • When accessing a camera by entering 192.168.100.1 in a web browser, set the computer to an IP address with the same subnet (255.255.255.0). • If multiple cameras with the factory default settings exist on the same network, the cameras cannot be accessed. 1 Launch the web browser. 2 Enter 192.168.100.1, and press the Enter key. The [Default Settings] top page will be displayed. 3 Enter the administrator name and administrator password, and click [Apply]. After the camera reboots, the Setting Page is displayed and you can configure the settings. 35
-
 1
1 -
2
-
3
-
4
-
5
-
6
-
7
-
8
-
9
-
10
-
11
-
12
-
13
-
14
-
15
-
16
-
17
-
18
-
19
-
20
-
21
-
22
-
23
-
24
-
25
-
26
-
27
-
28
-
29
-
30
-
31
-
32
-
33
-
34
-
35
-
36
-
37
-
38
-
39
-
40
-
41
-
42
-
43
-
44
-
45
-
46
-
47
-
 48
48 -
 49
49 -
 50
50 -
 51
51 -
 52
52 -
 53
53 -
 54
54 -
 55
55 -
 56
56 -
 57
57 -
 58
58 -
59
-
60
-
61
-
62
-
63
-
64
-
65
-
66
-
67
-
68
-
69
-
70
-
71
-
72
-
73
-
74
-
75
-
76
-
77
-
78
-
79
-
80
-
81
-
82
-
83
-
84
-
85
-
86
-
87
-
88
-
89
-
90
-
91
-
92
-
93
-
94
-
95
-
96
-
97
-
98
-
99
-
100
-
101
-
102
-
103
-
104
-
105
-
106
-
107
-
108
-
109
-
110
-
111
-
112
-
113
-
114
-
115
-
116
-
117
-
118
-
119
-
120
-
121
-
122
-
123
-
124
-
125
-
126
-
127
-
128
-
129
-
130
-
131
-
132
-
133
-
134
-
135
-
136
-
137
-
138
-
139
-
140
-
141
-
142
-
143
-
144
-
145
-
146
-
147
-
148
-
149
-
150
-
151
-
152
-
153
-
154
-
155
-
156
-
157
-
158
-
159
-
160
-
161
-
162
-
163
-
164
-
165
-
166
-
167
-
168
-
169
-
170
-
171
-
172
-
173
-
174
-
175
-
176
-
177
-
178
-
179
-
180
-
181
-
182
-
183
-
184
-
185
-
186
-
187
-
188
-
189
-
190
-
191
-
192
-
193
-
194
-
195
-
196
-
197
-
198
-
199
-
200
-
201
-
202
-
203
-
204
-
205
-
206
-
207
-
208
-
209
-
210
-
211
-
212
-
213
-
214
-
215
-
216
-
217
-
218
-
219
-
220
-
221
-
222
-
223
-
224
-
225
-
226
-
227
-
228
-
229
-
230
-
231
-
232
-
233
-
234
-
235
-
236
-
237
-
238
-
239
-
240
-
241
-
242
-
243
-
244
-
245
-
246
-
247
-
248
-
249
-
250
-
251
-
252
-
253
-
254
-
255
-
256
-
257
-
258
-
259
-
260
 |
 |