Canon VIXIA HG10 Corel Application Disc Ver.2 Instruction Manual - Page 8
Transferring Movies Back to the, Camcorder - high definition hard disk drive camcorder
 |
View all Canon VIXIA HG10 manuals
Add to My Manuals
Save this manual to your list of manuals |
Page 8 highlights
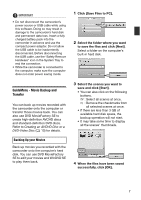
IMPORTANT If a folder on an external hard disk is selected, the message "Delayed Write Failed" will appear and you may not be able to save the files. NOTES • Movies recorded with this camcorder have a maximum file size of 2 GB (about 17 min. in HXP mode; about 35 min. in SP mode). Longer scenes will be divided into files smaller than 2 GB. They will be saved as separate scenes when transferred to a computer. • The file name of scenes saved on the hard disk reflects the date and time (in 24-hour format) of the original recordings. For example, the file name of a recording made around 9 p.m. on October 25 will be: 20071025212030.m2ts YYYYMMDDhhmmss • Unless you select a different folder in step 2, scenes will be saved in folders that reflect the date of recording under the My Videos folder in the My Documents folder. The exact path is different for each system but a typical path for the scene on the previous example would be: C:\Documents and Settings\ [User name]\My Documents\ My Videos\20071025 Transferring Movies Back to the Camcorder After movies have been transferred to your computer, they can be transferred back to the camcorder - even after being edited with DVD MovieFactory SE. After movies have been transferred back, you can connect the camcorder to a high-definition TV set to play back your movies. 1 Click [Write Back to Camcorder]. 2 Click [Select Folder]. In the window that opens, select a folder and then click [OK]. Select a folder on the computer's built-in hard disk. You cannot select a folder on the computer's CD or DVD drive. 3 Select the scenes to transfer and click [Start]. • It may take some time to display all the scenes' thumbnails. • Scenes larger than 2 GB cannot be selected. 8
-
 1
1 -
2
-
 3
3 -
 4
4 -
 5
5 -
 6
6 -
 7
7 -
 8
8 -
 9
9 -
 10
10 -
 11
11 -
 12
12 -
 13
13 -
14
-
15
-
16
 |
 |
