Canon XL2 Console Software Operations Manual - Page 17
DV Rec] Tab, HDV Rec] Tab - resolution
 |
View all Canon XL2 manuals
Add to My Manuals
Save this manual to your list of manuals |
Page 17 highlights
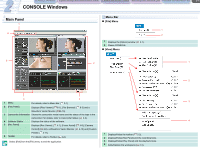
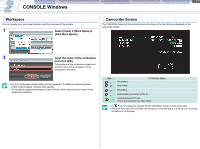
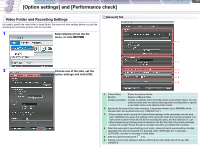
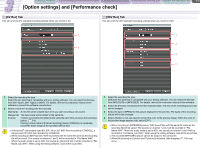
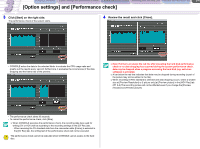
CONSOLE Windows [Option settings] and [Performance check] Camera and Picture Control Recording onto the Hard Disk Playback the Recorded Files 3-2 [Option settings] and [Performance check] [DV Rec] Tab This tab is for the DV standard recording settings when you record in DV. [HDV Rec] Tab This tab is for the HDV standard recording settings when you record in HDV. 11 1 2 22 3 4 1 Select the recording file type. Select the AVI type that is compatible with your editing software. You can select the file type from [AVI-Type1], [AVI-Type2] or [MXF]. For details, refer to the instruction manual of the software or consult the software manufacturer. 2 Select a mode for recoding onto the hard disk. [Standard] A new file will be created each time you start recording a new scene. [Sequence] [Frame] The new scene will be added to the same file. 1 frame is recorded and added to the same file each time you press the recording button. ( 5-4) Placing a check mark at [Interval recording] makes CONSOLE to repeatedly record the frame image at the specified interval time. Avid Xpress® can properly read 60i, 30F, 50i or 25F MSF files recorded by CONSOLE; it cannot read 24F MXF files recorded by CONSOLE. When recording an [MXF] picture, WAV sound files with the same file name as the recording file will be saved. The sounds on channel 1 and 2 will be recorded in "File Name.WAV". When the audio mode is set to 4CH, the sounds on channel 3 and 4 will be recorded in "File Name_sub.WAV". When using the editing software, load all the sound files. 1 Select the recording file type. Select the AVI type that is compatible with your editing software. You can select the file type from [MPEG2TS] or [MPEG2ES]. For details, refer to the instruction manual of the software. 2 Select the [Preview resolution] of the HDV standard data. The size of the recording picture will not be changed. 3 Select the type of MPEG2 for the picture displayed in the preview. The types of the recording picture will not be changed. 4 Select whether or not you need to convert the color of the preview image. When the color of the preview image appears odd, select [OFF]. When recording an [MPEG2ES] picture, WAV sound files with the same file name as the recording file will be saved. The sounds on channel 1 and 2 will be recorded in "File Name.WAV". When the audio mode is set to 4CH, the sounds on channel 3 and 4 will be recorded in "File Name_sub.WAV". When using the editing software, load all the sound files. The recorded [MPEG2ES] picture cannot be output to the camcorder. When [All pictures] or [I picture and P picture] is selected, data dropping ( 5-5) may occur.
-
 1
1 -
2
-
3
-
4
-
5
-
6
-
7
-
8
-
9
-
10
-
11
-
 12
12 -
 13
13 -
 14
14 -
 15
15 -
 16
16 -
 17
17 -
 18
18 -
 19
19 -
 20
20 -
 21
21 -
 22
22 -
23
-
24
-
25
-
26
-
27
-
28
-
29
-
30
-
31
-
32
-
33
-
34
-
35
-
36
-
37
-
38
-
39
-
40
-
41
-
42
-
43
-
44
-
45
-
46
-
47
-
48
-
49
-
50
-
51
-
52
-
53
 |
 |