Canon i550 i550 Quick Start Guide - Page 7
Installing the Ink Tanks - print head removal
 |
View all Canon i550 manuals
Add to My Manuals
Save this manual to your list of manuals |
Page 7 highlights
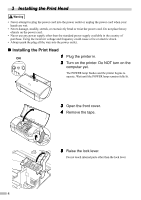
print head print head holder 6 Remove the protective cap from the print head. • Do not touch the print head nozzles or electrical contacts. • Do not attempt to reattach the protective cap once it has been removed. print head nozzles electrical contacts 7 Place the print head in the holder. 8 Lock the print head into place by lowering the lever. Do not touch the lock lever once the print head has been installed. „ Installing the Ink Tanks • For safety reasons, store ink tanks out of the reach of small children. 1 Take out the yellow ink tank. 2 Pull the orange tape in the direction of the arrow and remove the clear film. 5
-
 1
1 -
 2
2 -
 3
3 -
 4
4 -
 5
5 -
 6
6 -
 7
7 -
 8
8 -
 9
9 -
 10
10 -
 11
11 -
 12
12 -
13
-
14
-
15
-
16
-
17
-
18
-
19
-
20
-
21
-
22
-
23
-
24
-
25
-
26
 |
 |

5
6
Remove the protective cap from the
print head.
7
Place the print head in the holder.
8
Lock the print head into place by
lowering the lever.
Do not touch the lock lever once the print head has been
installed.
Installing the Ink Tanks
•
For safety reasons, store ink tanks out of the reach of small children.
1
Take out the yellow ink tank.
2
Pull the orange tape in the direction of
the arrow and remove the clear film.
•
Do not touch the print
head nozzles or
electrical contacts.
•
Do not attempt to
reattach the protective
cap once it has been
removed.
print head
nozzles
electrical
contacts
print head
print head holder