Canon i900D i900D PictBridge Instructions - Page 3
About Digital Camera Settings - manual
 |
View all Canon i900D manuals
Add to My Manuals
Save this manual to your list of manuals |
Page 3 highlights
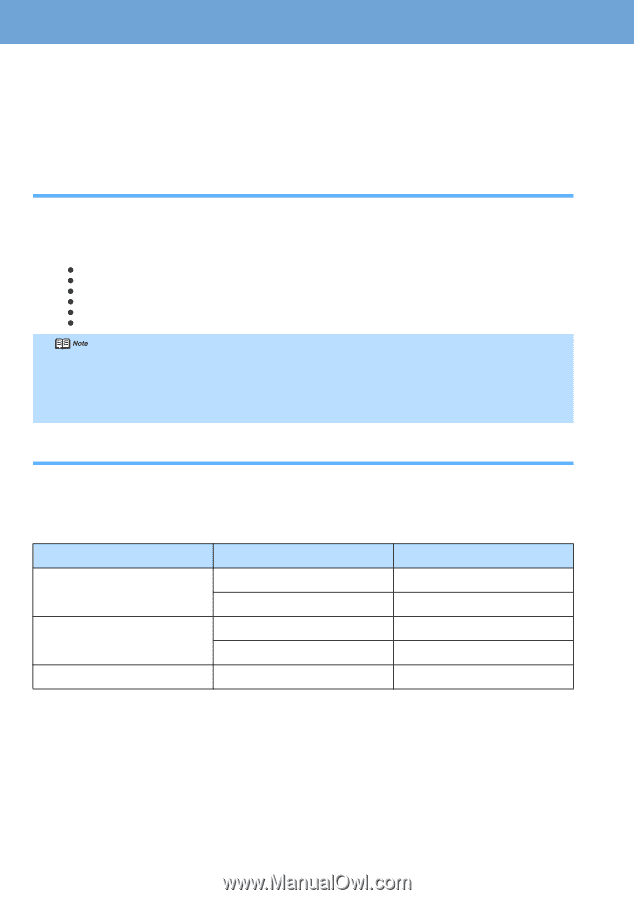
About Digital Camera Settings When operating the camera, be sure to follow the instructions given in the Instruction Manual supplied with the camera. Let's take a look at the paper size, paper type, layout, image optimization modes, and date printing modes that can be set on the PictBridge-compatible camera connected to the printer. Confirming or Changing the Camera Settings To change the paper size or paper type, operate the camera to select the PictBridge print setup mode and confirm or change the settings. The settings below can be changed by pressing the "Settings" button when the camera is connected. However, changes can be made on in the properties screen only when the corresponding items below are in the "Default Setting" (selections based on the printer setting) using the controls of the camera. z Paper Size z Paper Type z Borderless Printing z Print Quality z Photo Optimizer z Noise Reduction About the Settings Explained Below The settings explained cannot be made depending on the brand or model of your camera. If any setting cannot be made, printing will be based on the "Default Setting" specified with *. The items which the "Default Setting" is set will be printed based on the current printer setting. * Names of settings that are displayed on Canon PictBridge-compatible cameras are used in the description given below. Different names may be displayed on your camera depending on the brand or model. About "Paper Size" and "Paper Type" When you have select the "Default setting"(selections based on the printer setting), the printer operates based on the "Paper Size" and the "Paper Type" settings made using the controls of the printer. * When printing on Photo Paper Pro, select "Fast Photo" in "Paper type" using the controls of the camera. If using a Canon PictBridge-compatible camera, you can select 5"x7" in "Paper Size". The following sizes and types of paper can be loaded in the printer by selecting options in "Paper Size" and "Paper Type". "Paper Size" setting 4"×6" 8.5" ×11" (Letter) 5" ×7" *1 "Paper Type" setting Photo Fast Photo Photo Fast Photo Photo Paper loaded in printer Photo Paper Plus Glossy Photo Paper Pro Photo Paper Plus Glossy Photo Paper Pro Photo Paper Plus Glossy *1 This size can be selected only for Canon PictBridge-compatible cameras. (Note that it cannot be selected for some models.)
-
 1
1 -
 2
2 -
 3
3 -
 4
4
 |
 |