Canon i900D i900D Direct Printing Guide
Canon i900D Manual
 |
View all Canon i900D manuals
Add to My Manuals
Save this manual to your list of manuals |
Canon i900D manual content summary:
- Canon i900D | i900D Direct Printing Guide - Page 1
layout 19 Printing According to the Settings Made on the Camera - DPOF Printing 20 Specifying the Paper and Optimizing Images 22 Printing Photographs Directly from a Digital Camera 24 Other Useful Functions 27 Replacing an Ink Tank 34 Printing Maintenance 37 Troubleshooting 42 BE - Canon i900D | i900D Direct Printing Guide - Page 2
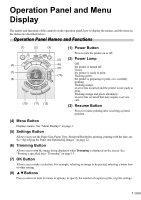
is currently printing. Flashing orange: an error has occurred and the printer is not ready to print. Flashing orange and green alternately: an error has occurred that may require a service call. (3) Resume Button Press to resume printing after resolving a printer problem. (4) Menu Button - Canon i900D | i900D Direct Printing Guide - Page 3
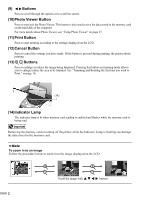
Viewer, see "Using Photo Viewer" on page 27. (11)Print Button Press to start printing according to the settings displayed on the LCD. (12)Cancel Button Press to cancel the settings you have made. If this button is pressed during printing, the printer aborts printing. (13) Buttons Press to - Canon i900D | i900D Direct Printing Guide - Page 4
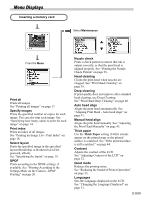
after standard head cleaning, use Deep Cleaning. See "Print Head Deep Cleaning" on page 40. Auto head align Aligns the print head automatically. See "Aligning Print Head - Auto head align" on page 41. Manual head align Aligns the print head manually. See "Adjusting the Print Head Manually" on page - Canon i900D | i900D Direct Printing Guide - Page 5
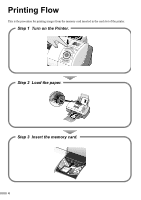
Printing Flow This is the procedure for printing images from the memory card inserted in the card slot of the printer. Step 1 Turn on the Printer. Step 2 Load the paper. Step 3 Insert the memory card. 4 - Canon i900D | i900D Direct Printing Guide - Page 6
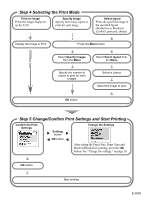
OK button Step 5 Change/Confirm Print Settings and Start Printing Confirm the Print Settings Settings button OK button Change the Settings After setting the Paper Size, Paper Type and Bordered/Borderless printing, press the OK button. See "Change the settings." on page 10. OK button Start - Canon i900D | i900D Direct Printing Guide - Page 7
Supported by this printer Supported memory cards are as follows: ‰ CompactFlash™ (CF) Card/Microdrive™ * Supports TYPE I/TYPE II (3.3V or 5V). ‰ SmartMedia™ Card * Supports supported by the digital camera, refer to your digital camera user's manual (Windows) or BJ Utility (Macintosh), neither printing - Canon i900D | i900D Direct Printing Guide - Page 8
1 Turn on the printer. 2 Open the card slot cover. The Indicator lamp lights. 3 Install the memory card in the card slot. • If you use a CompactFlash (CF) card or Microdrive, insert it as far as it will go as shown - Canon i900D | i900D Direct Printing Guide - Page 9
Removing a Memory Card If you use the printer connected to your computer, follow the instructions for removal of the memory card from the computer. For the procedure, refer to the on-screen User's Guide. 1 Ensure that the Indicator lamp is not flashing, then remove the memory card. Indicator lamp - Canon i900D | i900D Direct Printing Guide - Page 10
is displayed. (1) Confirm the printer settings. On the first screen, the Paper Size, Paper Type, Bordered/Borderless printing status, and whether or not to print the date are displayed. (2) Press the button. On the second screen, the settings for Print Quality, Photo Optimizer, and Noise Reduction - Canon i900D | i900D Direct Printing Guide - Page 11
confirmation is displayed. (5) Confirm the settings and press the OK button. The print confirmation screen is displayed. 7 Start printing. (1) Press the buttons to specify the number of copies to print. (2) Press the Print button. The specified number of copies of the selected image will be - Canon i900D | i900D Direct Printing Guide - Page 12
or 28 lb) *non-Canon branded paper • Picture postcards • Postcards affixed with photos or stickers • Any type of paper with holes (such as loose-leaf) „ Loading the Print Media In this example, description is provided using Photo Paper Plus Glossy 4" x 6"/101.6 x 152.4 mm in your printer. • Refer to - Canon i900D | i900D Direct Printing Guide - Page 13
up. (2) Align the paper stack snug against the right side of the sheet feeder. (3) Press the paper guide and slide it against the left side of the stack of paper. Do not touch the printed surface until the ink dries. For specific drying times, refer to the instructions packaged with your media. 12 - Canon i900D | i900D Direct Printing Guide - Page 14
for Card Direct Printing You can use the following Canon media: Setting Paper size Setting Paper Type For instructions on how to display and set these settings, see "Specifying the Paper and Optimizing Images" on page 22. Media Type Plain Paper Photo Paper Pro Photo Paper Plus Glossy Paper - Canon i900D | i900D Direct Printing Guide - Page 15
image. In addition, you can trim each image before it is printed. „ Specifying the number of copies to print for each image 1 Prepare to print. (1) Turn on the printer and load the paper. See "Loading Paper" on page 11. (2) Install the memory card into the card slot. See "Inserting a Memory Card - Canon i900D | i900D Direct Printing Guide - Page 16
area to print using the Trimming function. Refer to Printing a specified area - Trimming. 4 Start printing. (1) Confirm the print settings. images, Select layout and Printing an Image. See "Printing an Image Displayed on the LCD" on page 9. See "Specifying how many copies to print for each image" on - Canon i900D | i900D Direct Printing Guide - Page 17
2 Trimming and Rotating the Sections you wish to Print. Rotate the trimming area Using the Trimming button, you can rotate the trimming area. Move the area for trimming Using the buttons, you can move - Canon i900D | i900D Direct Printing Guide - Page 18
on a memory card. 1 Prepare to print. (1) Turn on the printer and load the paper. See "Loading Paper" on page 11. (2) Insert the memory card into the card slot. See "Inserting a Memory Card" on page 6. A stored image is displayed on the LCD. 2 Select the print mode from the Menu. (1) Press the - Canon i900D | i900D Direct Printing Guide - Page 19
of all images saved in the memory card known as an index print. 1 Prepare to print. (1) Turn on the printer and load the paper. See "Loading Paper" on page 11. (2) Insert the memory card into the card slot. See "Inserting a Memory Card" on page 6. A stored - Canon i900D | i900D Direct Printing Guide - Page 20
specified image in the specified layout (Borderless or Bordered x2/x4/x8, postcard, album). z Bordered z Borderless z Postcard z Album 1 Prepare to print. (1) Turn on the printer and load the paper. See "Loading Paper" on page 11. (2) Insert the memory card into the card slot. See "Inserting - Canon i900D | i900D Direct Printing Guide - Page 21
of copies for each image will be printed. Printing According to the Settings Made on the Camera DPOF Printing If DPOF (Digital Print Order Format) settings are made on the camera, images are printed automatically according to those settings. zThis printer allows you to make the following DPOF - Canon i900D | i900D Direct Printing Guide - Page 22
the buttons to select Yes and then press the OK button. The print confirmation screen is displayed DPOF Printing can also be started from the Menu. (1) With the memory card containing DPOF information inserted in the printer, press the Menu button. (2) Use the buttons to select DPOF and then - Canon i900D | i900D Direct Printing Guide - Page 23
, and Date (format). „ Settings Menu Display z Displaying an image on the LCD Settings button z Displaying the print confirmation screen on the LCD Settings button Settings button „ How to Make Settings 1 Select an item to set. Properties screen (1) Use the size. buttons to - Canon i900D | i900D Direct Printing Guide - Page 24
date in the format MM/DD/YYYY (10/22/2003). DD/MM/YYYY ......... Prints the date in the format DD/MM/YYYY (22/10/2003). Date Off Does not print the date the photo was shot. „ Print Quality Select the print quality. „ Photo Optimizer Exif Print Optimizes photos based on the information at the time - Canon i900D | i900D Direct Printing Guide - Page 25
to connect to the printer. • Use only a "PictBridge" or Canon "Bubble Jet Direct" compatible digital camera or digital video camcorder for printing directly. • This section describes how to operate a Canon "Bubble Jet Direct" compatible camera. For instructions on operating a "PictBridge" compliant - Canon i900D | i900D Direct Printing Guide - Page 26
Printing from a Digital Camera 1 Ensure that the printer is turned on. 2 Load the paper. Load the paper as shown below. (3) Press the paper guide and digital camera and the printer. (1) Ensure that the digital camera is turned off. (2) Connect the digital camera and the printer with the USB cable - Canon i900D | i900D Direct Printing Guide - Page 27
digital camera. zThe digital camera does not support the following functions: - Print quality setting - Maintenance * The print head cannot be aligned through the digital camera. To align the print head, use the operation panel of the printer. zTo disconnect the cable connected between the digital - Canon i900D | i900D Direct Printing Guide - Page 28
. To use the Photo Viewer, the printer must be connected to the computer and the printer driver must have been installed in the computer. If the printer driver has not been installed, install it following the procedure described in the Quick Start Guide. 1 Ensure that the printer and the computer - Canon i900D | i900D Direct Printing Guide - Page 29
will be saved in the location specified below. A folder will be created with a name and the date of the images were saved (YYYY_MM_DD). - Windows XP/Windows 2000/Windows Me: My Pictures folder - Windows 98: My Document folder - Mac OS X 10.2.1or later: Pictures folder - Mac OS 9.0-9.2: Desk Top 28 - Canon i900D | i900D Direct Printing Guide - Page 30
the computer, the printer must be connected to the computer and the Memory Card Utility (Windows) or BJ Utility (Macintosh) must have been installed in the computer. If the utility is not installed, install it following the installation procedure explained in the Quick Start Guide. • When Read/write - Canon i900D | i900D Direct Printing Guide - Page 31
1 Ensure that the printer and the computer are turned on. 2 Start the BJ Utility. (1) Ensure that . Read-only mode ... The card slot is used only for read. Be sure to select this mode when printing images. Read/write mode ... The card slot is used as the memory card drive of the computer. Image data - Canon i900D | i900D Direct Printing Guide - Page 32
Changing the Language Displayed You can change the language displayed on the LCD. 1 Turn on the printer. 2 Select Maintenance from the Menu. (1) Press the Menu button. (2) Use the buttons to select Maintenance and then press the OK button. The maintenance menu is - Canon i900D | i900D Direct Printing Guide - Page 33
Adjusting Contrast of the LCD You can adjust contrast of the LCD, if it is too high or too low. 1 Turn on the printer. 2 Select Maintenance from the Menu. (1) Press the Menu button. (2) Use the buttons to select Maintenance and then press the OK button. The maintenance menu is - Canon i900D | i900D Direct Printing Guide - Page 34
from a memory card or from a digital camera connected to this printer. If you are printing with your computer connected, specify the required settings in the Printer Driver. 1 Turn on the printer. 2 Select Maintenance from the Menu. (1) Press the Menu button. (2) Use the buttons to select - Canon i900D | i900D Direct Printing Guide - Page 35
an Ink Tank When replacing an ink tank, check the model number very carefully. The printer will not print properly if the wrong ink tank is used, or installed in the incorrect position. With this printer, ink tanks must be installed from the right in the order indicated below. ‰ :Magenta ‰ Photo - Canon i900D | i900D Direct Printing Guide - Page 36
Replacing Ink Tanks When ink tanks run out of ink, replace them using the following steps. 1 Ensure that the printer is on, and then open the front cover. The print head holder moves to the center. 2 Remove the empty ink tank. (1) Push the tab and remove the ink tank. Do not touch the lock lever - Canon i900D | i900D Direct Printing Guide - Page 37
5 Close the front cover. The print head holder moves to the right. The ink tank installation process is now complete. • To maintain optimal Print Quality, use an ink tank within six months of first use. • Once an ink tank has been used, do not remove it from the printer and leave it out in the open - Canon i900D | i900D Direct Printing Guide - Page 38
ink tank is installed securely. • Increase the Print Quality setting in the printer driver settings. Step1 "Printing the Nozzle Check Pattern" on page 38 If the print quality is poor If white stripes are noticeable Step2 "Print Head Cleaning" on page 39 Step2 "Aligning Print Head - Auto head - Canon i900D | i900D Direct Printing Guide - Page 39
check pattern should appear as follows when ink is discharged properly. Examine the nozzle check pattern output by the printer. (1) White stripes in this pattern require running print head cleaning. When white stripes appear See "Print Head Cleaning" on page 39. (2) Unevenness in this pattern - Canon i900D | i900D Direct Printing Guide - Page 40
Print Head Cleaning Clean the print head if you suspect that the nozzles might be clogged. Cleaning the print head consumes ink, so perform print head cleaning only when necessary. 1 Ensure that the printer is on. 2 Print Head Cleaning. (1) Press the Menu button. (2) Use the buttons to select - Canon i900D | i900D Direct Printing Guide - Page 41
see "Replacing Ink Tanks" on page 35. If the problem remains, make sure that ink remains in the ink tank, turn off the printer's power for at least 24 hours, and then perform deep cleaning of the print head again. If the problem still remains, the print head may be damaged. Contact your local Canon - Canon i900D | i900D Direct Printing Guide - Page 42
"Replacing Ink Tanks" on page 35. (3) Print the nozzle check pattern to verify that the print nozzles are clean. See "Printing the Nozzle Check Pattern" on page 38. (4) Move the printer so that the paper output is not in direct sunlight and try automatic print head aligning again. (5) If the error - Canon i900D | i900D Direct Printing Guide - Page 43
"Replacing Ink Tanks" on page 35. (2) Print the nozzle check pattern to verify that the print nozzles are clean. See "Printing the Nozzle Check Pattern" on page 38. (3) Move the printer so that the paper output is not in direct sunlight and try automatic print head aligning again. (4) If the error - Canon i900D | i900D Direct Printing Guide - Page 44
cord back in, and then turn on the printer again. If the same error persists, contact a Canon service representative. Adjusting the Print Head Manually If the automatic print head adjustment does not work or if you wish to adjust the print heads manually, follow the procedure below. (1) With the - Canon i900D | i900D Direct Printing Guide - Page 45
pattern, clean the print head. • If ink supply is uneven: See "Print Head Cleaning" on page 39. • If straight lines are misallign: See "Aligning Print Head - Auto head align" on page 41. Check that your paper is loaded with the correct print side facing up. Follow the instructions packaged with - Canon i900D | i900D Direct Printing Guide - Page 46
No print head is installed. Install a print head according to the Quick Start Guide. When there is a print head installed, the print head is defective. Contact a Canon service representative. The waste ink tank is nearly full. Press the Resume button on the printer to recover from the error. Contact - Canon i900D | i900D Direct Printing Guide - Page 47
of the following messages appears while using the Photo Viewer, printing may be disabled or the Photo Viewer may be terminated forcibly. Error Massage Executing maintenance. Insert a memory card. The printer's card slot has been write-enabled. ...... There is a problem with the memory card or it is - Canon i900D | i900D Direct Printing Guide - Page 48
The following ink tanks are compatible with this printer. For details on ink tank replacement, refer to "Print Head Maintenance" in this guide. QA7-2791-V01 XX2003XX ©CANON INC.2003 PRINTED IN THAILAND
-
 1
1 -
 2
2 -
 3
3 -
 4
4 -
 5
5 -
 6
6 -
 7
7 -
8
-
9
-
10
-
11
-
12
-
13
-
14
-
15
-
16
-
17
-
18
-
19
-
20
-
21
-
22
-
23
-
24
-
25
-
26
-
27
-
28
-
29
-
30
-
31
-
32
-
33
-
34
-
35
-
36
-
37
-
38
-
39
-
40
-
41
-
42
-
43
-
44
-
45
-
46
-
47
-
48
 |
 |

BUBBLE JET PRINTER
Direct Printing Guide
Table of Contents
Operation Panel and Menu Display
1
Printing Flow
4
Using a Memory Card
6
Printing Photograph
9
Loading Paper
11
Printing Images from a Memory Card
14
Specifying how many copies to print for each image
14
Printing all images
17
Printing an Image List - Print Index
18
Specifying the layout
19
Printing According to the Settings Made on the Camera
- DPOF Printing
20
Specifying the Paper and Optimizing Images
22
Printing Photographs Directly from a Digital Camera
24
Other Useful Functions
27
Replacing an Ink Tank
34
Printing Maintenance
37
Troubleshooting
42
QA7-2791-V01
BE