Canon iP100 Easy Setup Instructions - Page 1
Canon iP100 - PIXMA Color Inkjet Printer Manual
 |
UPC - 013803067316
View all Canon iP100 manuals
Add to My Manuals
Save this manual to your list of manuals |
Page 1 highlights
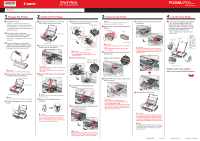
Start Here Easy Setup Instructions Important When cleaning the exterior of the printer, use a soft cloth to wipe it gently. For details, refer to "Cleaning Your Printer" in the Quick Start Guide. 1 Prepare the Printer 2 Install the Print Head 3 Install the Ink Tanks a Unpack the Printer. Confirm the included items referring to the illustration printed on the lid of the packing box or "Included Items" in the Quick Start Guide. A USB cable is necessary to connect the printer with your computer. b Place the printer on a flat and horizontal surface, and do not place any objects in front of the printer. Remove all the shipping tapes on the outside of the printer. c Connect the power cord to the AC adapter. Plug the AC adapter into the printer, and connect the other end of the power cord to the wall outlet. a Open the Print Head Cover. The Print Head Holder moves to the center. Print Head Cover Print Head Holder b Unlock the Print Head Lock Lever by squeezing both tabs inward. e Remove the orange protective cap from the Print Head and discard it. Print Head Nozzles Note For the ink tanks compatible with this printer, refer to the back cover of the Quick Start Guide. a Remove the orange protective cap and discard it. Protective Cap Ink Port Protective Cap Important • Do not touch the print head nozzles. • Do not reattach the protective tape once you have removed it. f Insert the Print Head. Align the mark on the Print Head with the mark on the Print Head Holder. Electrical Contacts Important • Do not touch the electrical contacts and the ink port. • Do not reattach the protective tape once you have removed it. b Insert the Black ink tank at a slant into the right slot. Align the with the Holder. mark on the ink tank mark on the Print Head Important Do NOT connect the USB cable at this stage. d Open the Rear Tray Cover and pull out the Paper Support completely. Paper Support Important • Make sure the printer is turned on and the Power lamp is flashing green. • Make sure the Print Head Holder has moved to the center. c Raise the Print Head Lock Lever until it stops. c Press the mark on the ink tank until it clicks into place. d Similarly, insert the Color ink tank into the left slot. Important If the front (innermost) part of the ink tank (A) is sticking up, push down on the Canon logo on the ink tank as illustrated below. Do not remove the ink tank forcibly. (A) Photo Printer 4 Load Printing Paper a Load a sheet of supplied paper (Paper For Print Head Alignment MP-101) loaded with the printing side (whiter side) facing UP in the Rear Tray, align the paper stack against the guide on the right side of the Rear Tray. Make sure that the Paper Thickness Lever is set to the right. MP-101 Paper Guide Print Side Paper Thickness Lever Hardware setup is now complete. Next, turn over and install the software. Rear Tray Cover g Lower the Print Head Lock Lever carefully. Paper Output Slot Cover Note The Paper Output Slot Cover will open automatically. e Press the Power button to turn on the printer. Caution Do not touch internal parts other than the Print Head Lock Lever. d Remove the Print Head from its package. h Push both tabs in left to right order until each clicks into place. e Close the Print Head Cover. Important • Make sure that the ink lamp lights red. • If the ink lamp does not light red after it is in- serted, repeat steps b and c. • If the Print Head Cover is left open for more than 10 minutes, the Print Head Holder moves to the right. Close and reopen the Print Head Cover to return the holder to the center. Caution There may be some transparent or light blue ink on the inside of the bag the print head comes in, or the inside of the protective cap - this has no effect on print quality. Be careful not to get ink on yourself when handling these items. Important Make sure that the Print Head Lock Lever is firmly locked into the Print Head Holder by pressing both tabs on the Print Head Lock Lever until it clicks. Important Once you have installed both ink tanks, the Power lamp will flash green. Wait for about 2 minutes, until the Power lamp stops flashing and changes to steady, non-flashing green and the printer has stopped making operating noises, before proceeding. Note If the Alarm lamp on the printer flashes orange after you have closed the Print Head Cover, refer to "Alarm Lamp Flashes Orange" in "Troubleshooting" of the Quick Start Guide. QT5-1436-V02 XXXXXXXX © 2008 Canon Inc. PRINTED IN THAILAND
-
 1
1 -
 2
2
 |
 |