Canon imageCLASS MF5770 imageCLASS MF5750 Set-Up Instructions - Page 5
Connect the power cord., Set the receive mode - reset
 |
View all Canon imageCLASS MF5770 manuals
Add to My Manuals
Save this manual to your list of manuals |
Page 5 highlights
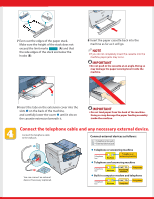
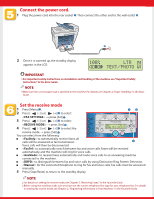
Connect the power cord. 1 Plug the power cord into the rear socket ➊. Then connect the other end to the wall outlet ➋. 2 Once it is warmed up, the standby display appears in the LCD. IMPORTANT ● For important safety instructions on installation and handling of the machine, see "Important Safety Instructions" in the Basic Guide. NOTE ● Make sure the correct paper size is specified in the machine. For details, see Chapter 2,"Paper Handling," in the Basic Guide. Set the receive mode 1 Press [Menu]➊. 2 Press [ (-)] or [ (+)]➋ to select → press [Set] . 3 Press [ (-)] or [ (+)]➋ to select → press [Set] . Redial / Pause Coded Dial COPY Alarm In Use / Memory FAX SCAN Menu 4 Press [ (-)] or [ (+)]➋ to select the receive mode → press [Set] . Directory Status Monitor Clear Hook Start Stop/Reset Set You can select from the following: ● to automatically receive faxes, all calls will be answered as fax transmission. Voice calls will then be disconnected. ● to automatically switch between fax and voice calls. Faxes will be received automatically, and the machine will ring for voice calls. ● to receive faxes automatically and route voice calls to an answering machine connected to the machine. ● to distinguish between fax and voice calls by using Distinctive Ring Pattern Detection. ● for the connected telephone to ring for fax and voice calls. Fax calls must be answered manually. 5 Press [Stop/Reset] to return to the standby display. NOTE ● For details on setting fax receive mode, see Chapter 5, "Receiving Faxes," in the Facsimile Guide. ● Before using the machine, make sure you have set the correct telephone line type for your telephone line. For details on setting fax receive mode, see Chapter 2, "Registering Information in Your Machine," in the Facsimile Guide.
-
 1
1 -
 2
2 -
 3
3 -
 4
4 -
 5
5 -
 6
6 -
 7
7 -
 8
8
 |
 |
