Canon imageFORMULA P-208II Scan-tini Personal Document Scanner User Manual
Canon imageFORMULA P-208II Scan-tini Personal Document Scanner Manual
 |
View all Canon imageFORMULA P-208II Scan-tini Personal Document Scanner manuals
Add to My Manuals
Save this manual to your list of manuals |
Canon imageFORMULA P-208II Scan-tini Personal Document Scanner manual content summary:
- Canon imageFORMULA P-208II Scan-tini Personal Document Scanner | User Manual - Page 1
Please read this manual before operating this scanner. After you finish reading this manual, store it in a safe place for future reference. CE-IM-0937-1.10 - Canon imageFORMULA P-208II Scan-tini Personal Document Scanner | User Manual - Page 2
Manual 3 Features of the Scanner 4 Names and Functions of Parts 6 Power Supply 7 Regulations 9 Trademarks 10 Chapter 2 Important Safety Instructions 11 Installation Location 11 Moving the Scanner as the background of the scanned document 79 To correct tilted documents and images 80 When you - Canon imageFORMULA P-208II Scan-tini Personal Document Scanner | User Manual - Page 3
the Scanner 87 Cleaning the Scanning Glass and the Rollers 88 Chapter 11 Detaching and attaching the separation pad 89 When to replace the separation pad 89 Detaching and attaching the separation pad 90 Chapter 12 Uninstalling the Software 91 Uninstallation 91 Chapter 13 Troubleshooting 92 - Canon imageFORMULA P-208II Scan-tini Personal Document Scanner | User Manual - Page 4
Chapter 1 Introduction About This Manual Thank you for purchasing the Canon imageFORMULA P-208II Document Scanner. In order to fully understand the features of this scanner and use them more effectively, please read this manual and the manuals shown below thoroughly before using the product. After - Canon imageFORMULA P-208II Scan-tini Personal Document Scanner | User Manual - Page 5
/P-208II User Manual Symbols Used in This Manual The following symbols are used in this manual to explain procedures, restrictions, handling precautions, and instructions that should be observed for safety. Indicates a warning concerning operations that may lead to death or injury to persons - Canon imageFORMULA P-208II Scan-tini Personal Document Scanner | User Manual - Page 6
of steps and which is performed by registering a job. Color and Grayscale Support The scanner is capable of scanning a document in 24-bit color or 256-level grayscale. Two-Sided Scanning The scanner supports one-sided and two-sided scanning. Using the skip blank pages function enables you to - Canon imageFORMULA P-208II Scan-tini Personal Document Scanner | User Manual - Page 7
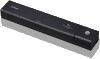
USB Connector Connect the USB cable supplied with the scanner. (1) Feeder Cover Open this when cleaning the scanner. (2) Document Feed Tray This tray is for feeding documents. Open it when scanning documents. (3) Document Guides These guides ensure documents are fed straight (one on the left and - Canon imageFORMULA P-208II Scan-tini Personal Document Scanner | User Manual - Page 8
Switch Use this switch to change the operation mode of the scanner. (2) Eject Outlet This outlet is for ejecting documents when scanning is completed. (3) Theft Prevention Hole (Security Slot) Attach a key chain, etc. here to prevent the scanner from being stolen. Power Supply The power of the - Canon imageFORMULA P-208II Scan-tini Personal Document Scanner | User Manual - Page 9
is set to turn off automatically if it is not used for scanning or for other purposes for 4 hours. (The Start button blinks.) The scanner turns on when the document is loaded in the document feed tray or when the scanner's Start button is pressed. (The Start button lights.) Rating label of the - Canon imageFORMULA P-208II Scan-tini Personal Document Scanner | User Manual - Page 10
Document Scanner with the instructions, may cause manual. If such changes or modifications should be made, you could be required to stop operation of the equipment. Canon U.S.A. Inc. One Canon service. For more information regarding return and recycling of WEEE products, please visit www.canon - Canon imageFORMULA P-208II Scan-tini Personal Document Scanner | User Manual - Page 11
region of the Document Scanner. P-208II: Model M111162 Disclaimers The information in this document is subject to change without notice. CANON ELECTRONICS INC. or registered trademarks in other countries. imageFORMULA is a trademark of CANON ELECTRONICS INC. Microsoft, Windows, Windows Vista - Canon imageFORMULA P-208II Scan-tini Personal Document Scanner | User Manual - Page 12
the following environmental requirements. Provide adequate space around the scanner for operation, maintenance, and ventilation. Scanned documents are ejected behind the scanner. Be sure to provide sufficient space behind the scanner. Avoid installing the machine in direct sunlight. Avoid - Canon imageFORMULA P-208II Scan-tini Personal Document Scanner | User Manual - Page 13
heat, or strange odors, or the scanner does not function or other abnormalities occur when you use the scanner, immediately close the feed tray, turn the scanner OFF, and disconnect the USB cable. Then, contact your local authorized Canon dealer or service representative for further information. 12 - Canon imageFORMULA P-208II Scan-tini Personal Document Scanner | User Manual - Page 14
local authorized Canon dealer or service representative to have the unit serviced. Do not locate the scanner in a humid or dusty location. Doing so may result in a fire or electric shock. Do not place objects on top of the scanner. Such objects may tip or fall over, resulting in personal injury - Canon imageFORMULA P-208II Scan-tini Personal Document Scanner | User Manual - Page 15
Microsoft Windows XP Service Pack 3 or later • Microsoft Windows XP x64 Edition Service Pack 2 or later • Microsoft Windows Vista Service Pack 2 or with the scanner. If the CPU, memory, interface card, and other specifications do not satisfy the installation requirements, the scanning speed may be - Canon imageFORMULA P-208II Scan-tini Personal Document Scanner | User Manual - Page 16
scanner driver supplied with this product supports scanning Evernote Multi-platform document filing software from Evernote scanning with third-party software, user the scanner driver of this scanner to configure scanning conditions. For details on how to open the scanner driver, refer to the manuals - Canon imageFORMULA P-208II Scan-tini Personal Document Scanner | User Manual - Page 17
obtaining an account. For details, refer to the website of your cloud service provider. Simple installation of the above software does not require an account. Software Installation Install the software before connecting the scanner to the computer. Log on to Windows as an Administrator. Close - Canon imageFORMULA P-208II Scan-tini Personal Document Scanner | User Manual - Page 18
starts up. About Read Me First Click [Read Me First] to display "Setup Guide". This manual describes the procedures for setting up the scanner for use. Please follow the procedures in the Setup Guide to set up the scanner. If you choose Evernote, the Web browser will start and display a webpage - Canon imageFORMULA P-208II Scan-tini Personal Document Scanner | User Manual - Page 19
5 Follow the instructions on the screen to complete installation. 6 Click [Exit] to finish installing the software. Installation of EMC Cloud Capture Function EMC Captiva Cloud Runtime provides a component that enables the use of web-based applications. The applications need to support this - Canon imageFORMULA P-208II Scan-tini Personal Document Scanner | User Manual - Page 20
Install the software before connecting the scanner to the computer. Close all other applications before you need a connection to the Internet. 3 Follow the instructions on the screen to complete installation. 2 Click [P-208II Installer]. 4 When the installation is complete, click [Log Out - Canon imageFORMULA P-208II Scan-tini Personal Document Scanner | User Manual - Page 21
use the supplied USB cable to connect the scanner to the computer. • Take care not to disconnect the USB cable while data is being transferred between the scanner and computer during scanning. • The USB connector to which the scanner is connected on your computer must be one capable of supplying - Canon imageFORMULA P-208II Scan-tini Personal Document Scanner | User Manual - Page 22
may not be able to start. When connecting a USB cable and opening the document feed tray, the start button can slowly flash. After the start button stops flashing and remains lit, the scanner is ready for use. Opening the scanner document feed tray switches on the power supply automatically. The - Canon imageFORMULA P-208II Scan-tini Personal Document Scanner | User Manual - Page 23
time, the balloon message shown below appears on the Windows task bar. If you wait a while, automatic scanner recognition will end and the scanner will become ready to use. When the scanner is properly connected to the computer, the (CaptureOnTouch) icon appears on the taskbar as follows. If the - Canon imageFORMULA P-208II Scan-tini Personal Document Scanner | User Manual - Page 24
section describes how to load a document for scanning. Documents 23 Loading a document 25 Loading cards 27 Documents The scanner can scan documents ranging in size from business cards and checks to LTR/A4/LGL. The document sizes that this scanner can scan are shown below. Plain Paper Size - Canon imageFORMULA P-208II Scan-tini Personal Document Scanner | User Manual - Page 25
so that they cover the entire span of the feed rollers. ● Scanning documents before the ink is dry can cause problems with the scanner. Always make sure that the ink on a document is dry before scanning it. ● Scanning documents that are written in pencil or similar material may make the rollers and - Canon imageFORMULA P-208II Scan-tini Personal Document Scanner | User Manual - Page 26
into the feed inlet of the scanner with the scanning side of the document face down and the top of the document pointing down. 4 Align the document guides with both edges of the loaded document. • Press the document beneath the tabs of the document guides. • Up to 10 pages of plain paper can - Canon imageFORMULA P-208II Scan-tini Personal Document Scanner | User Manual - Page 27
slanted when loading to the back of the paper pressure, it will not be fed correctly.) A scanned document is ejected behind the scanner. Do not place any objects behind the scanner. Set the document feed tray from the pulled out position back to its original position. Push in (push back) the - Canon imageFORMULA P-208II Scan-tini Personal Document Scanner | User Manual - Page 28
facing up. Embossed cards may not be scanned correctly, depending on the type of embossment. After a card is scanned, it is ejected from the back of the scanner. Do not place objects behind the scanner. 5 When the scan is finished, set the document feed tray back to its original position. 27 - Canon imageFORMULA P-208II Scan-tini Personal Document Scanner | User Manual - Page 29
Set the document feed tray from the pulled out position back to its original position. Push in (push back) the document feed tray in the direction of the arrow. 6 Close the feed tray. 28 - Canon imageFORMULA P-208II Scan-tini Personal Document Scanner | User Manual - Page 30
that comes preinstalled in the scanner. It can be used on a computer that does not have the scanner driver installed. Click the Select document and Output panels, and then click the [Scan] button to scan the document. You can select the scan method according to the document type and purpose of use - Canon imageFORMULA P-208II Scan-tini Personal Document Scanner | User Manual - Page 31
Scanning Procedure 1 Set the Auto Start switch at the rear panel of the scanner to ON and then connect the scanner to the computer. 1 Click [Open folder to view files]. CaptureOnTouch Lite starts, and the main screen appears. 2 Open the feed tray, turn ON the scanner, and then load the document. - Canon imageFORMULA P-208II Scan-tini Personal Document Scanner | User Manual - Page 32
For details, "Loading a document". When you open the document feed tray, the Start button on the scanner lights and the Finder window shown below opens automatically. If you click the [CaptureOnTouch Lite Launcher] icon, CaptureOnTouch Lite starts up and the main screen - Canon imageFORMULA P-208II Scan-tini Personal Document Scanner | User Manual - Page 33
, see "Setting the output". The document is scanned. While scanning is in progress, the number of pages scanned is displayed in addition to the scanner settings. When the scan is finished, the [Scanned image preview screen] opens. If you configure scanning conditions that consume a large amount of - Canon imageFORMULA P-208II Scan-tini Personal Document Scanner | User Manual - Page 34
image, click the [Finish] button. If scanning continuously, set the next document, and click the [Scan more pages] button to start the document scan. To edit scan images, see ["Operations for the scanned image edit window"]. Click the [ ] button to edit the output settings. "Setting the output - Canon imageFORMULA P-208II Scan-tini Personal Document Scanner | User Manual - Page 35
at the top of the window. This closes the window, but CaptureOnTouch Lite will continue to reside in the system. The scanner turns OFF. 3 Disconnect the USB cable from the scanner and computer. Click (CaptureOnTouch icon) in the menu bar and then click [Launch CaptureOnTouch] from the menu which - Canon imageFORMULA P-208II Scan-tini Personal Document Scanner | User Manual - Page 36
, click on the tool bar. 2 Drag and drop the [ONTOUCHLITE] folder and [CaptureOnTouch Lite for Mac] folder onto the [Trash] icon. 3 Close the feed tray. Scanned image preview screen The scanner turns OFF. 4 Disconnect the USB cable from the - Canon imageFORMULA P-208II Scan-tini Personal Document Scanner | User Manual - Page 37
documents. Click an item to open the edit window. Click the [Restore] button to discard the edit results and return to the previous scan image. [Color adjustment] (Easy settings) Click [Color adjustment] to display the default. Click the button to toggle between the typical settings and manual - Canon imageFORMULA P-208II Scan-tini Personal Document Scanner | User Manual - Page 38
] (Manual settings) [Image alignment] Move the slider to the left or right to adjust the brightness and contrast of the image, checking the preview image. Click the [Grayscale] button to render the image in grayscale. Click the [Black and White] button to render the image using 2 values: black and - Canon imageFORMULA P-208II Scan-tini Personal Document Scanner | User Manual - Page 39
will return to the top screen. Select document settings By default, CaptureOnTouch Lite enables the [Full auto] scan setting, so shortcut scans saved to the folder are implemented using the scan conditions that match the document. To specify the document size, color mode, and other settings, set - Canon imageFORMULA P-208II Scan-tini Personal Document Scanner | User Manual - Page 40
color mode based on the document content and scans accordingly. Scans the document in color. Scans the document in color using photocompatible tones. Scans the document in Grayscale. Scans the document in color using photocompatible tones. Scans the document in black and white (binary). [Page Size - Canon imageFORMULA P-208II Scan-tini Personal Document Scanner | User Manual - Page 41
Name Enter the name to be displayed in the select document panel. Icon You can change the select document icon displayed in the scan mode panel. Enable [Change icon] to enable the [Settings the plug-in, you can use various services such as printing the scanned image or attaching it in an e-mail. 40 - Canon imageFORMULA P-208II Scan-tini Personal Document Scanner | User Manual - Page 42
To install plugins, enable the checkbox when installing CaptureOnTouch. The output methods that can be selected depend on the plugins that have been installed. For how to use the plugins, see the plugin help. Environmental Settings You can configure the following in this dialog box. [Maintenance] - Canon imageFORMULA P-208II Scan-tini Personal Document Scanner | User Manual - Page 43
that enables you to scan a document with a simple operation merely by selecting the screen panel. CaptureOnTouch is provided with multiple scanning methods that can be selected according to the purpose and application. Turn OFF the Auto Start switch on the rear of the scanner, and use the supplied - Canon imageFORMULA P-208II Scan-tini Personal Document Scanner | User Manual - Page 44
to the scanner start button in advance. Set the document and press the Start button to start the scan. You can also allocate your own shortcuts to the start button. -> "Scanning with Start Button" You can also start CaptureOnTouch from the Start menu. Click [Start] - [All Programs] - [Canon P-xxx - Canon imageFORMULA P-208II Scan-tini Personal Document Scanner | User Manual - Page 45
and the icon disappears from the taskbar. Click [Start] - [All Programs] - [Canon P-xxxx] - [P-xxxx CaptureOnTouch]. Press the Start button on the scanner (in this case, the main screen of CaptureOnTouch will open and scanning will start using the scan method assigned to the Start button). 44 - Canon imageFORMULA P-208II Scan-tini Personal Document Scanner | User Manual - Page 46
Start button on the scanner (in this case, the main screen of CaptureOnTouch will open and scanning will start using the scan method assigned to the Start prepared according to the scan types and outputs in each section. Click the [New document] button, and a [New document] panel will be added. - Canon imageFORMULA P-208II Scan-tini Personal Document Scanner | User Manual - Page 47
the Select output panel->Start scanning 1 Place the document in the scanner. 2 Click the select document panel for the document to be scanned from [1 Select document]. The selected [Select document] panel will be displayed in orange. To edit scan images, see "Select document settings". 4 Click the - Canon imageFORMULA P-208II Scan-tini Personal Document Scanner | User Manual - Page 48
. Change the save settings if an error message is displayed. If scanning continuously, set the next document, and click the [Scan more pages] button to start the document scan. To edit scan images, see Operations for the scanned image edit window52. Click the [ ] button to edit the output settings - Canon imageFORMULA P-208II Scan-tini Personal Document Scanner | User Manual - Page 49
just by pressing the scanner start button -> "Scanning with Start Button" Registering and editing scanning shortcuts Multiple scanning shortcuts can be allocated to CaptureOnTouch. 1 Either click the [New shortcut] button in [Scanning shortcut], or select the document scan and output in [Standard - Canon imageFORMULA P-208II Scan-tini Personal Document Scanner | User Manual - Page 50
. [Button assignment] You can allocate one of the settings registered in scanning shortcuts to the scanner start button. If a scanning shortcut is allocated to the start button, its icon will be displayed in the scanning shortcuts panel. 5 Click the [Option] tab to set the options. [Order of - Canon imageFORMULA P-208II Scan-tini Personal Document Scanner | User Manual - Page 51
the document scan. If [Enable additional scan] is disabled in the scanning shortcut settings, the [Scan more pages] button will not be displayed. The document is scanned. While scanning is in progress, the number of pages scanned is displayed in addition to the scanner settings. When the scan is - Canon imageFORMULA P-208II Scan-tini Personal Document Scanner | User Manual - Page 52
folder] button may not be displayed. Scanning with Start Button Scanning shortcuts" are allocated to the scanner start button in advance. You can set frequently-used scans to the scanning shortcuts, and then allocate them to the start button. If you place the document and press the Start button - Canon imageFORMULA P-208II Scan-tini Personal Document Scanner | User Manual - Page 53
in the preview window. Drag a thumbnail to change pages. (3)Preview Area The preview images of scanned documents are displayed. (4)Edit window You can edit scanned documents. Click an item to open the edit window. Click the [Restore] button to discard the edit results and return to the previous - Canon imageFORMULA P-208II Scan-tini Personal Document Scanner | User Manual - Page 54
Click the button to toggle between the typical settings and manual settings displays. Click a thumbnail in typical color adjustment to to render the image in grayscale. Click the [Black and White] button to render the image using 2 values: black and white. When adjustment is finished, click the - Canon imageFORMULA P-208II Scan-tini Personal Document Scanner | User Manual - Page 55
cancel the adjustment, click the [Back] button. Click [Rotate] to display. The scanned image can be rotated in 90 degrees to the left or the right. The Information Display Area The information regarding the "Select document" and "Select output" is displayed. Click the button, and the - Canon imageFORMULA P-208II Scan-tini Personal Document Scanner | User Manual - Page 56
color mode based on the document content and scans accordingly. Scans the document in color. Scans the document in color using photocompatible tones. Scans the document in Grayscale. Scans the document in color using photocompatible tones. Scans the document in black and white (binary). [Page Size - Canon imageFORMULA P-208II Scan-tini Personal Document Scanner | User Manual - Page 57
of the scanner driver For the advanced settings other than the basic items, see the help in the driver settings dialog box. General Set the following items as occasion demands. Name Enter the name to be displayed in the select document panel. Icon You can change the document scan icon displayed - Canon imageFORMULA P-208II Scan-tini Personal Document Scanner | User Manual - Page 58
CaptureOnTouch supplies output methods other than [Save to folder] as plugins. By installing the plug-in, you can use various services such as printing the scanned image or attaching it in an e-mail. To install plugins, enable the checkbox when installing CaptureOnTouch. The output methods that - Canon imageFORMULA P-208II Scan-tini Personal Document Scanner | User Manual - Page 59
panel. Click the [Save to Shortcut] button in [3 actions] in Standard Scanning to register the selected output and document scan to one of the scanning shortcut panels. Click the [New shortcut] button to add [New scanning shortcut] panel. Click to display the list of panel types. The selected - Canon imageFORMULA P-208II Scan-tini Personal Document Scanner | User Manual - Page 60
can specify the compression rate of JPEG images. PPTX settings You can specify whether to add OCR information to the scanned images. In [Multi-tiff settings], specify whether to save the scanned images as a multipage file ([Save all pages as one file]) or single page files ([Create a file for each - Canon imageFORMULA P-208II Scan-tini Personal Document Scanner | User Manual - Page 61
When this setting is enabled, the [Do not display the main screen when the scan is started with the scanner button] setting is disabled. If the [Do not display the main screen when the scan is started with the scanner button] check box is selected, the main screen of CaptureOnTouch is not displayed - Canon imageFORMULA P-208II Scan-tini Personal Document Scanner | User Manual - Page 62
[Plugin] Tab On the [Plugin] tab, confirm the plugins that have been added to CaptureOnTouch. [Maintenance] Tab On the [Maintenance] tab, you can configure the log settings for the maintenance of CaptureOnTouch and initialize the settings. [Setting] button Displays the detailed information on the - Canon imageFORMULA P-208II Scan-tini Personal Document Scanner | User Manual - Page 63
to not make CaptureOnTouch resident in the system. Display setting for when scanner connected Select the [Launch CaptureOnTouch when scanner is connected] checkbox to open the main screen of CaptureOnTouch automatically when the scanner is connected to the computer. This setting is only enabled when - Canon imageFORMULA P-208II Scan-tini Personal Document Scanner | User Manual - Page 64
[Plugin] Tab On the [Plugin] tab, confirm the plugins that have been added to CaptureOnTouch. Deleting plugins Click the [Delete] button to delete a plugin selected in the list. [Maintenance]Tab On the [Maintenance] tab, configure the following settings. [Initialize] Return all settings to their - Canon imageFORMULA P-208II Scan-tini Personal Document Scanner | User Manual - Page 65
Driver When you scan a document in an ISIS compatible or TWAIN compatible application (CaptureOnTouch, etc.), open the scanner driver and configure the scanning conditions and other settings. This section describes the configuration and functions of the scanner driver. Configuration and Functions - Canon imageFORMULA P-208II Scan-tini Personal Document Scanner | User Manual - Page 66
scanned. Depending on the ISIS compatible application, the application may have its own screen for setting scanning conditions. If the scanner value, see the instruction manual that came with the monitor. [Image processing] Tab Adjust the brightness and contrast of scanned images. In addition, - Canon imageFORMULA P-208II Scan-tini Personal Document Scanner | User Manual - Page 67
[Feeding] Tab When the scanner driver is opened from CaptureOnTouch, the following settings screen of the scanner driver appears. Specify scanner operations related to document feeding. [Others] Tab Configure settings for specialized scanning and image processing. 66 - Canon imageFORMULA P-208II Scan-tini Personal Document Scanner | User Manual - Page 68
Mode Advanced Mode Configuration and Functions of the Scanner Driver Scan Panel Scan Panel Scan Panel is software for controlling scanning operations such as feeding documents and stopping scanning when scanning multiple documents one after the other. Scan Panel runs when [Feeding Option] is set - Canon imageFORMULA P-208II Scan-tini Personal Document Scanner | User Manual - Page 69
setting items that are the minimum requirements when configuring the scanner settings. Confirming Basic Conditions for Scanning When you scan a document, make sure you confirm the [Color mode], [Page Size], [Dots per inch], and [Scanning Side] basic conditions in the Basic settings dialog box. 68 - Canon imageFORMULA P-208II Scan-tini Personal Document Scanner | User Manual - Page 70
deleted when images are saved. Confirming Basic Conditions for Scanning When you scan a document, make sure you confirm the [Color mode], [Dots per inch], [Page Size], and [Scanning Side] basic conditions in the settings screen of the scanner driver. If [Match original size] is selected, the edges - Canon imageFORMULA P-208II Scan-tini Personal Document Scanner | User Manual - Page 71
detects whether a document is color, grayscale, or black and white based on its content. When this is selected, you can configure detailed settings for the detection method. Refer to the Help for details. Dots per inch Select the scanning resolution. in the settings screen of the scanner driver is - Canon imageFORMULA P-208II Scan-tini Personal Document Scanner | User Manual - Page 72
tabs are disabled as follows depending on the setting for [Color Mode] on the [Basic] tab. [Brightness] tab Setting value Detect automatically Black and White Advanced Text Enhancement II 256-level Gray 24-bit Color O: Available for setting -: Not available for setting Contrast O O O O O [Others - Canon imageFORMULA P-208II Scan-tini Personal Document Scanner | User Manual - Page 73
Some of the setting items are disabled as follows depending on the setting for [Color Mode] in the settings screen of the scanner driver. Simple Mode Setting value Detect automatically Black and White Advanced Text Enhancement II 256-level Gray 24-bit Color Check the image of the first page O O O - Canon imageFORMULA P-208II Scan-tini Personal Document Scanner | User Manual - Page 74
sheet of paper 83 When you want to set the scanner conditions automatically .. 84 When you want to save a scanner driver setting 85 To scan unregistered size documents Configuring the following settings allows you to scan a document of an unregistered page size. You can register a non-standard - Canon imageFORMULA P-208II Scan-tini Personal Document Scanner | User Manual - Page 75
the [Add/Delete Page Size] dialog box. Name and register the unregistered page size in [Page Size]. Practical Examples When you want to specify the scan area Specify the area of the document to be scanned in the [Scan Area] dialog box, which is opened from the [Area] button on the [Basic] tab. 74 - Canon imageFORMULA P-208II Scan-tini Personal Document Scanner | User Manual - Page 76
on the [Basic] tab to delete the images of the blank pages in the document. Also, if you scan the document when [Check the image of the first page] is selected, only one page of the document is scanned and the corresponding scanned image is displayed in the preview window. If [Skip Blank Page] is - Canon imageFORMULA P-208II Scan-tini Personal Document Scanner | User Manual - Page 77
Set the scanning side setting to [Skip blank page] to delete the images of the blank pages in the document. Practical Examples When you want to enhance contours in images Adjust the edge emphasis setting on the [Image processing] tab. If [Skip blank page] is - Canon imageFORMULA P-208II Scan-tini Personal Document Scanner | User Manual - Page 78
processing] and adjust the edge emphasis settings in the dialog box which appears. Practical Examples When you want to make lines or characters in the scanned images thicker Drag the slider for [Character Emphasis] on the [Image processing] tab to make the lines and characters that appear in the - Canon imageFORMULA P-208II Scan-tini Personal Document Scanner | User Manual - Page 79
Click [Image processing], and in the dialog box that appears adjust letter and line thickness settings. Practical Examples How to produce a picture quality scan In the [Image processing] tab, click [Apply corrections suitable for photographs] checkbox to ON. 78 - Canon imageFORMULA P-208II Scan-tini Personal Document Scanner | User Manual - Page 80
than black and white shading. Disabling the checkbox will output character data and image backgrounds that are closer to black as black, and See the User Manual enclosed with the monitor for the monitor settings to use. [Advanced Text Enhancement II] is suitable for scanning a document with a - Canon imageFORMULA P-208II Scan-tini Personal Document Scanner | User Manual - Page 81
The background behind the text is removed or processed so that the text is emphasized for better readability. Practical Examples To correct tilted documents and images Place a check in [Automatically straightens skewed] under the [Basic] tab, and then click [Setting] to display the [Deskew Settings - Canon imageFORMULA P-208II Scan-tini Personal Document Scanner | User Manual - Page 82
Click the [Deskew] check box to ON. You can select either [Straightens with angle of fed documents] or [Straightens with angle & contents of fed documents]. Practical Examples When you want to detect multiple pages fed at the same time Select the [Double Feed Detection] check box on the [Feeding] - Canon imageFORMULA P-208II Scan-tini Personal Document Scanner | User Manual - Page 83
] check box. Practical Examples When you want to match the orientation of images to the text when scanning a mixture of pages with different text orientations Select [Text orientation recognition] in [Document Orientation] on the [Others] tab. The text orientation on each page is detected, and the - Canon imageFORMULA P-208II Scan-tini Personal Document Scanner | User Manual - Page 84
of a card in a single scan, in the [Feeding] tab, click the [Combine Front & Back Card Images] check box to ON. When the [Text Orientation Recognition] check box is selected, [Document Orientation] is unavailable. For directions on how to feed a card into the scanner, refer to "Loading cards" on - Canon imageFORMULA P-208II Scan-tini Personal Document Scanner | User Manual - Page 85
sides is in the same direction. Practical Examples When you want to set the scanner conditions automatically Set [Full Automatic Mode] in [User Preference] to scan with scanning conditions that match the document. For a portrait card, the lettering on each side is oriented in opposite directions - Canon imageFORMULA P-208II Scan-tini Personal Document Scanner | User Manual - Page 86
Set [Full Automatic Mode] in [Favorite Settings] to scan with scanning conditions that match the document. Practical Examples When you want to save a scanner driver setting When you finish configuring a setting, click the [Save] button of [User Preference] to save the setting. When [Full Automatic - Canon imageFORMULA P-208II Scan-tini Personal Document Scanner | User Manual - Page 87
When you finish configuring a setting, select [Add/Delete] of [Favorite Settings] to save the setting. Clicking the [Add] button registers the current setting to [Favorite Setting List]. Use the [Delete] button to delete a setting from the list. The preregistered [Full Automatic Mode] cannot be - Canon imageFORMULA P-208II Scan-tini Personal Document Scanner | User Manual - Page 88
may cause lines or smudges to appear on scanned images. Use compressed air to periodically clean dust and paper particles from the document feed opening and the inside of the scanner. After finishing a large scanning job, turn OFF the scanner and then clean out any paper particles remaining inside - Canon imageFORMULA P-208II Scan-tini Personal Document Scanner | User Manual - Page 89
scanned documents become dirty, the scanning glass or rollers inside the scanner may be dirty. Clean them periodically. 1 Open the feed tray. 4 Remove any dirt from the scanning glass, separation pad and rollers inside the scanner the scanner. Precision the inside of the scanner. Scratches on the - Canon imageFORMULA P-208II Scan-tini Personal Document Scanner | User Manual - Page 90
item and wears with scanner use. A worn separation pad is no longer able to correctly feed a document and can cause paper jams. If documents no longer feed correctly as frequent multi feed, replace the separation pad. Contact your local authorized Canon dealer or service representative for detailed - Canon imageFORMULA P-208II Scan-tini Personal Document Scanner | User Manual - Page 91
pad When replacing the separation pad, perform the following steps to detach it from and attach it to the unit. Detaching the separation pad 1 Open document feed tray and the feeder cover. Attaching the separation pad 1 Attach the separation pad. 2 Push up the paper pressure until it makes a click - Canon imageFORMULA P-208II Scan-tini Personal Document Scanner | User Manual - Page 92
Chapter 12 Uninstalling the Software Uninstallation If the scan driver, CaptureOnTouch is not operating normally, follow the procedure below to uninstall them. Then, re- Finder to delete the following files. /Library/Image Capture/TWAIN Data Sources/P208II /Applications/CaptureOnTouch P-208II 91 - Canon imageFORMULA P-208II Scan-tini Personal Document Scanner | User Manual - Page 93
Clearing a Paper Jam 92 Common Problems and Solutions 94 Software Troubleshooting 96 Useful tips 96 Clearing a Paper Jam When paper jams occur during scanning, use the following procedure to clear them. Be careful when removing jammed paper. It is possible to cut your hand on the - Canon imageFORMULA P-208II Scan-tini Personal Document Scanner | User Manual - Page 94
pieces. Make sure the document does not get caught in the card guides as well. When a paper jam or other problem occurs while [Rapid recovery system] is enabled in the scanner driver, the image of the last document that was scanned properly is saved before scanning is stopped. Therefore, you - Canon imageFORMULA P-208II Scan-tini Personal Document Scanner | User Manual - Page 95
pages that you load into the scanner If you have a problem that is not solved by the following, contact your local authorized Canon dealer. at one time, and then scan again. 2 Align the document guides to fit the documents as closely as possible, and load the documents so that they feed straightly - Canon imageFORMULA P-208II Scan-tini Personal Document Scanner | User Manual - Page 96
Regular Maintenance". If the problem cannot be solved by cleaning, the internal glass may be scratched. Contact your local authorized Canon dealer. Q8 Pages are missing. A8 Then the scanner driver's [Scanning Side] setting is [Skip blank page], documents with very little black may be unintentionally - Canon imageFORMULA P-208II Scan-tini Personal Document Scanner | User Manual - Page 97
This section describes troubleshooting problems and solutions for operating the supplied software (CaptureOnTouch). If scanning is too slow 1 Close other running programs, if any. 2 Scanning can be slowed down by memory shortage caused by memory-resident applications such as anti-virus - Canon imageFORMULA P-208II Scan-tini Personal Document Scanner | User Manual - Page 98
Match original size] (Windows) or [Detect automatically] (OS X) in the settings screen of the scanner driver. Scanned image edges are lost when scanning document that is closer to black with dark borders. How can I scan correctly without any loss of edges? Set the check box of [Remove Shadow] in the - Canon imageFORMULA P-208II Scan-tini Personal Document Scanner | User Manual - Page 99
and Scanning Shortcut, select [Attach to E-mail] in the [Select output] panel. • To use this function, you need to install a plug-in. • The plug-in can be installed by selecting its checkbox when installing CaptureOnTouch. How do I use the automatic document color detection function? The scanner - Canon imageFORMULA P-208II Scan-tini Personal Document Scanner | User Manual - Page 100
External Dimensions 101 Specifications Main Unit Type Desktop sheetfed scanner Scanning Document Size Plain paper Width 50.8 to 216 mm cards Document Feeding Method Automatic Scanning Sensor Contact image sensor Light source LED Scanning Side Simplex/Duplex Scanning modes Black and - Canon imageFORMULA P-208II Scan-tini Personal Document Scanner | User Manual - Page 101
the scanner may fluctuate depending on the type of document being scanned, the processing load on the scanner, or the condition of your PC. In such cases, the scanning separation pad. Contact your local authorized Canon dealer or service representative for detailed information about the replacement - Canon imageFORMULA P-208II Scan-tini Personal Document Scanner | User Manual - Page 102
External Dimensions Front View (Unit with top open) Side View (With the document feed tray open) 101
-
 1
1 -
 2
2 -
 3
3 -
 4
4 -
 5
5 -
 6
6 -
 7
7 -
8
-
9
-
10
-
11
-
12
-
13
-
14
-
15
-
16
-
17
-
18
-
19
-
20
-
21
-
22
-
23
-
24
-
25
-
26
-
27
-
28
-
29
-
30
-
31
-
32
-
33
-
34
-
35
-
36
-
37
-
38
-
39
-
40
-
41
-
42
-
43
-
44
-
45
-
46
-
47
-
48
-
49
-
50
-
51
-
52
-
53
-
54
-
55
-
56
-
57
-
58
-
59
-
60
-
61
-
62
-
63
-
64
-
65
-
66
-
67
-
68
-
69
-
70
-
71
-
72
-
73
-
74
-
75
-
76
-
77
-
78
-
79
-
80
-
81
-
82
-
83
-
84
-
85
-
86
-
87
-
88
-
89
-
90
-
91
-
92
-
93
-
94
-
95
-
96
-
97
-
98
-
99
-
100
-
101
-
102
 |
 |

Please read this manual before operating this scanner.
After you finish reading this manual, store it in a safe
place for future reference.
CE-IM-0937-1.10