Canon imagePROGRAF TM-300 MFP Z36 TM-305 / TM-300 / TM-205 / TM-200 Setup Guid - Page 9
Loading Paper, Select the paper on which to, print the print head alignment pattern., Manual
 |
View all Canon imagePROGRAF TM-300 MFP Z36 manuals
Add to My Manuals
Save this manual to your list of manuals |
Page 9 highlights
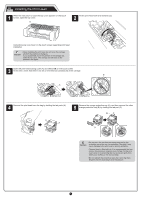
Loading Paper Load the paper for adjustment. 1 When Select the paper on which to print the print head alignment pattern. appears on the touch screen, select Manual. 2 Slide the width guide (A) to align it with a marker indicating the size of the loaded paper. In this example, align the guide to A2, which is the size of the provided paper for adjustment. A 3 Prepare 1 sheet of paper for adjustment. Identify the printed side by referring to the bag in which the paper came. Important • Return unused paper to the bag in which it came and store it away from high temperature, high humidity, and direct sunlight. The touch screen shows instructions on how to load cut sheets. 4 Insert the paper straight into the feed slot, with the printed side facing up, so that the right edge of the paper is aligned with the paper alignment guide (A) on the right side of the roll paper cover. Insert the paper until the edge makes contact and you hear 2 short beep sounds. 5 Adjust the position of the width guide (A) according to the size of the loaded paper. Align the width guide exactly with the paper to avoid the loaded paper from tilting or crinkling. 6 The screen for selecting the paper type appears. Select the type of paper you loaded. In this example, select Coated papers and then Coated papers. A A The paper starts feeding. Printing side Important • This printer allows only 1 sheet to be loaded. Do not load 2 or more sheets. Doing so may cause a paper jam. • If the paper is wavy or warped, it may cause a paper jam. Flatten out the paper before loading it. 9
-
 1
1 -
2
-
3
-
 4
4 -
 5
5 -
 6
6 -
 7
7 -
 8
8 -
 9
9 -
 10
10 -
 11
11 -
 12
12 -
 13
13 -
 14
14
 |
 |
