Canon imagePROGRAF iPF8300S iPF8300S Basic Guide No.1
Canon imagePROGRAF iPF8300S Manual
 |
View all Canon imagePROGRAF iPF8300S manuals
Add to My Manuals
Save this manual to your list of manuals |
Canon imagePROGRAF iPF8300S manual content summary:
- Canon imagePROGRAF iPF8300S | iPF8300S Basic Guide No.1 - Page 1
Large-Format Printers Basic Guide Please read the following electronic manuals also. • User's Guide • Paper Reference Guide Printer Operations 1 This Basic Guide includes three booklets. Read this manual first. Printer Operations 1 Safety Precautions 2 The Manuals Supplied with This Printer - Canon imagePROGRAF iPF8300S | iPF8300S Basic Guide No.1 - Page 2
immediately and remove the power plug from the power outlet. Contact the nearest service center. █ Cleaning the Printer • For cleaning, use a cloth dampened in water. Never use flammable solvents such as alcohol, benzene, or thinner. If these substances come into contact with electrical components - Canon imagePROGRAF iPF8300S | iPF8300S Basic Guide No.1 - Page 3
Always disconnect the power cable from the outlet before cleaning the printer. If the printer is switched on accidentally, moving parts inside the printer may cause personal injuries. █ Printhead, Ink Tanks, and Maintenance Cartridge • Always store consumables in a safe location out of the reach of - Canon imagePROGRAF iPF8300S | iPF8300S Basic Guide No.1 - Page 4
, if a foreign object falls into or a liquid spills into the printer, press the Power button immediately to switch the printer off, unplug the printer power cable from the outlet, and then call for service. If you continue to use the printer, this could cause a fire or electrical shock. • Connect the - Canon imagePROGRAF iPF8300S | iPF8300S Basic Guide No.1 - Page 5
Basic Guide 1 (this manual) Printer Operations Basic Guide 2 Troubleshooting Basic Guide 3 Printer Relocation / Software Installation Electronic manuals Details Instructions for unpacking and setting up the printer, and for installing the software and electronic manuals Descriptions of the paper - Canon imagePROGRAF iPF8300S | iPF8300S Basic Guide No.1 - Page 6
as follows in the documentation. In the Basic Guides: In the electronic manuals: Guide number and section title Example: (→ , Attaching the Roll Holder to Rolls) Manual name and title Example: (→"Selecting the Paper Type (Roll)," User's Guide) Text conventions and illustrations Button names and - Canon imagePROGRAF iPF8300S | iPF8300S Basic Guide No.1 - Page 7
(U.S.A) Canon Large Format Printer iPF8300S This uses and can radiate radio frequency energy and, if not installed and used in accordance with the instructions of the equipment. Canon U.S.A. Inc. One Canon Plaza, Lake Success, NY 11042, U.S.A. Tel No. 516-328-5600 For CA, USA Only Included battery - Canon imagePROGRAF iPF8300S | iPF8300S Basic Guide No.1 - Page 8
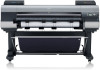
m Maintenance Cartridge n Carrying Handles o Maintenance Cartridge Cover p Stand Operation Open this cover to install the Printhead, load paper, and remove any jammed paper from inside the printer as needed. Paper is cut (using the cutter or manually with scissors) over this groove. Guides printed - Canon imagePROGRAF iPF8300S | iPF8300S Basic Guide No.1 - Page 9
the platen to print. Vacuum holes on the platen hold paper in place. For catching ink outside the edges of paper during borderless printing. When cleaning inside the printer under the Top Cover, use this brush to sweep away paper dust on the Platen. Also use the brush to move the blue Switch on the - Canon imagePROGRAF iPF8300S | iPF8300S Basic Guide No.1 - Page 10
Map) Cancels print jobs in progress and ends the ink drying period. Turns the printer on and off. The power button is lit when the printer is on or in Sleep mode. Enables you to check instructions for loading and removing paper or replacing ink tanks or printheads, as well as other operations. Press - Canon imagePROGRAF iPF8300S | iPF8300S Basic Guide No.1 - Page 11
control panel as follows. After the printer starts up, the Tab Selection screen Paper Menu Plain Paper ISO A2 Roll Parts (Paper tab A tab indicating status and showing menus related to paper. (Ink tab A tab indicating status and showing menus related to ink. (Job tab A tab indicating status - Canon imagePROGRAF iPF8300S | iPF8300S Basic Guide No.1 - Page 12
ends of the roll. Misalignment may cause feeding problems. • For details on supported sizes and types of rolls, see "Paper Sizes" or the Paper Reference Guide. (→"Paper Sizes," User's Guide), (→"Types of Paper," User's Guide) • To view instructions as you attach the Roll Holder, press the Navigate - Canon imagePROGRAF iPF8300S | iPF8300S Basic Guide No.1 - Page 13
with the holes (b) of the Holder Stopper and insert it firmly. No attachment is needed. b a • Using rolls with a 3-inch paper core Holder Stopper Side Align the tips (a) of 3-Inch Paper Core Attachment #2 with the holes (b) of the Holder Stopper and insert it firmly. b a Roll Holder Side - Canon imagePROGRAF iPF8300S | iPF8300S Basic Guide No.1 - Page 14
. • Always load rolls when the printer is on. If the printer is off when you load a roll, the paper may not be advanced correctly when you turn the printer on. • Before loading rolls, make sure the printer is clean inside the Top Cover and around the Ejection Guide. If these areas are dirty, we - Canon imagePROGRAF iPF8300S | iPF8300S Basic Guide No.1 - Page 15
Slot, fully into the slot. ba Loading Rolls in the Printer ab • Be careful not to drop the roll and hurt yourself paper is wrinkled or warped, straighten it out before loading it. • For paper that tends to curl, lift the Release Lever and manually pull the roll paper over the Platen. • Load paper - Canon imagePROGRAF iPF8300S | iPF8300S Basic Guide No.1 - Page 16
in the Printer 6 Lower the Ejection Guide. 7 Holding the edge of the roll paper, lift the Release Lever. 8 Hold the edge of the roll paper as you gently pull it evenly with both hands to the position of the Ejection Guide a (a). Align the right side of the roll paper with the Paper Alignment - Canon imagePROGRAF iPF8300S | iPF8300S Basic Guide No.1 - Page 17
press the OK button. Loading Rolls in the Printer • For details on types of paper to select, see the Paper Reference Guide. (→ , The Manuals Supplied with This Printer) • Adjusting the printhead alignment with the type of paper to be used in printing may enhance printing quality. (→ , If Vertical - Canon imagePROGRAF iPF8300S | iPF8300S Basic Guide No.1 - Page 18
rolls from the printer as follows. • If you need to cut a roll, see the following procedure. (→"Specifying the Cutting Method for Rolls," User's Guide) 1 On the Tab Selection screen of the Control Panel, press ◄ or ► to select the Paper tab ( ). Ready OK: Paper Menu Plain Paper ISO A2 Roll - Canon imagePROGRAF iPF8300S | iPF8300S Basic Guide No.1 - Page 19
Roll Holder Slot. a • See the following procedure for instructions on removing the Roll Holder from the roll. (→"Removing Rolls From the Roll Holder," User's Guide) 8 Lower the Ejection Guide and close the Top Cover. • To load new paper in the printer at this point, see the following procedure - Canon imagePROGRAF iPF8300S | iPF8300S Basic Guide No.1 - Page 20
printer is clean inside the Top Cover and around the Ejection Guide. If these areas are dirty, we recommend cleaning them in advance. (→ , If Paper is Soiled) • Store unused paper press the OK button. • If any paper has been advanced that will not be used, a message is shown requesting you to remove - Canon imagePROGRAF iPF8300S | iPF8300S Basic Guide No.1 - Page 21
and then press the OK button. The printer now starts feeding the paper. • For details on types of paper to select, see the Paper Reference Guide. (→ , The Manuals Supplied with This Printer) • When using the Output Stacker, if you will print on large, stiff sheets, we recommend adjusting the Output - Canon imagePROGRAF iPF8300S | iPF8300S Basic Guide No.1 - Page 22
Removing Sheets This section describes how to remove sheets from the printer. 1 On the Tab Selection screen of the Control Panel, press ◄ or ► to select the Paper tab ( ). Ready OK: Paper Menu Plain Paper ISO A2 • If the Tab Selection screen is not displayed, press the Menu button. 2 Press the - Canon imagePROGRAF iPF8300S | iPF8300S Basic Guide No.1 - Page 23
PFI-704PC • PM Ink Tank PFI-704PM • GY Ink Tank PFI-704GY Maintenance Cartridge The maintenance cartridge is provided with a shaft cleaner. • Maintenance Cartridge MC-08 Cutter Unit • Cutter Unit CT-06 • For instructions on replacing the Cutter Unit, see the User's Guide. (→"Replacing the Cutter - Canon imagePROGRAF iPF8300S | iPF8300S Basic Guide No.1 - Page 24
of ink tanks you removed. Handle ink tanks carefully during replacement. The ink may stain clothing. • Do not install used ink tanks in another model of printer. This will prevent correct ink level detection, which may damage the printer or cause other problems. • We recommend using up an Ink Tank - Canon imagePROGRAF iPF8300S | iPF8300S Basic Guide No.1 - Page 25
Cover. Remove the Ink Tank at this point. Remove the ink tanks 1 Open the Ink Tank Cover of the tank for replacement and check the Ink Lamp. The Ink Lamp flashes quickly if there is no ink left. • Avoid hitting the printer when replacing an Ink Tank. Handle the printer gently when replacing tanks - Canon imagePROGRAF iPF8300S | iPF8300S Basic Guide No.1 - Page 26
it down to the front. GG a 330 ml tanks a 700 ml tanks • Push the Ink Tank Lock Lever down until it locks. • Make sure the Ink Tank Lock Lever does not return to the original position. 3 Hold the Ink Tank by the grips (a) or handle (b) and remove it. Press the OK button. a BK - Canon imagePROGRAF iPF8300S | iPF8300S Basic Guide No.1 - Page 27
instead of just your wrist. If you agitate it using just your wrist, you may injure your wrist. • Do not remove and agitate ink tanks that have already been installed in the printer. Ink may leak out. • If you do not agitate the Ink Tank, the ink may settle, which may affect printing quality. 2 Open - Canon imagePROGRAF iPF8300S | iPF8300S Basic Guide No.1 - Page 28
holder, do not force it into the holder. Make sure the color of the Ink Tank Lock Lever matches the color of the Ink Tank, and check the orientation of the Ink Tank before reloading it. 4 Lift the Ink Tank Lock Lever until it stops, and then push it down until it clicks into - Canon imagePROGRAF iPF8300S | iPF8300S Basic Guide No.1 - Page 29
Tank Lock Lever may not be closed completely. Make sure all ink tank lock levers are fully closed. • To close the Ink Tank Cover when no Ink Tank is installed (as when moving the printer), push the release lever (a) as shown while returning the Ink Tank Lock Lever to the original position. a BK 29 - Canon imagePROGRAF iPF8300S | iPF8300S Basic Guide No.1 - Page 30
the instructions in "Replace the maintenance cartridge." 䇭䇭Maintenance cartridge full. Replace the maintenance cartridge. • Do not replace the Maintenance Cartridge during initialization immediately after turning on the printer, during Printhead cleaning, or when ink is being absorbed. Ink may - Canon imagePROGRAF iPF8300S | iPF8300S Basic Guide No.1 - Page 31
Replacing the Maintenance Cartridge Access the menu for maintenance cartridge replacement 1 On the Tab Selection screen of the Control Panel, press ◄ or ► to select the Settings/Adj. tab ( ). Printing OK:Setting/Adj. Menu Maint. cart. - Canon imagePROGRAF iPF8300S | iPF8300S Basic Guide No.1 - Page 32
removal and storage. If you drop a used Maintenance Cartridge or store it at an angle, ink may leak and cause stains. • The remaining Maintenance Cartridge capacity is recorded on each printer. Do not install a used Maintenance Cartridge in another printer. 3 Open the box, remove the plastic - Canon imagePROGRAF iPF8300S | iPF8300S Basic Guide No.1 - Page 33
. Replacing the Maintenance Cartridge • Always put the used Maintenance Cartridge back in the box and store the box on a flat surface. Otherwise, ink may leak and cause stains. 6 Wipe away any soiling on the Maintenance Cartridge Cover. • Support the Maintenance Cartridge Cover from underneath - Canon imagePROGRAF iPF8300S | iPF8300S Basic Guide No.1 - Page 34
Replacing the Maintenance Cartridge 9 Press the OK button. The printer now initializes the Maintenance Cartridge. Next, replace the Shaft Cleaner. 34 - Canon imagePROGRAF iPF8300S | iPF8300S Basic Guide No.1 - Page 35
it. a 4 Holding the new Shaft Cleaner by the grips (a), attach it to the Carriage. a • Be sure to put the used Shaft Cleaner in the small box before putting it in the larger box with the used Maintenance Cartridge for disposal. 5 Close the Top Cover. The Carriage moves back into position. 35 - Canon imagePROGRAF iPF8300S | iPF8300S Basic Guide No.1 - Page 36
of Head Cleaning B from the printer menu Replace any printheads with poor Canon dealer has advised you to replace the Printhead Replace the Printhead as directed. Compatible printheads Use ink around the nozzles of the Printhead you remove. Handle the Printhead carefully during replacement. The ink - Canon imagePROGRAF iPF8300S | iPF8300S Basic Guide No.1 - Page 37
when ink levels are low. • When the remaining capacity of Maintenance Cartridge is low, prepare a new Maintenance Cartridge. 1 Remove any paper that has been advanced by selecting Eject Paper in the Control Panel menu. • When using a roll, rewind it. (→ , Removing the Roll from the Printer) • When - Canon imagePROGRAF iPF8300S | iPF8300S Basic Guide No.1 - Page 38
touch the metal contacts of the Carriage. This may damage the printer. 3 If the ventilation duct (a) is dirty, use a damp cloth that you have wrung out completely to wipe it clean. a Move the Carriage out of the way manually if the Carriage is concealing the ventilation duct, and then clean - Canon imagePROGRAF iPF8300S | iPF8300S Basic Guide No.1 - Page 39
completely. 6 Pull up the Printhead Fixer Cover to open it completely. 7 Remove the Printhead and press the OK button. Replacing the Printhead • Dispose of the used Printhead in accordance with local regulations. 39 - Canon imagePROGRAF iPF8300S | iPF8300S Basic Guide No.1 - Page 40
the ink supply section (d). This may cause printing problems. a use your other hand to remove the orange Protective Part (a). Squeeze the grips (c) of Protective Part (b) and pull it down to remove it. bc a • The inside surface of the Protective Part (a) and Protective Part (b) is coated with ink - Canon imagePROGRAF iPF8300S | iPF8300S Basic Guide No.1 - Page 41
printer until it clicks. 13 Push the Carriage Cover down toward the front. 14 Close the Top Cover. Ink now fills the system. It takes about 13 minutes for ink to fill the system. • Never remove an Ink instructions on the Display Screen and supply paper that you will use for printing. After the paper - Canon imagePROGRAF iPF8300S | iPF8300S Basic Guide No.1 - Page 42
types of paper the printer supports, refer to the Paper Reference Guide. The paper type setting in the printer driver and related software (as well as on the Control Panel) is updated when you install the printer driver from the User Software CD-ROM or if you change paper information by using the - Canon imagePROGRAF iPF8300S | iPF8300S Basic Guide No.1 - Page 43
Status Print Interface Print Paper Details Print Job Log Menu Map Adjust Printer Head Posi. Adj. Feed Priority Calibration Auto(Standard) Auto(Advanced) *5 Auto(Expansion) Manual *5 Adj. Priority Adj. Quality *6 Adjust Length *7 Auto Adjust Calibration Log Use Adj. Value Set Exec. Guide - Canon imagePROGRAF iPF8300S | iPF8300S Basic Guide No.1 - Page 44
*15 NetWare *15 AppleTalk *15 Ethernet Driver *15 System Setup Interface Print *15 Return IPv6 Support IPv6 StlessAddrs *11 DHCPv6 *11 DNS Settings *11*16 NetWare Frame Type *10 Print Service Not Use * Use xxxxxxxxxxxx H Off On * -4,-3,-2,-1,0*,+1,+2,+3,+4 Automatic Manual * DHCP - Canon imagePROGRAF iPF8300S | iPF8300S Basic Guide No.1 - Page 45
Printer Info OK Back d Date & Time *15 Date Format *15 Language Time Zone *15 Length Unit Detect Mismatch Paper Size Basis Keep Paper Size Rep.P.head Print Nozzle Check CarriageScanWdth Use On Off On Frequency Warning Automatic Fixed On Off High Speed Secure High Spd. Secure Print Print (Auto Del) - Canon imagePROGRAF iPF8300S | iPF8300S Basic Guide No.1 - Page 46
23 F Flange 13 I imagePROGRAF Support Information 5 Ink hole 26 Ink Lamp 25, 29 Ink tab 11, 25 Ink Tank Lock Lever 26, 28 Ink tank replacement 24 J Job tab 11 M Maintenance cartridge replacement 30 Menu map (menu structure 42 Menu operations 11 P Paper Reference Guide 5 Paper tab 11, 18 - Canon imagePROGRAF iPF8300S | iPF8300S Basic Guide No.1 - Page 47
- Canon imagePROGRAF iPF8300S | iPF8300S Basic Guide No.1 - Page 48
. 30-2, Shimomaruko 3-chome, Ohta-ku, Tokyo 146-8501, Japan Canon U.S.A., Inc. One Canon Plaza, Lake Success, NY 11042 U.S.A Canon Europe Ltd. 3 The Square, Stockley Park, Uxbridge, Middlesex, UB11 1ET United Kingdom Canon (China) Co., Ltd. 15F Jinbao Building No.89 Jinbao Street, Dongcheng District
-
 1
1 -
 2
2 -
 3
3 -
 4
4 -
 5
5 -
 6
6 -
 7
7 -
8
-
9
-
10
-
11
-
12
-
13
-
14
-
15
-
16
-
17
-
18
-
19
-
20
-
21
-
22
-
23
-
24
-
25
-
26
-
27
-
28
-
29
-
30
-
31
-
32
-
33
-
34
-
35
-
36
-
37
-
38
-
39
-
40
-
41
-
42
-
43
-
44
-
45
-
46
-
47
-
48
 |
 |

1
Printer Operations
Basic Guide
Read this manual before attempting to operate the printer.
Keep this manual in a handy location for future referencing.
Printer Operations
1
This Basic Guide includes three booklets.
Large-Format Printers
2
Troubleshooting
3
Printer Relocation
Software Installation
ENG
Read this manual
fi
rst.
Please read the following electronic
manuals also.
• User's Guide
• Paper Reference Guide
Safety Precautions
........................................
2
The Manuals Supplied with This Printer
...........
5
How to read the Basic Guides
..........................
6
Parts
.................................................................
8
Attaching the Roll Holder to Rolls
...................
12
Loading Rolls in the Printer
............................
14
Removing the Roll from the Printer
................
18
Loading Sheets in the Printer
.........................
20
Removing Sheets
...........................................
22
Consumables
..................................................
23
Replacing Ink Tanks
.......................................
24
Replacing the Maintenance Cartridge
............
30
Replacing the Printhead
.................................
36
Menu Map
.......................................................
42
Troubleshooting
................................................
2
If Roll Paper Jams
..........................................
20
If a Sheet Jams
...............................................
22
If Paper is Soiled
............................................
24
If Printing is Faint
............................................
26
If Vertical Lines are Warped or Colors are
Misaligned
..................................................
27
If Banding Occurs
...........................................
29
If Line Length Does Not Match
.......................
31
Error Messages
..............................................
33
Preparing to Transfer the Printer
......................
2
Reinstalling the Printer
.....................................
8
Installing the Software (Windows)
..................
12
Installing the Software (Mac OS X)
................
14
Convenient Printer Driver Features
................
16