Casio BE-300 Getting Started Guide - Page 21
To remove the CASSIOPEIA from the cradle, take care to keep its serial connector cover
 |
UPC - 079767696948
View all Casio BE-300 manuals
Add to My Manuals
Save this manual to your list of manuals |
Page 21 highlights
4. Orient the CASSIOPEIA in relation to the cradle as shown in the illustration below. 5. Taking care to align the serial connector on the bottom of the CASSIOPEIA with the connector on the cradle, lower the CASSIOPEIA into the cradle as shown in the illustration below. Important • Make sure the CASSIOPEIA lowers securely into the cradle as far as it can go. • While the CASSIOPEIA is on the cradle, take care to keep its serial connector cover in a safe place. Also, make sure you replace the serial connector cover when you remove the CASSIOPEIA from the cradle. To remove the CASSIOPEIA from the cradle Lift the CASSIOPEIA straight up from the cradle. 21
-
 1
1 -
2
-
3
-
4
-
5
-
6
-
7
-
8
-
9
-
10
-
11
-
12
-
13
-
14
-
15
-
 16
16 -
 17
17 -
 18
18 -
 19
19 -
 20
20 -
 21
21 -
 22
22 -
 23
23 -
 24
24 -
 25
25 -
 26
26 -
27
-
28
-
29
-
30
-
31
-
32
-
33
-
34
-
35
-
36
-
37
-
38
-
39
-
40
-
41
-
42
-
43
-
44
-
45
-
46
-
47
 |
 |

21
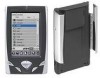
4.Orient the CASSIOPEIA in relation to the cradle as shown in the illustration below.
5. Taking care to align the serial connector on the bottom of the CASSIOPEIA with the
connector on the cradle, lower the CASSIOPEIA into the cradle as shown in the
illustration below.
Important
•
Make sure the CASSIOPEIA lowers securely into the cradle as far as it can go.
•
While the CASSIOPEIA is on the cradle, take care to keep its serial connector cover
in a safe place. Also, make sure you replace the serial connector cover when you
remove the CASSIOPEIA from the cradle.
To remove the CASSIOPEIA from the cradle
Lift the CASSIOPEIA straight up from the cradle.