Casio CW-50 User Guide
Casio CW-50 - Disc Title Printer Color Thermal Transfer Manual
 |
UPC - 079767139438
View all Casio CW-50 manuals
Add to My Manuals
Save this manual to your list of manuals |
Casio CW-50 manual content summary:
- Casio CW-50 | User Guide - Page 1
E DISC TITLE PRINTER Application Version 3.03 For Windows® User's Guide • We recommend that you print on a disc* before you record anything on it. Printing on a disc that already has data recorded on it can cause the data to become corrupted. • Note that CASIO COMPUTER CO., LTD. shall not be held - Casio CW-50 | User Guide - Page 2
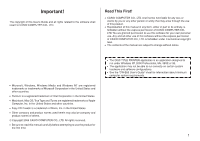
first time. • The DISC TITLE PRINTER application is an application designed to run under Windows XP, 2000 Professional, Me, 98SE or 98. • The application may not be able to run correctly on certain system hardware and software configurations. • See the "CW-E60 User's Guide" sheet for information - Casio CW-50 | User Guide - Page 3
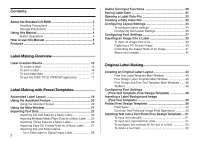
CD-ROM 3 Handling Precautions 3 Storage Precautions 3 Using this Manual 4 Button Operations 4 How to use this Manual 5 Features 6 Label Making Overview Label Creation Basics 10 To create a label 10 To print a label 14 To save label data 17 To quit the DISC TITLE PRINTER application - Casio CW-50 | User Guide - Page 4
advanced print settings 59 Registering and Deleting a Phrase Memory Entry .......... 59 To configure advanced layout settings 60 Using Help 61 To use Help 61 Phrase Library List 62 Troubleshooting 62 Error Messages 64 About the Bundled CD-ROM Handling Precautions • Handle the disc to - Casio CW-50 | User Guide - Page 5
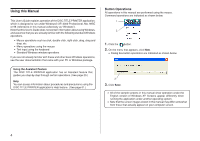
This User's Guide explains operation of the DISC TITLE PRINTER application, which is designed to run under Windows® XP, 2000 Professional, Me, 98SE or 98 (referred to in this manual collectively as "Windows"). Note that this User's Guide does not contain information about using Windows, and assumes - Casio CW-50 | User Guide - Page 6
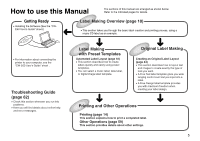
• Installing the Software (See the "CWE60 User's Guide" sheet.) Label Making Overview (page 10) • This section takes you through the basic label creation and printing process, using a music CD label as an example. • For information about connecting the printer to your computer, see the "CW-E60 - Casio CW-50 | User Guide - Page 7
Features After using this software to create the labels you want, you can connect your printer to your computer and print then. • Music Discs Labels can include artist names and track titles (page 18). You can also import track names from Windows MediaTM Player, iTunes, or Easy CD Creator, or you - Casio CW-50 | User Guide - Page 8
This software does not include functions for recording to a CD-R, CD-RW or other types of discs. • Data Discs You can import the names of folders and files you plan to store on a disc and print them on its label. You can also type in information manually (pages 18 and 28). • Digital Image Discs You - Casio CW-50 | User Guide - Page 9
Features • Print with TrueType® fonts installed on your PC (page 37). • Support for both text and images (page 39). Note that images are printed in monochrome. • A collection of preset templates lets you produce great looking labels with minimum effort. 8 - Casio CW-50 | User Guide - Page 10
• A Free Text Template allows more control over the appearance and layout of text (Free Text → page 44). • A Free Design Template gives you almost total freedom for laying out text and images to create exactly the look you want (Free Design → page 44). 9 - Casio CW-50 | User Guide - Page 11
by clicking the Windows Start button and then All Programs. Next, point to CASIO, and then click DISC TITLE PRINTER. Note that the location of the application may be different on your computer, depending on what you specified when you installed it. After DISC TITLE PRINTER application starts up - Casio CW-50 | User Guide - Page 12
in the disc title, artist names, and track names. The text you input appears in the preview image on the screen. Label Input Boxes Important! You must select a label template before you can perform operations on the main window. Warning message Important! The warning message "Printing string is - Casio CW-50 | User Guide - Page 13
text layout. 6. Click . Note See page 35 for details about changing the text layout pattern. 5. Click . 7. Click . 8. Click . This displays a dialog box for selecting the print pattern. Note See page 34 for details about - Casio CW-50 | User Guide - Page 14
9. Click . 12. For Font Size, select 2. Selecting a Font 10. Click . This displays a dialog box for making font settings. 13. Click the Artist Name tab. 11. Confirm that Title tab is selected. Note If a different tab is displayed, click Title. 13 - Casio CW-50 | User Guide - Page 15
a level surface when printing. A tilted surface can make normal printing impossible. • Make sure an ink ribbon cassette is loaded in the printer . 1. Connect the printer to your computer. • See the "CW-E60 User's Guide" sheet for more information. 14 Important! • Handle the disc gently when sliding - Casio CW-50 | User Guide - Page 16
• This will cause the print head to release the disc so you can remove it from the printer. Positioning guide Printing will appear here. • Adjust the position of the disc so its logo or marking is parallel with the positioning guide and slit. • Note that the printer cannot print in an area of the - Casio CW-50 | User Guide - Page 17
lower label area (Label 2). 4 Click this button to cancel printing. 5 This is the eject button. Click it to open the disc tray. Eject button operation is not supported with the CW-E60. 6 This is advanced settings button. Click it to configure printer, preset phrase, and other settings. Label 2 16 - Casio CW-50 | User Guide - Page 18
, click Save. 3. Check the file name and then click Save. The label data is saved in your Windows My Documents folder. Note See page 31 for details about saving label data. To quit the DISC TITLE PRINTER application 1. Click . 2. On the menu that appears, click Exit. Note You can also quit the - Casio CW-50 | User Guide - Page 19
format and filling in the blanks. The following procedure shows how to do this, using the music label template as an example. 1. On the main window, click . 2. On the menu that appears, click New. This displays a dialog box for selecting the label template. 3. Click the label template you want to - Casio CW-50 | User Guide - Page 20
Digital Image Label • If you want to create your own original layout, select the Free Text or Free Design template. See "Creating an Original Label Layout" on page 44 for more information. 19 - Casio CW-50 | User Guide - Page 21
on the main window displays the Assistant screen. The Assistant screen does not appear while the Free Text or Free Design label template is displayed. Using the Assistant Screen When you are unsure of DISC TITLE PRINTER application operations... Follow the instructions on the Assistant screen - Casio CW-50 | User Guide - Page 22
CD-Text, Windows Media Player track data, iTunes, Easy CD Creator project list, folder name, file name) are included on the Import menu of the Free Text template and Free Design template. Output a list of file names on a printer (page 33) Quit the DISC TITLE PRINTER more advanced printing and phrase - Casio CW-50 | User Guide - Page 23
" in the "CW-E60 User's Guide" sheet. • With the CW-E60, clicking the Eject button will eject the disc and also advance with ink ribbon. Because of this, you should avoid clicking the Eject button except when absolutely necessary. Important! The Eject button is disabled while a printing operation is - Casio CW-50 | User Guide - Page 24
track names, and other information. You can import such text using the DISC TITLE PRINTER application and incorporate it into music labels. Note that some CDs may not contain CD-Text data. 1. On the music label template main window, click the 2. On the menu that appears, click Import. This displays - Casio CW-50 | User Guide - Page 25
the Title (7). 3 Artist Name This is the name of the artist as specified in the CD-Text. (8). 4 Tracks This is the title of the track as specified in the CD-Text. To change the text displayed on the left in the Title box on the right, click OK. The CD-Text data is displayed in the label input boxes and - Casio CW-50 | User Guide - Page 26
Screen shots shown in this manual are based on Windows Media Player for Windows XP. Note Screen contents and operational procedures may be slightly different for other supported Windows versions. 1. Start up Windows Media Player. 4. Start up the DISC TITLE PRINTER application. 5. On the music label - Casio CW-50 | User Guide - Page 27
application lets you import play lists created using iTunes. This capability is supported for data created using iTunes 6.0.4 or higher. 1. Start up the DISC TITLE PRINTER application. 2. On the music label main window, click the button. 3. On the menu that appears, click Import. This displays - Casio CW-50 | User Guide - Page 28
you have installed. • CD-R and CD-RW writing software. DISC TITLE PRINTER application supports project lists created using Easy CD Creator for incorporation into a music label. This capability is supported for data created using Easy CD Creator 4.0 and 5.0. • All the screen shots shown in this manual - Casio CW-50 | User Guide - Page 29
then Import Easy CD Creator Project List. on page 23 for information about selecting data for import. 10.After checking the track names in the label input box, click 1. On the data label template or digital image label template main window, move the cursor to the label input box where you want - Casio CW-50 | User Guide - Page 30
4. See step 4 of the procedure on page 23 for information about selecting data for import. Note • When importing a folder name, select the folder icon on the left. • When importing a file name, select a file icon on the left. 5. After checking to make sure that the folder name and file name are - Casio CW-50 | User Guide - Page 31
Useful Text Input Functions Right-clicking the DISC TITLE PRINTER application main window displays a shortcut menu of commands that come in handy during text input. w 1 2 e 3 4 5 6 r 7 8 9 0 q Before text editing When text has been edited 1 Copy Copies the selected text - Casio CW-50 | User Guide - Page 32
box. • Save: This button appears if this is the first time you are saving the label data. Clicking this button saves the data, assigning the title name as the file name. If the label data you are editing has already been saved, this button name changes to Overwrite. Clicking Overwrite replaces - Casio CW-50 | User Guide - Page 33
Opening a Label Data File Perform the following steps when you want to open an existing label data file. 1. Click the button. 2. On the menu that appears, click Open. This displays a dialog box for selecting the file you want to open. 3. Select the name of the file you want to open, and then click - Casio CW-50 | User Guide - Page 34
File For a disc that contains so much data that it cannot fit on a label, you can use the following procedure to create a data index file that you can print out on a computer printer. 1. Click the a data index file using standard word processor or spreadsheet software, and then print from there. 33 - Casio CW-50 | User Guide - Page 35
Indicates text and image orientation. Available Print Patterns The 11 DISC TITLE PRINTER print patterns are shown below. 1 4 7 0 To configure print pattern settings 1. Click the panel. This displays a menu for selecting a print pattern. 2. Click the print pattern to which you want to - Casio CW-50 | User Guide - Page 36
print pattern 1. On the main window, click . This displays a dialog box for selecting a print pattern. 2. Click . This displays a dialog box for configuring advanced print 1 2 Templete Item Music Label 1 Title Artist Name Data Label Title Digital Image Label Music Label Tracks Data - Casio CW-50 | User Guide - Page 37
Available Text Layouts The 5 DISC TITLE PRINTER text layouts are shown below. 1 2 3 4 5 Note Layouts 1, 2, 3 and 4 allow fewer characters per line than the other layouts. To configure text layout settings 1. Click the panel. - Casio CW-50 | User Guide - Page 38
, attribute, and size settings of label text. 1. On the main window, click the button. This displays a dialog box for configuring font settings Label Data Label Digital Image Label These tabs are: Title, Artist Name, Tracks Title, Contents Title, Date/Location, Image Information 4. Select the font - Casio CW-50 | User Guide - Page 39
by the font size you select. If you specify a 2-line font size for the title font and artist name, when creating a music CD label, for example, you will be able to input only two lines of song title text. L 7. After completing the settings, click OK. The settings you configure are reflected in - Casio CW-50 | User Guide - Page 40
in monochrome in accordance with the "Dithering" settings. See page 43 for more information. • To view the actual print image, click . To input an image from a file 1. On the main window, click the button. This displays the Image Settings dialog box. 2. Click Open Image. 3. Select the file name - Casio CW-50 | User Guide - Page 41
the screen you want to capture. 3. On the Windows task bar, click DISC TITLE PRINTER. This displays the main window. 4. On the main window, click the button. This displays the Image Settings dialog box. 5. Click Capture. This minimizes the main window. Note To cancel the capture operation, press - Casio CW-50 | User Guide - Page 42
want, click OK. Note that the layout preview image on the main window shows a monochrome version of the image you selected. Note See page 42 conversion dithering settings. To save a captured image to your PC's hard disc 1. While the captured image is shown on the Image Settings dialog box, - Casio CW-50 | User Guide - Page 43
all the settings are the way you want, click OK. • The settings you configure are reflected in the preview image on the main window. Note To view the actual print image, click . 2. Select "Pattern" or "Error Diffusion" and then click OK. The dithering setting you select is reflected in the label - Casio CW-50 | User Guide - Page 44
Difference between Pattern and Error Diffusion Dithering With both dithering methods and dark colors are printed blacker, while light colors are a lighter shade of gray. Compared with Pattern dithering, Error Diffusion takes longer, but the printout looks better. Pattern Error Diffusion 43 - Casio CW-50 | User Guide - Page 45
Common Characteristics • The following characteristics are common to both the Free Text label template and the Free Design label template. • CD-Text, Windows Media Player, iTunes, and Easy CD Creator track name data, as well as file names and folder names can be imported into labels. • Font and font - Casio CW-50 | User Guide - Page 46
Free Text Label Template Main Window 1 Print Pattern Panel 2 Toolbar 4 Image Button Free Design Label Template Main Window 7 Measurement Unit Button 8 Work Area Size Button 1 Print Pattern Panel 5 Insert Text Button 2 Toolbar 9 Image Button 3 Work Area 6 Print Area 3 Work Area 45 - Casio CW-50 | User Guide - Page 47
Free Design and Free Text Template Main Windows Free Text Template 1 Print Pattern Panel This panel shows the location and orientation of the printing on the currently selected label. Click this panel when you want to change the text layout. 2 Toolbar Contains a selection of useful editing tools. - Casio CW-50 | User Guide - Page 48
or more fields so they are evenly spaced horizontally. Center -Vertical -Horizontal Centers the selected fields vertically in the print area. Centers the selected fields horizontally in the print area. Send -To Front -To Back -Forward -Back Sends the selected field to the front of all the fields - Casio CW-50 | User Guide - Page 49
Configuring Font Settings (Free Text Template, Free Design Template) This section describes how to configure font settings for text you input manually into the work area, or text you import (page 23). You can select font, font size, font style, and text alignment from the toolbar. Font - Casio CW-50 | User Guide - Page 50
then select the image you want to insert. • The image appears in the preview image on the main window. • One image can be inserted per label area. After you insert an image into print pattern or , you cannot input text. To insert a label background image, choose or . Note • See "Inserting an - Casio CW-50 | User Guide - Page 51
. If the text field has a white background and the cursor flashing inside it (for text input and editing), click the boundary of the field again. 50 - Casio CW-50 | User Guide - Page 52
edit, and delete text. To input text manually 1. On the main window, click . This inserts a text field into below to import text from a CD-Text, Windows Media Player, iTunes or Easy CD Creator file, and input it into Using this option imports only the titles, artist names, and track names whose - Casio CW-50 | User Guide - Page 53
a label image. To insert an image into a label 1. On the main window, click , configure settings for the image you want to insert, and then click OK. • This inserts the image in the center of the print area. • If the selected image is larger than the work area, it is - Casio CW-50 | User Guide - Page 54
Resizing a Field (Free Design Template) Use the procedures in this section when you want to change the size of a field. Important! Note that the result obtained when you resize a field depends on whether it is a text field or an image field. 1. Select the field you want to resize so it is enclosed - Casio CW-50 | User Guide - Page 55
(See page 46). Note You can use the following procedures for both text fields and image fields. I What is alignment? The DISC TITLE PRINTER application lets you align multiple fields vertically or horizontally in relation to a reference field that you specify. Example: To center fields vertically - Casio CW-50 | User Guide - Page 56
To align fields 1. Drag the mouse on the label so the fields you want to align or resize are enclosed in the selection boundary. 2. To make a different field the reference field, hold down the Ctrl key as you click the new reference field. This is the reference field. L 3. Click the button. This - Casio CW-50 | User Guide - Page 57
a field 1. Select the field you want to reposition. On the main window, click . Note If multiple fields are selected, only the reference field ( print area to move to the new location. 3. Input the values you want. The settings you configure are reflected in the preview image on the main window. - Casio CW-50 | User Guide - Page 58
Useful Text Input Functions (Free Text Template, Free Design Template) This section describes various useful functions you can access on the shortcut menu that appears when you right-click on the Free Text label template or Free Design label template. Right-clicking the mouse while the cursor is - Casio CW-50 | User Guide - Page 59
w Return to Original Size (Image Field only) This command change the size of the field so the image within it is the same size it was when captured or imported. e Layout Use the commands on the submenus to align fields and to move them forward and back. Note • See "Toolbars" on page 46. • See " - Casio CW-50 | User Guide - Page 60
creation or print settings. To configure advanced print settings 1. On the main window or Print dialog box, click the 2. Click the Print tab. whether the printer unit's disc tray should be opened automatically or manually before printing is started. This setting is not supported with the CW-E60. 3. - Casio CW-50 | User Guide - Page 61
when you click the and . 1. On the main window or print dialog box, click the button. 2. Click the Other tab. Select the check way you want, click OK. Save Style Clicking the Save button saves the current print pattern, text layout, and font settings and makes the initial default settings. • - Casio CW-50 | User Guide - Page 62
type of information. • Information about functions and supplementary information • Software version information • Connection on the CASIO Website To use Help 1. On the main window, click the 2. Click Help. button. 3. Use standard Windows online help procedures to find the information you need - Casio CW-50 | User Guide - Page 63
the CW-E60 User's Guide. Symptom G Nothing works. G Printing is not clear. G Printing is poor quality. G Printing is too light. Possible Cause The software is not installed. Recommended Action Disconnect the USB cable and re-install the software. Installing the software also installs the driver - Casio CW-50 | User Guide - Page 64
. • If you see a question mark (?) or exclamation point (!) next to CW-E60 Device, disconnect the USB cable from your computer, and re-install this DISC TITLE PRINTER application and the USB driver. After re-installing, reconnect the USB cable. The printer is not turned on or there is no connection - Casio CW-50 | User Guide - Page 65
See the CW-E60 User's Guide. Message The printer is turned off or it is not connected to the computer. Check to make sure that the printer model specified by the print settings is correctly connected to the computer. After correcting the problem, try printing again. There is no ink ribbon cassette - Casio CW-50 | User Guide - Page 66
CASIO COMPUTER CO., LTD. 6-2, Hon-machi 1-chome Shibuya-ku, Tokyo 151-8543, Japan MO0604-B
-
 1
1 -
 2
2 -
 3
3 -
 4
4 -
 5
5 -
 6
6 -
 7
7 -
8
-
9
-
10
-
11
-
12
-
13
-
14
-
15
-
16
-
17
-
18
-
19
-
20
-
21
-
22
-
23
-
24
-
25
-
26
-
27
-
28
-
29
-
30
-
31
-
32
-
33
-
34
-
35
-
36
-
37
-
38
-
39
-
40
-
41
-
42
-
43
-
44
-
45
-
46
-
47
-
48
-
49
-
50
-
51
-
52
-
53
-
54
-
55
-
56
-
57
-
58
-
59
-
60
-
61
-
62
-
63
-
64
-
65
-
66
 |
 |

E
Application Version 3.03
For Windows
®
User’s Guide
•
We recommend that you print on a disc* before you record anything on it. Printing on a
disc that already has data recorded on it can cause the data to become corrupted.
•
Note that CASIO COMPUTER CO., LTD. shall not be held liable for any loss or
corruption of data on discs arising through the use of this printer.
*
CD-R, CD-RW, DVD-R, etc.
Please keep this User’s Guide and all information handy for future reference.
DISC TITLE PRINTER