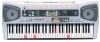
Casio LK-55 User Guide - Page 49
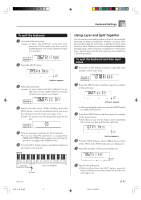
Using Layer and Split Together
 |
UPC - 079767312701
View all Casio LK-55 manuals
Add to My Manuals
Save this manual to your list of manuals |
Page 49 highlights
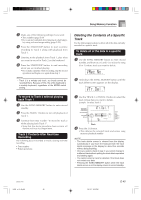
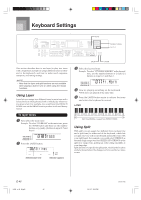
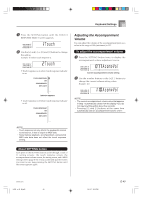
Keyboard Settings To split the keyboard 1 First select the main tone. Example: To select "062 STRINGS" as the main tone, press the TONE button and then use the number buttons or [+] and [-] buttons to input 0, 6 and then 2. St r ings 2 Press the SPLIT button. Aco . Bas s Indicator appears 3 Select the split tone. Example: To select "060 PIZZICATO STRINGS" as the split tone, use the number buttons or [+] and [-] buttons to input 0, 6 and then 0. Pizz.St r 4 Specify the split point. While holding down the SPLIT button, press the keyboard where you want the leftmost key of the high end range to be. Example: To specify G3 as the split point, press the G3 key. G3 5 Now try playing something on the keyboard. • Every key from F 3 and below is assigned the PIZZICATO STRINGS tone, while every key from G3 and above is assigned the STRINGS tone. 6 Press the SPLIT button again to unsplit the keyboard and return it to normal. SPLIT Using Layer and Split Together You can use layer and split together to created a layered split keyboard. It makes no difference whether you layer tones first and then split the keyboard, or split the keyboard and then layer tones. When you use layer and split in combination, the high range of the keyboard is assigned two tones (main tone + layered tone), and the low range two tones (split tone + layered split tone). To split the keyboard and then layer tones 1 Press the TONE button and then input the tone number of the main tone. Brass 2 Press the SPLIT button and then input the number of the split tone. Pizz.St r Indicator appears • After specifying the split tone, press the SPLIT button to unsplit the keyboard. 3 Press the LAYER button and then input the number of the layered tone. • Note that you can reverse steps 2 and 3, specifying the layered tone first and then the split tone. F r .Ho rn Indicator appears 4 Press the SPLIT button or the LAYER button so both of the SPLIT and LAYER indicators are displayed. 5 Input the number of the layered split tone. St r ings Split Tone (PIZZICATO STRINGS) Split point Main Tone (STRINGS) 642A-E-049A LK55_e_46_58.p65 47 6 Specify the split point. • While holding down the SPLIT button, press the keyboard where you want the leftmost key of the low end range to be. E-47 03.10.9, 0:28 PM
-
 1
1 -
2
-
3
-
4
-
5
-
6
-
7
-
8
-
9
-
10
-
11
-
12
-
13
-
14
-
15
-
16
-
17
-
18
-
19
-
20
-
21
-
22
-
23
-
24
-
25
-
26
-
27
-
28
-
29
-
30
-
31
-
32
-
33
-
34
-
35
-
36
-
37
-
38
-
39
-
40
-
41
-
42
-
43
-
 44
44 -
 45
45 -
 46
46 -
 47
47 -
 48
48 -
 49
49 -
 50
50 -
 51
51 -
 52
52 -
 53
53 -
 54
54 -
55
-
56
-
57
-
58
-
59
-
60
-
61
-
62
-
63
-
64
-
65
-
66
-
67
-
68
-
69
-
70
-
71
-
72
-
73
-
74
-
75
-
76
-
77
-
78
-
79
-
80
-
81
-
82
-
83
 |
 |
