Casio PCR T48S Manual - Page 2
Setting Department and PLU Name - manual for
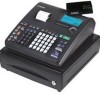 |
UPC - 079767507114
View all Casio PCR T48S manuals
Add to My Manuals
Save this manual to your list of manuals |
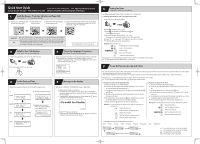
Page 2 highlights
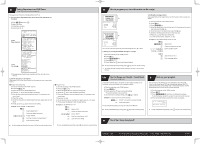
8 Setting Department and PLU Name (See Page 52 in the Users Manual) Two ways to set character to the department and PLUs 1) You can choose department name from a preset list (300 names are included). A) Enter 1 2 and press / B) Select the name. C) Follow the procedure. D) Repeat step B), C). Follow these steps 6 Select the name 6 12:how to SET DEPT/PLU NAME? please select THE NAME NUMBER (XXX) FROM BELOW TABLE •TO SET DEPARTMENT NAME 1)TURN MODE KEY TO PGM. 2)2 3)PRESS APPROPRIATE KEY. 4)Press key. 5)enter xxx and press key. REPEAT 3)-5) 6)PRESS TO TERMINATE. •TO SET PLU NAME 1)TURN MODE KEY TO PGM. 2)2 REPEAT 3)-5) 6)PRESS TO TERMINATE. 001:ADJUSTMENT 002:ADULT 003:ADVANCE PAY 004:AUDIO 005:BABY 006:BACON 007:BAGS 008:BAKERY 298:WHITE WINE 299:WIRING 300:WRAPPING E) To program department name manually, see Page 56 in the Users Manual. 2) Set the characters to be entered. (See pages 53-54 in the User's Manual for information on how to enter characters.) ■ Program Department key A) Turn the mode key to the "PGM" position. B) Press the 2s key C) Press the key for the desired department. D) Press the C key to clear the default characters. E) Enter the characters from the keyboard (up to 12 characters in the normal size). F) Press the a key. G) To set the characters for another department key, repeat steps C) to F) above. H) Finally, press the s key to end character setting. Example: To set "DRINK" for department 1 2s ! Selects department 1. C Clears the default characters. 20 12 19 18 3 Enters "DRINK". a Sets the characters for department 1. s Ends character setting. ■ Program PLUs A) Turn the mode key to the "PGM" position. B) Press the 2s key C) Enter the desired PLU No. and press the * key. D) Press the C key to clear the default characters. E) Enter the characters from the keyboard (up to 12 characters in the normal size). F) Press the a key. G) To set the characters for another PLU, repeat steps C) to F) above. H) Finally, press the s key to end character setting. Example: To set "BEER" for PLU1 2s 1* Selects PLU1. C Clears the default characters. 10 25 25 12 Enters "BEER". a Sets the characters for PLU1. s Ends character setting. To stop unexpected long printing, press s key twice to cancel printing. To stop unexpected long printing, press s key twice to cancel printing. 9 How to program your store information on the receipt YOUR RECEIPT THANK YOU ★ CALL AGAIN REG 07-14-2009 13:11 000006 1 DEPT002 1 DEPT003 TL CASH $1.00 $2.00 $3.00 $3.00 YOUR RECEIPT THANK YOU ★ CALL AGAIN REG 07-14-2009 13:09 000004 1 DEPT002 1 DEPT003 TL CASH $1.00 $2.00 $3.00 $3.00 You can set a text message in the area indicated by the star ( ★ ) above. 2) Setting for printing the selected message in a receipt A)Turn the mode key to the "PGM" position. B) Press 3s. C) Press 2122s. D) Press 0a. (*1) E) Finally, press the s key to end the print setting. To stop unexpected long printing, press s key twice to cancel printing. *1: To change the logo, background or message, see page n in the User's Manual. 1) Setting the message content (See pages 53-54 in the User's Manual for information on how to enter characters.) A) Turn the mode key to the "PGM" position. B) Press 2s. C) Press 132s. D) Enter the desired text in the first line (up to 24 characters in the normal size) and press the a key. E) To set more text in the second line, press the a key. F) Set text in the third and fourth lines in the same way. G) Press the s key. Message setting ends. H) To interrupt the process, press the s key. Example: To set "CASIO SHOP" in the first line 2s 132s Selects line 1. C Clears the previously set text. xx: 15 5 17 Enters "CASIO SHOP". x 19 23 17 14 23 2 a s Sets the text in line 1. Ends message setting. 10 How to change over Receipt / Jounal mode (One sheet model only) At shipment from the factory, the printer is set to receipt printing. To use the printer for journal printing, use the procedure below. A) Turn the mode key to the "PGM" position. B) Press 10h. C) Finally, press the s key to end printer setting. The printer switches to journal printing. D) To switch back to receipt printing, press -h in step B). Example: To use the printer for journal printing 10h Enters 10 (to switch to journal printing). s Ends print setting. To use background printing, see page 16 in the User's Manual. To stop unexpected long printing, press s key twice to cancel printing. 3 Back up your program You can back up the settings you have specified so far in the ECR. If you turn the mode key to OFF after changing the settings, the ECR automatically backs up the settings after 1 minute has elapsed. Use the following procedure to back up your settings manually. A) Turn the mode key to the "PGM" position. B) Press 7s. C) Press 6200s and follow the displayed messages. To run the backup, press the a key. To cancel, press the s key. D) If the text shown below is printed, the backup is complete. P07 07-14-2009 13:13 000007 Data Backup Normal End To stop unexpected long printing, press s key twice to cancel printing. 9 Quick Start Setup Completed! QSG292_3-EA For Programming Assistance Please Call TOLL FREE 1-800-435-7732 0909-C
-
 1
1 -
 2
2
 |
 |
