Casio lk300tvad User Guide - Page 12
Using the Keyboard Position Stickers
 |
View all Casio lk300tvad manuals
Add to My Manuals
Save this manual to your list of manuals |
Page 12 highlights
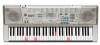
General Guide *1 Attaching the Score Stand *3 e Insert both ends of the music stand provided with the keyboard into the two holes on the top surface. *2 Rear Panel h i e SD CARD SLOT f Number buttons g [+]/[-] buttons • For input of numbers to change a displayed number or setting. • Negative values cannot be input using the number buttons. Use [+] (increase) and [-] (decrease) instead. j kl m h USB port i VIDEO OUT jack j SUSTAIN/ASSIGNABLE JACK k DC 9V jack l PHONES/OUTPUT jack m MIC jack Using the Keyboard Position Stickers Affix the keyboard position stickers that come with the keyboard as shown in the illustration below. The locations of the M and G marks will correspond to the marks shown in the TV image when you practice while viewing a TV screen. This will make it easier for you to see the relationship between the TV image and the keyboard. Affix the keyboard position stickers here. E-10 C4 C5 664A-E-012A
-
 1
1 -
2
-
3
-
4
-
5
-
6
-
 7
7 -
 8
8 -
 9
9 -
 10
10 -
 11
11 -
 12
12 -
 13
13 -
 14
14 -
 15
15 -
 16
16 -
 17
17 -
18
-
19
-
20
-
21
-
22
-
23
-
24
-
25
-
26
-
27
-
28
-
29
-
30
-
31
-
32
-
33
-
34
-
35
-
36
-
37
-
38
-
39
-
40
-
41
-
42
-
43
-
44
-
45
-
46
-
47
-
48
-
49
-
50
-
51
-
52
-
53
-
54
-
55
-
56
-
57
-
58
-
59
-
60
-
61
-
62
-
63
-
64
-
65
-
66
-
67
-
68
-
69
-
70
-
71
-
72
-
73
-
74
 |
 |
