Chicco 67648800070 Owners Manual
Chicco 67648800070 - DJ Baby Walker Manual
 |
UPC - 049796603118
View all Chicco 67648800070 manuals
Add to My Manuals
Save this manual to your list of manuals |
Chicco 67648800070 manual content summary:
- Chicco 67648800070 | Owners Manual - Page 1
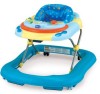
Lil' Driver/ Lil' Piano Walker Conductor de Lil'/ Piano Lil' Walker Owner's Manual • Manual del propietario IS0057.5ES ©2011 ARTSANA USA, INC. 11/12 - Chicco 67648800070 | Owners Manual - Page 2
For the correct assembly of the product, please refer to the following instructions. • STAIR HAZARD: Avoid serious injury or death. Block stairs/steps unstable floors, swimming pools or other sources of water. Only use the baby walking frame on flat, stable surfaces. • Never leave child unattended. - Chicco 67648800070 | Owners Manual - Page 3
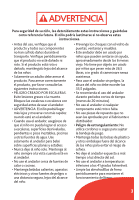
ADVERTENCIA Para seguridad de su niño, lea detenidamente estas instrucciones y guárdelas como referencia futura. El niño podría lastimarse si no observa estas instrucciones. • Antes del uso, verifique que el producto y todos sus componentes no han sufrido daños durante el transporte. Verifique - Chicco 67648800070 | Owners Manual - Page 4
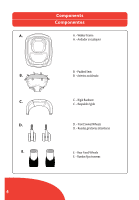
Components Componentes A. A. - Walker Frame A. - Andador si cualquier B. - Padded Seat B. B. - Asiento acolchado C. C. - Rigid Backrest C. - Respaldo rígido D. D. - Front Swivel Wheels D. - Ruedas giratorias delanteras E. E. - Rear Fixed Wheels E. - Ruedas fijas traseras 4 - Chicco 67648800070 | Owners Manual - Page 5
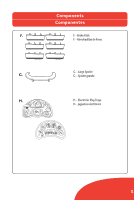
Components Componentes F. F. - Brake Pads F. - Almohadillas de freno G. - Large Spoiler G. G. - Spoiler grande H. H. - Electronic Play Trays H. - Juguetes electrónico 5 - Chicco 67648800070 | Owners Manual - Page 6
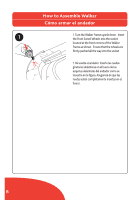
How to Assemble Walker Cómo armar el andador 1 1. Turn the Walker Frame upside down. Insert the Front Swivel Wheels into the socket located at the front corners of the Walker Frame as shown. Ensure that the wheels are firmly pushed all the way into the socket. 1. Dé vuelta el andador. - Chicco 67648800070 | Owners Manual - Page 7
How to Assemble Walker Cómo armar el andador 2 2. Insert the Rear Fixed Wheels into the socket located at the rear of the Walker Frame as shown. Ensure that the wheels snap lock clicks into place. The snap lock should be visible through the opening. "CLICK!" "¡CLIC!" 2. Inserte las ruedas - Chicco 67648800070 | Owners Manual - Page 8
How to Assemble Walker Cómo armar el andador 3 3. Insert the Brake Pads into the sockets located around the bottom of the Walker Frame as shown. Ensure that the Brake Pads are firmly pushed all the way into each of the sockets. 3. Inserte las almohadillas de freno en los huecos ubicados - Chicco 67648800070 | Owners Manual - Page 9
How to Assemble Walker Cómo armar el andador 4 "CLICK!" "¡CLIC!" 4. To raise the Walker Frame pull, up on the upper tray, while pressing down on the lower base, until a "click" is heard. This is the first locked seating position. Push down on the Tray before each use to make sure the seat - Chicco 67648800070 | Owners Manual - Page 10
How to Assemble Walker Cómo armar el andador 5 "CLICK!" "¡CLIC!" 5. Insert the tabs on the Rigid Backrest into the slots located at the back of the seat opening. Rotate the Rigid Backrest down and press firmly until it latches in the back. Pull up on the Rigid Backrest to make sure it is - Chicco 67648800070 | Owners Manual - Page 11
How to Assemble Walker Cómo armar el andador 6 6. Insert the plastic rings on the Padded Seat into the slots located on the upper edge of the walker frame. Reach under the upper tray and pull the rings through the slots. Check to make sure that each plastic ring is locked into the position - Chicco 67648800070 | Owners Manual - Page 12
7 "CLICK!" "¡CLIC!" How to Assemble Walker Cómo armar el andador 7. Insert the tabs on the Large Spoiler into the slots located at the back of the seat opening. Rotate the Large Spoiler down and press firmly until it latches in the back. Pull up on the Large Spoiler to make sure it is properly - Chicco 67648800070 | Owners Manual - Page 13
How to Assemble Walker Cómo armar el andador 8 8. Insert the edge of the Electronic Play Tray into the walker tray opening as shown. Rotate the Electronic Play Tray down until is locks into place and a "click" is heard. Pull up on the Electronic Play Tray to make sure is is properly - Chicco 67648800070 | Owners Manual - Page 14
Using Electronic Play Tray Uso de la bandeja electrónica de juego Note: Electronic toy will differ depending on specific walker model. 9A. The functions and use of the Electronic Play Tray 1 are shown below. 9A A D Nota: Los juguetes electró - Chicco 67648800070 | Owners Manual - Page 15
Using Electronic Play Tray Uso de la bandeja electrónica de juego Note: Electronic toy will differ depending on specific walker model. 9B. The functions and use of the Electronic Play Tray 2 are shown below. Nota: Los juguetes electrónicos - Chicco 67648800070 | Owners Manual - Page 16
Using Electronic Play Tray Uso de la bandeja electrónica de juego 10A 10A. Turn the rear view mirror to set the activity selector switch (A). Slide the power/ volume switch (B) to the low (I) or high (II) volume setting. B A 10A. Gire el espejo retrovisor para configurar el interruptor de - Chicco 67648800070 | Owners Manual - Page 17
How to Adjust the Walker Cómo ajustar el andador WARNING When opening, closing, or adjusting the walker make sure your child is at a safe distance. Before placing your child in the walker push down on the tray to make sure that the height adjustment is properly latched. 11 ADVERTENCIA Al abrir, - Chicco 67648800070 | Owners Manual - Page 18
How to Adjust the Walker Cómo ajustar el andador 12 T1r2a.yHoawt tporaodpjuestrthheeWigahlkter: LTarabyaant pdreopjaeraheliaghatltura correcta PClaómteoaaujuàstalraebl aonndandeorh: auteur La bandeja a la altura correcta TTrraayy ttoooohighhigh - Chicco 67648800070 | Owners Manual - Page 19
Folding the Walker Cómo plegar el andador WARNING When opening, closing, or adjusting the walker make sure your child is at a safe distance. 13 ADVERTENCIA Al abrir, cerrar o ajustar el andador, asegúrese de que su hijo se encuentre a una distancia segura. 13. To close the walker: Remove your - Chicco 67648800070 | Owners Manual - Page 20
an adult. CLEANING The fabric seat can be removed (please refer to the section 6 and reverse the step). Please refer to the care labels for instructions on how to clean the fabric seat. Below are the cleaning symbols and their meanings: Wash by hand in cold water. Do not bleach. Do - Chicco 67648800070 | Owners Manual - Page 21
Cleaning and Maintenance Limpieza y mantenimiento La limpieza y el mantenimiento de la silla de mesa sólo deben ser realizados por un adulto. LIMPIEZA Se puede quitar el asiento de tela (consulte la sección "Cómo quitar el asiento de tela"). Consulte las instrucciones sobre cómo limpiar el asiento - Chicco 67648800070 | Owners Manual - Page 22
batteries is not recommended, since they could impair the functionality of the Electronic Play Tray. • If rechargeable batteries are used, take them out of the toy before recharging them. Batteries must always be recharged under adult supervision. 22 - Chicco 67648800070 | Owners Manual - Page 23
Fitting and/or Replacing Batteries Cómo colocar y/o reemplazar las pilas ADVERTENCIA El juguete del andador requiere 2 pilas alcalinas tamaño "AA" de 1,5 voltios (no se incluyen). • Un adulto solamente debe colocar las pilas. • Para colocar y/o cambiar las pilas: Afloje el tornillo en la tapa del - Chicco 67648800070 | Owners Manual - Page 24
For more Information Para más información If you have any questions or comments about this product, or are missing any of the parts. Please do not return this product to the store. Contact us in one of the following ways: By phone (toll free): (877)-424-4226 By e-mail: [email protected] By mail - Chicco 67648800070 | Owners Manual - Page 25
. This equipment generates, uses and can radiate radio frequency energy and, if not installed and used in accordance with the instructions, may cause harmful interference to radio communications. However, there is no guarantee that interference will not occur in a particular installation - Chicco 67648800070 | Owners Manual - Page 26
www.chiccousa.com
-
 1
1 -
 2
2 -
 3
3 -
 4
4 -
 5
5 -
 6
6 -
 7
7 -
8
-
9
-
10
-
11
-
12
-
13
-
14
-
15
-
16
-
17
-
18
-
19
-
20
-
21
-
22
-
23
-
24
-
25
-
26
 |
 |

Lil' Driver/ Lil' Piano Walker
Conductor de Lil'/ Piano Lil' Walker
Owner's Manual • Manual del propietario
IS0057.5ES
©2011 ARTSANA USA, INC.
11/12