Cisco 7975G Administration Guide - Page 17
that is highlighted on the screen., Navigation button - handset
 |
UPC - 882658140457
View all Cisco 7975G manuals
Add to My Manuals
Save this manual to your list of manuals |
Page 17 highlights
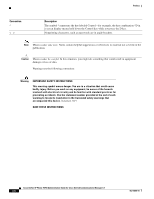
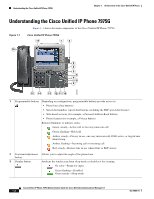
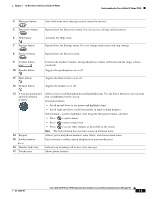
Chapter 1 An Overview of the Cisco Unified IP Phone Understanding the Cisco Unified IP Phone 7975G 4 Messages button Auto-dials your voice message service (varies by service). 5 Directories button Opens/closes the Directories menu. Use it to access call logs and directories. 6 Help button 7 Settings button Activates the Help menu. Opens/closes the Settings menu. Use it to change touchscreen and ring settings. 8 Services button Opens/closes the Services menu. 9 Volume button 10 Speaker button 11 Mute button Controls the handset, headset, and speakerphone volume (off-hook) and the ringer volume (on-hook). Toggles the speakerphone on or off. Toggles the Mute feature on or off. 12 Headset button Toggles the headset on or off. 13 4-way navigation pad and Select button (center) 14 Keypad 15 Softkey buttons Allows you to scroll through menus and highlight items. Use the Select button to select an item that is highlighted on the screen. Navigation button • Scroll up and down to see menus and highlight items. • Scroll right and left to scroll horizontally in multi-column displays. Select button-scroll to highlight a line using the Navigation button, and then: • Press to open a menu. • Press to play a ringer item. • Press to access other features as described on the screen. Note The Select button does not take action on all menu items. Allows you to dial phone numbers, enter letters, and choose menu items. Each activates a softkey option (displayed on your touchscreen). 16 Handset light strip 17 Touchscreen Indicates an incoming call or new voice message. Shows phone features. OL-14640-01 Cisco Unified IP Phone 7975G Administration Guide for Cisco Unified Communications Manager 6.1 1-3
-
 1
1 -
2
-
3
-
4
-
5
-
6
-
7
-
8
-
9
-
10
-
11
-
 12
12 -
 13
13 -
 14
14 -
 15
15 -
 16
16 -
 17
17 -
 18
18 -
 19
19 -
 20
20 -
 21
21 -
 22
22 -
23
-
24
-
25
-
26
-
27
-
28
-
29
-
30
-
31
-
32
-
33
-
34
-
35
-
36
-
37
-
38
-
39
-
40
-
41
-
42
-
43
-
44
-
45
-
46
-
47
-
48
-
49
-
50
-
51
-
52
-
53
-
54
-
55
-
56
-
57
-
58
-
59
-
60
-
61
-
62
-
63
-
64
-
65
-
66
-
67
-
68
-
69
-
70
-
71
-
72
-
73
-
74
-
75
-
76
-
77
-
78
-
79
-
80
-
81
-
82
-
83
-
84
-
85
-
86
-
87
-
88
-
89
-
90
-
91
-
92
-
93
-
94
-
95
-
96
-
97
-
98
-
99
-
100
-
101
-
102
-
103
-
104
-
105
-
106
-
107
-
108
-
109
-
110
-
111
-
112
-
113
-
114
-
115
-
116
-
117
-
118
-
119
-
120
-
121
-
122
-
123
-
124
-
125
-
126
-
127
-
128
-
129
-
130
-
131
-
132
-
133
-
134
-
135
-
136
-
137
-
138
-
139
-
140
-
141
-
142
-
143
-
144
-
145
-
146
-
147
-
148
-
149
-
150
-
151
-
152
-
153
-
154
-
155
-
156
-
157
-
158
-
159
-
160
-
161
-
162
-
163
-
164
-
165
-
166
-
167
-
168
-
169
-
170
-
171
-
172
-
173
-
174
-
175
-
176
-
177
-
178
-
179
-
180
-
181
-
182
-
183
-
184
-
185
-
186
-
187
-
188
-
189
-
190
-
191
-
192
-
193
-
194
-
195
-
196
-
197
-
198
-
199
-
200
-
201
-
202
-
203
-
204
-
205
 |
 |