Cisco AIR-AP1142N-A-K9 Hardware Installation Guide - Page 41
T-Bar Grid Mounting Bracket Parts, Step 1 - configuring
 |
View all Cisco AIR-AP1142N-A-K9 manuals
Add to My Manuals
Save this manual to your list of manuals |
Page 41 highlights
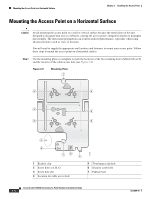
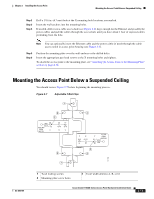
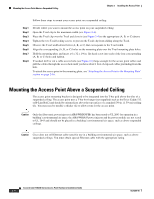
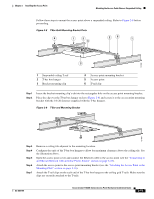
Chapter 2 Installing the Access Point Mounting the Access Point Above a Suspended Ceiling Follow these steps to mount the access point above a suspended ceiling. Refer to Figure 2-8 before proceeding. Figure 2-8 T-Bar Grid Mounting Bracket Parts 6 1 3 4 2 6 1 121838 5 1 Suspended ceiling T-rail 2 T-bar box hanger 3 Bracket mounting clip 4 Access point mounting bracket 5 Access point 6 T-rail clip Step 1 Step 2 Insert the bracket mounting clip's tab into the rectangular hole on the access point mounting bracket. Place the clip over the T-bar box hanger (refer to Figure 2-9) and secure it to the access point mounting bracket with the 1/4-20 fastener (supplied with the T-bar hanger). Figure 2-9 T-Bar and Mounting Bracket 121839 Step 3 Step 4 Step 5 Step 6 Step 7 Remove a ceiling tile adjacent to the mounting location. Configure the ends of the T-bar box hanger to allow for maximum clearance above the ceiling tile. See the illustration above. Open the access point cover and connect the Ethernet cable to the access point (see the "Connecting to an Ethernet Network with an Inline Power Source" section on page 2-22). Attach the access point to the access point mounting bracket (see the "Attaching the Access Point to the Mounting Plate" section on page 2-16). Attach the T-rail clips on the each end of the T-bar box hanger to the ceiling grid T-rails. Make sure the clips are securely attached to the T-rails. OL-8369-05 Cisco Aironet 1130AG Series Access Point Hardware Installation Guide 2-15
-
 1
1 -
2
-
3
-
4
-
5
-
6
-
7
-
8
-
9
-
10
-
11
-
12
-
13
-
14
-
15
-
16
-
17
-
18
-
19
-
20
-
21
-
22
-
23
-
24
-
25
-
26
-
27
-
28
-
29
-
30
-
31
-
32
-
33
-
34
-
35
-
 36
36 -
 37
37 -
 38
38 -
 39
39 -
 40
40 -
 41
41 -
 42
42 -
 43
43 -
 44
44 -
 45
45 -
 46
46 -
47
-
48
-
49
-
50
-
51
-
52
-
53
-
54
-
55
-
56
-
57
-
58
-
59
-
60
-
61
-
62
-
63
-
64
-
65
-
66
-
67
-
68
-
69
-
70
-
71
-
72
-
73
-
74
-
75
-
76
-
77
-
78
-
79
-
80
-
81
-
82
-
83
-
84
-
85
-
86
-
87
-
88
-
89
-
90
-
91
-
92
-
93
-
94
-
95
-
96
-
97
-
98
-
99
-
100
-
101
-
102
-
103
-
104
-
105
-
106
-
107
-
108
-
109
-
110
-
111
-
112
-
113
-
114
-
115
-
116
-
117
-
118
-
119
-
120
-
121
-
122
-
123
-
124
-
125
-
126
 |
 |
