Cisco AIR-AP1142N-E-K9 Hardware Installation Guide - Page 42
Mounting Above a Suspended Ceiling
 |
View all Cisco AIR-AP1142N-E-K9 manuals
Add to My Manuals
Save this manual to your list of manuals |
Page 42 highlights
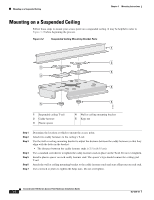
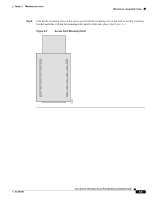
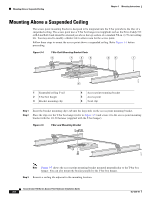
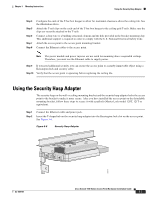
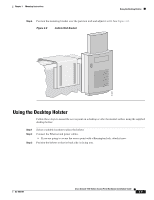
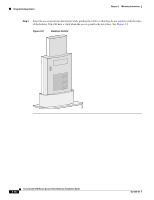
Mounting Above a Suspended Ceiling Chapter 3 Mounting Instructions Mounting Above a Suspended Ceiling The access point mounting bracket is designed to be integrated into the T-bar grid above the tiles of a suspended ceiling. The access point uses a T-bar box hanger (not supplied) such as the Erico Caddy 512 or B-Line BA12 and should be oriented just above the top surface of a standard 5/8-in. (1.59 cm) ceiling tile. You may need to modify a thicker tile to allow room for the access point. Follow these steps to mount the access point above a suspended ceiling. Refer Figure 3-4 before proceeding. Figure 3-4 T-Bar Grid Mounting Bracket Parts 6 1 3 4 2 6 1 85776 1 Suspended ceiling T-rail 2 T-bar box hanger 3 Bracket mounting clip 5 4 Access point mounting bracket 5 Access point 6 T-rail clip Step 1 Step 2 Insert the bracket mounting clip's tab into the large hole on the access point mounting bracket. Place the clip over the T-bar box hanger (refer to Figure 3-5) and secure it to the access point mounting bracket with the 1/4-20 fastener (supplied with the T-bar hanger). Figure 3-5 T-Bar and Mounting Bracket 85777 Note Figure 3-5 shows the access point mounting bracket mounted perpendicular to the T-bar box hanger. You can also mount the bracket parallel to the T-bar box hanger. Step 3 Remove a ceiling tile adjacent to the mounting location. Cisco Aironet 1100 Series Access Point Hardware Installation Guide 3-6 OL-4309-07
-
 1
1 -
2
-
3
-
4
-
5
-
6
-
7
-
8
-
9
-
10
-
11
-
12
-
13
-
14
-
15
-
16
-
17
-
18
-
19
-
20
-
21
-
22
-
23
-
24
-
25
-
26
-
27
-
28
-
29
-
30
-
31
-
32
-
33
-
34
-
35
-
36
-
 37
37 -
 38
38 -
 39
39 -
 40
40 -
 41
41 -
 42
42 -
 43
43 -
 44
44 -
 45
45 -
 46
46 -
 47
47 -
48
-
49
-
50
-
51
-
52
-
53
-
54
-
55
-
56
-
57
-
58
-
59
-
60
-
61
-
62
-
63
-
64
-
65
-
66
-
67
-
68
-
69
-
70
-
71
-
72
-
73
-
74
-
75
-
76
-
77
-
78
-
79
-
80
-
81
-
82
-
83
-
84
-
85
-
86
-
87
-
88
-
89
-
90
-
91
-
92
-
93
-
94
-
95
-
96
-
97
-
98
-
99
-
100
-
101
-
102
-
103
-
104
-
105
-
106
-
107
-
108
-
109
-
110
-
111
-
112
-
113
-
114
-
115
-
116
 |
 |
