Cisco AIR-AP1231G-A-K9 Hardware Installation Guide - Page 37
Mounting on a Horizontal or Vertical Surface
 |
UPC - 746320862675
View all Cisco AIR-AP1231G-A-K9 manuals
Add to My Manuals
Save this manual to your list of manuals |
Page 37 highlights
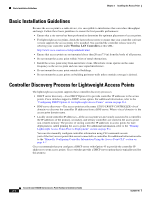
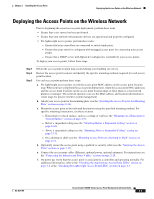
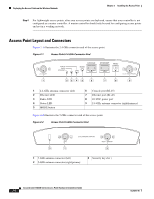
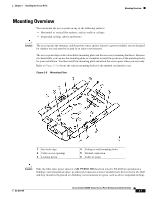
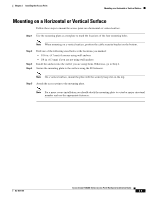
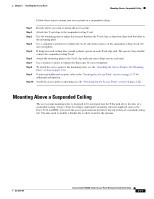
Chapter 2 Installing the Access Point Mounting on a Horizontal or Vertical Surface Mounting on a Horizontal or Vertical Surface Follow these steps to mount the access point on a horizontal or vertical surface. Step 1 Use the mounting plate as a template to mark the locations of the four mounting holes. Note When mounting on a vertical surface, position the cable security bracket on the bottom. Step 2 Step 3 Step 4 Drill one of the following sized holes at the locations you marked: • 3/16 in. (4.7 mm) if you are using wall anchors • 1/8 in. (6.3 mm) if you are not using wall anchors Install the anchors into the wall if you are using them. Otherwise, go to Step 4. Secure the mounting plate to the surface using the #8 fasteners. Note On a vertical surface, mount the plate with the security hasp slot on the top. Step 5 Attach the access point to the mounting plate. Note For a more secure installation you should attach the mounting plate to a stud or major structural member and use the appropriate fasteners. OL-8371-05 Cisco Aironet 1240AG Series Access Point Hardware Installation Guide 2-9
-
 1
1 -
2
-
3
-
4
-
5
-
6
-
7
-
8
-
9
-
10
-
11
-
12
-
13
-
14
-
15
-
16
-
17
-
18
-
19
-
20
-
21
-
22
-
23
-
24
-
25
-
26
-
27
-
28
-
29
-
30
-
31
-
 32
32 -
 33
33 -
 34
34 -
 35
35 -
 36
36 -
 37
37 -
 38
38 -
 39
39 -
 40
40 -
 41
41 -
 42
42 -
43
-
44
-
45
-
46
-
47
-
48
-
49
-
50
-
51
-
52
-
53
-
54
-
55
-
56
-
57
-
58
-
59
-
60
-
61
-
62
-
63
-
64
-
65
-
66
-
67
-
68
-
69
-
70
-
71
-
72
-
73
-
74
-
75
-
76
-
77
-
78
-
79
-
80
-
81
-
82
-
83
-
84
-
85
-
86
-
87
-
88
-
89
-
90
-
91
-
92
-
93
-
94
-
95
-
96
-
97
-
98
-
99
-
100
-
101
-
102
-
103
-
104
-
105
-
106
-
107
-
108
-
109
-
110
-
111
-
112
-
113
-
114
-
115
-
116
-
117
-
118
-
119
-
120
-
121
-
122
-
123
-
124
 |
 |
