Cisco WRT54GS User Manual - Page 18
Connecting One Router to Another - default password
 |
View all Cisco WRT54GS manuals
Add to My Manuals
Save this manual to your list of manuals |
Page 18 highlights
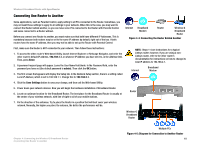
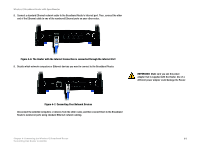
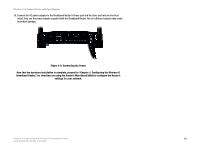
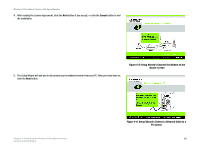
Wireless-G Broadband Router with SpeedBooster Connecting One Router to Another Some applications, such as Parental Control, apply setting to all PCs connected to the Router. Sometimes, you may not want those settings to apply to all settings in your network. When this is the case, you may want to connect the Router behind another, so you can have some PCs connected to the Router with Parental Control and some connected to a Router without. Before you connect one Router to another, you must make sure that both have different IP Addresses. This is mandatory because both routers may be set to the same IP address by default, right out of the box. If both routers have the same IP address, then you may not be able to set up the Router with Parental Control. Internet Broadband Modem Router Wireless-G Broadband Router Figure 4-4: Connecting the Router Behind Another First, make sure the Router is NOT connected to your network. Then follow these instructions: 1. To access the other router's Web-based Utility, launch Internet Explorer or Netscape Navigator, and enter the other router's default IP address, 192.168.1.1, or whatever IP Address you have set it to, in the Address field. Then, press Enter. 2. A password request page will appear. Leave the User Name field blank. In the Password field, enter the password you have set (the default password is admin). Then click the OK button. 3. The first screen that appears will display the Setup tab. In the Network Setup section, there is a setting called Local IP Address, which is set to 192.168.1.1. Change this to 192.168.2.1. NOTE: Steps 1-4 are instructions for a typical Linksys router; however, if you are using a nonLinksys router, refer to the other router's documentation for instructions on how to change its local IP address to 192.168.2.1. Internet Broadband Modem 4. Click the Save Settings button to save your change, and then exit the Web-based Utility. 5. Power down your network devices. Now you will begin the hardware installation of Broadband Router. 6. Locate an optimum location for the Broadband Router. The best place for the Broadband Router is usually at the center of your wireless network, with line of sight to all of your mobile stations. Router 7. Fix the direction of the antennas. Try to place the Router in a position that will best cover your wireless network. Normally, the higher you place the antenna, the better the performance will be. Wireless-G Broadband Router Chapter 4: Connecting the Wireless-G Broadband Router Connecting One Router to Another Multiple PCs Figure 4-5: Diagram for Connection to Another Router 10
-
 1
1 -
2
-
3
-
4
-
5
-
6
-
7
-
8
-
9
-
10
-
11
-
12
-
 13
13 -
 14
14 -
 15
15 -
 16
16 -
 17
17 -
 18
18 -
 19
19 -
 20
20 -
 21
21 -
 22
22 -
 23
23 -
24
-
25
-
26
-
27
-
28
-
29
-
30
-
31
-
32
-
33
-
34
-
35
-
36
-
37
-
38
-
39
-
40
-
41
-
42
-
43
-
44
-
45
-
46
-
47
-
48
-
49
-
50
-
51
-
52
-
53
-
54
-
55
-
56
-
57
-
58
-
59
-
60
-
61
-
62
-
63
-
64
-
65
-
66
-
67
-
68
-
69
-
70
-
71
-
72
-
73
-
74
-
75
-
76
-
77
-
78
-
79
-
80
-
81
-
82
-
83
-
84
-
85
-
86
-
87
-
88
-
89
-
90
-
91
-
92
-
93
-
94
-
95
-
96
-
97
-
98
-
99
-
100
-
101
-
102
-
103
-
104
-
105
-
106
-
107
-
108
-
109
-
110
-
111
-
112
-
113
-
114
-
115
-
116
-
117
-
118
-
119
-
120
-
121
-
122
-
123
-
124
-
125
-
126
-
127
-
128
-
129
-
130
-
131
-
132
-
133
-
134
-
135
-
136
-
137
-
138
-
139
-
140
-
141
-
142
-
143
-
144
-
145
-
146
-
147
-
148
-
149
-
150
-
151
-
152
-
153
-
154
-
155
-
156
-
157
-
158
-
159
-
160
-
161
-
162
-
163
-
164
-
165
-
166
-
167
-
168
-
169
-
170
-
171
-
172
-
173
-
174
-
175
-
176
-
177
-
178
-
179
-
180
-
181
-
182
-
183
-
184
-
185
-
186
-
187
-
188
-
189
-
190
-
191
-
192
-
193
-
194
-
195
-
196
-
197
-
198
-
199
-
200
-
201
-
202
-
203
-
204
-
205
-
206
-
207
-
208
-
209
-
210
-
211
-
212
-
213
-
214
-
215
-
216
-
217
-
218
-
219
-
220
-
221
-
222
-
223
-
224
-
225
-
226
-
227
-
228
-
229
-
230
-
231
-
232
-
233
-
234
-
235
-
236
-
237
-
238
-
239
-
240
-
241
-
242
-
243
-
244
-
245
-
246
-
247
-
248
-
249
-
250
-
251
-
252
-
253
-
254
-
255
-
256
-
257
-
258
-
259
-
260
-
261
-
262
-
263
-
264
-
265
-
266
-
267
-
268
-
269
-
270
-
271
-
272
-
273
-
274
-
275
-
276
-
277
-
278
-
279
-
280
-
281
-
282
-
283
-
284
-
285
-
286
-
287
-
288
-
289
-
290
-
291
-
292
-
293
-
294
-
295
-
296
-
297
-
298
-
299
-
300
-
301
-
302
-
303
-
304
-
305
-
306
-
307
-
308
-
309
-
310
-
311
-
312
-
313
-
314
-
315
-
316
-
317
-
318
-
319
-
320
-
321
-
322
-
323
-
324
-
325
-
326
-
327
-
328
-
329
-
330
-
331
-
332
-
333
 |
 |
