Clifford ACE 2000 Owners Guide - Page 8
Table of User-Selectable Features
 |
View all Clifford ACE 2000 manuals
Add to My Manuals
Save this manual to your list of manuals |
Page 8 highlights
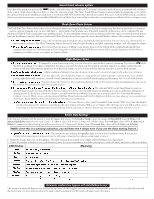
a. To select another feature in that same column, repeat step 5 within the next 5 seconds (after 5 seconds, 3 chirps mean you are back to the "Feature Select" position). b. To select a different feature column, go to step 4. c. To exit program mode, turn the ignition off (you'll hear 3 chirps and the LED will turn off). If driving, just wait 60 seconds and the system will automatically exit program mode. If you make an error, just turn off the ignition and start again. Table of User-Selectable Features Feature Select 1 blank press 2 blank presses 3 blank presses 4 blank presses 1 ✱ press Add a new remote control NOTE 1 Chirps: off/on (1/2 chirps) AutoArming: off/on NOTE 5 - Other vehicle's remote: arm/disarm (1 then 2 chirps) 2 ✱ presses Personalized Siren Sounds* NOTE 2 NOT USED Lock upon AutoArming: off/on NOTE 6 - Other vehicle's remote: trunk release* (2 chirps) 3 ✱ presses Play Personalized Siren Sounds*: Remote valet mode via trigger only/always (1/2 chirps) button combo + ✱: off/on AutoArming entry delay: off/on NOTE 6 - Other vehicle's remote: silent arm and disarm (3 chirps) 4 ✱ presses Siren duration: 30/60/90sec. (1/2/3 chirps) AutoStart*: both off/both on/temp only/battery only (1/2/3/4 chirps) FACT: off/on NOTE 6 - Other vehicle's remote: remote engine starting* (4 chirps) 5 ✱ presses AutoLock: off/on NOT USED NOT USED NOT USED 6 ✱ presses AutoUnLock: off/on Clear all remotes NOTE 3 NOT USED NOTE 6 - Other vehicle's remote: window rolldown/venting* (6 chirps) 7 ✱ presses Reset all features (except remotes and valet code) to factory settings Set a new secret valet code NOTE 4 NOT USED NOTE 6 - Other vehicle's remote: remote valet mode (7 chirps) * Requires optional wiring or accessory; ask your Clifford Dealer for details. NOTE 1: Press the button of the new remote. You'll hear one chirp. Press the chirps to confirm that the new remote control has been added. button again. You'll hear two NOTE 2: This feature requires the optional Self-Powered SmartSiren 4. If so equipped, selection of this feature will cause the system to sound a few seconds of siren sound #1. Press the blank button to turn on this sound or the ✱ button to turn it off. It will then sound a few seconds of sound #2. Repeat: blank=ON, ✱=OFF for each of the six sounds. NOTE 3: You'll hear two chirps to indicate all remotes have been cleared from memory. You must now add new/existing remotes with the "Add new remote control" feature and/or the "Other vehicle's remote" feature. NOTE 4: Immediately PRESS THE BLANK BUTTON, THEN enter your new code, wait for the two chirps, then turn off the ignition (you'll hear 3 chirps to confirm program mode exit). You MUST now turn the ignition back on and then re-enter your new code. If the LED flashes on, your new code has been accepted. If the LED does not light, the two codes did not match and the system has reverted to your previous code. NOTE 5: Lets you arm/disarm with the remote control of a G4 system on your other vehicle(s). For instance, to set the ✱ button of the other car's remote to arm and disarm this system, select column 4, row 1, then press the ✱ button of the other car's remote (you'll hear one chirp). Immediately press the ✱ button again (you will hear a 2-chirp confirmation). The ✱ button of the other vehicle's remote will now arm/disarm this system. NOTE 6: The features in this column allow you to control your system with the remote control of a G4 system on your other vehicle(s). Just select the function you wish, then press the unused button or button combination on the other remote that you want to use to perform that function on this system (you will then hear a the chirps noted). NOTE: You must first set a button or button combination on the other car's remote that will arm/disarm the system (column 4, row 1) before these others will be accepted. EXAMPLE: Turn on Lock upon AutoArming and turn off Remote Valet Mode and FACT: In this example, we'll change three different features in just one programming session: We'll turn on the Lock upon AutoArming feature, turn off remote controlled valet mode and turn off the FACT anti-falsing feature: 1. Enter program mode as previously noted (ignition on, enter your valet code, press and hold the ✱ button on the PlainView 2 switch until you hear a chirp). 2. Since the Lock upon AutoArming feature is in column 3, row 2 of the Table, go to column 3 by pressing the blank button on the PlainView 2 switch three times. Wait for the 3-chirp/column 3 confirmation. Then press the ✱ button twice (you'll hear a chirp each time you press the ✱ button). After a brief pause, you'll hear 2 chirps to confirm that Lock upon AutoArming is now on. 3. Since FACT is also in column 3, there is no need to reselect column 3. Therefore, you can go straight to the row selection. Select row 4 by pressing the ✱ button four times. After a brief pause, you'll hear one chirp to confirm that FACT is now off. 4. You'll note that the Remote valet mode feature is at column 2, row 3. To change to column 2, press the blank button twice, then wait for the 2-chirp/column 2 confirmation. Press the ✱ button three times to select row 3. After a brief pause, you'll hear one chirp to confirm that the Remote valet mode feature is now turned off. 5. To exit the program mode, turn the ignition off. You'll hear 3 chirps to confirm program mode exit. &
-
 1
1 -
2
-
 3
3 -
 4
4 -
 5
5 -
 6
6 -
 7
7 -
 8
8 -
 9
9
 |
 |
